1. Introduction
The RYOBI 18-Volt ONE+ Hybrid Soldering Station is designed for a wide range of soldering applications, offering both cordless convenience and corded reliability. This station allows for precise temperature control and includes features for safe and efficient operation. It is part of the RYOBI ONE+ system, providing flexibility with power sources.
Key Features:
- Hybrid Power: Operates on any RYOBI ONE+ battery or via an AC power cord (battery, charger, and extension cord sold separately).
- Adjustable Temperature: Heats up to 900°F (482°C) with temperature control from 300°F to 900°F.
- Integrated Iron Holder: Provides safe and convenient storage for the soldering iron when not in use.
- Extended Reach: The soldering iron features a 3 ft. cord for increased maneuverability.
- Included Components: Fine point tip, chisel solder coil, and a tip cleaning sponge.
2. Safety Information
Always read and understand all safety warnings and instructions before operating this product. Failure to follow the warnings and instructions may result in electric shock, fire, and/or serious injury.
- Heat Hazard: The soldering iron tip and surrounding areas become extremely hot during operation. Avoid contact with skin or flammable materials.
- Fume Warning: Soldering produces fumes. Always work in a well-ventilated area or use a fume extractor.
- Electrical Safety: Ensure the power source (battery or AC outlet) matches the product's requirements. Do not use in wet conditions.
- Proper Storage: Always place the hot iron in the designated iron holder when not actively soldering. Allow the iron to cool completely before storing.
- Tool-Only: This product is sold as a "Tool-Only" unit. Battery, charger, and extension cord are required for operation and are sold separately.
3. Setup
Before first use, ensure all components are present and undamaged.
- Unpacking: Carefully remove the soldering station and its components from the packaging. Inspect for any shipping damage.
- Component Identification: Verify the presence of the soldering station base, soldering iron with cord, fine point tip, chisel solder coil, and tip cleaning sponge.
- Iron Holder Assembly: Attach the spring-style iron holder to the designated slot on the soldering station base. Ensure it is securely fastened.
- Power Source Connection:
- Battery Operation: Insert a fully charged RYOBI ONE+ 18-Volt battery into the battery port on the soldering station base.
- AC Operation: Connect a standard extension cord (not included) to the AC input port on the soldering station base, then plug the extension cord into a suitable wall outlet.
- Tip Installation: Securely screw the desired soldering tip (fine point or chisel) onto the end of the soldering iron.
- Sponge Preparation: Lightly dampen the tip cleaning sponge with water and place it in the designated tray on the soldering station base.
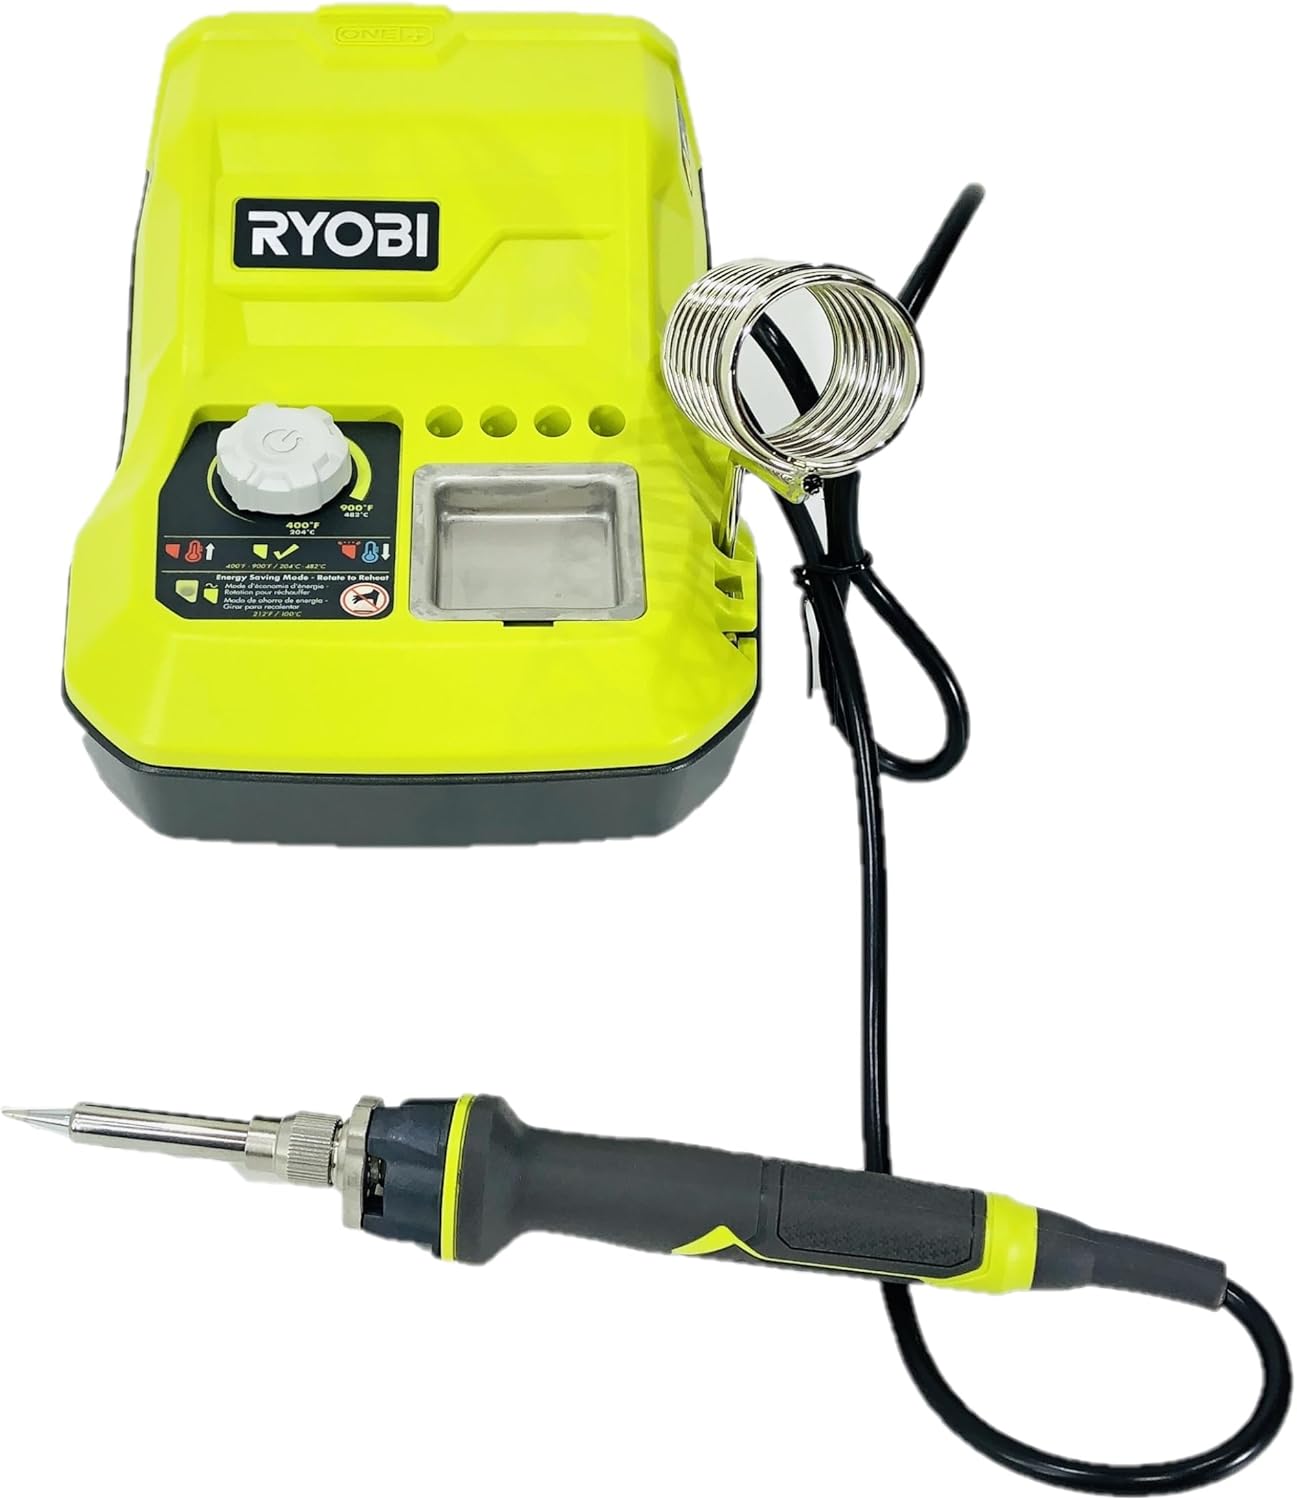
Figure 1: Ryobi 18-Volt ONE+ Hybrid Soldering Station with soldering iron and coil holder.

Figure 2: Important note: Battery and charger are sold separately.

Figure 3: Rear view of the soldering station, highlighting the AC power input port.
4. Operating Instructions
Follow these steps for safe and effective operation of your soldering station.
- Power On: Turn the temperature control dial clockwise to the desired temperature setting. The station will begin to heat up.
- Temperature Adjustment: The temperature can be adjusted between 300°F (149°C) and 900°F (482°C). Allow a few minutes for the iron to reach the set temperature.
- Tinning the Tip: Before first use and periodically during operation, apply a small amount of solder to the heated tip. This "tins" the tip, improving heat transfer and preventing oxidation.
- Soldering: Place the tip of the soldering iron against the joint to be soldered, ensuring it heats both the component lead and the pad. Apply solder to the heated joint, not directly to the iron tip. Allow the solder to flow smoothly and form a strong connection.
- Iron Holder Use: Always return the soldering iron to its holder when not actively soldering to prevent accidental burns or damage to surfaces.
- Power Off: When finished, turn the temperature control dial counter-clockwise to the "OFF" position. Allow the iron to cool completely before storing.

Figure 4: Side view of the soldering station, illustrating the temperature control dial.
Figure 5: Close-up of the control panel, showing the temperature dial and tip cleaning sponge tray.
5. Maintenance
Regular maintenance ensures optimal performance and extends the life of your soldering station.
- Tip Cleaning: Regularly wipe the soldering iron tip on the damp cleaning sponge to remove excess solder and oxidation. For stubborn residue, use a brass wire cleaner (not included) or specialized tip tinner.
- Tip Replacement: Over time, soldering tips will wear out. Replace tips when they become pitted, corroded, or no longer tin properly.
- Station Cleaning: Keep the soldering station base clean and free of debris. Use a dry cloth to wipe down the exterior. Do not use harsh chemicals or abrasive cleaners.
- Storage: Store the soldering station in a dry, safe place away from children and flammable materials when not in use. Ensure the iron is completely cool before storage.
6. Troubleshooting
If you encounter issues with your soldering station, refer to the following common problems and solutions:
| Problem | Possible Cause | Solution |
|---|---|---|
| Iron not heating | No power; loose connection; faulty iron/station | Check battery charge/AC connection; ensure iron is fully plugged in; contact customer support if issue persists. |
| Inconsistent temperature | Dirty or oxidized tip; incorrect temperature setting | Clean and tin the tip; adjust temperature dial as needed. |
| Solder not flowing | Tip not tinned; insufficient heat; incorrect solder type | Tin the tip; increase temperature; ensure solder is appropriate for the application. |
For issues not listed here or if troubleshooting steps do not resolve the problem, please contact RYOBI customer support.
7. Specifications
| Specification | Detail |
|---|---|
| Model Number | P3100 |
| Brand | RYOBI |
| Power Source | 18-Volt ONE+ Battery or AC Power |
| Voltage | 18 Volts |
| Wattage | 45 watts |
| Temperature Range | 300°F - 900°F (149°C - 482°C) |
| Temperature Stability | 600°F (315°C) |
| Number of Channels | 1 |
| Included Components | Fine point tip, chisel solder coil, tip cleaning sponge |
| Item Weight | 2.5 pounds |
| Product Dimensions | 9 x 4 x 4 inches |
| Material | Copper (tip) |
| UPC | 033287176977 |
8. Warranty and Support
For warranty information, technical support, or service inquiries, please refer to the documentation included with your product at the time of purchase or visit the official RYOBI website. Keep your proof of purchase for warranty claims.
RYOBI is committed to providing quality tools and support. If you have any questions or require assistance, please contact RYOBI customer service.