Introduction
The Vision-Luxo 18946LG LED Magnifier is an advanced illuminated magnifier designed for industrial and precision applications. It features a 5-diopter (2.25X) lens, providing clear and magnified views for detailed work. The unit is equipped with a flexible, self-balancing arm and an edge clamp mount, allowing for versatile positioning and hands-free operation. Its fully-enclosed neck design is optimized for environments where Foreign Object Debris (FOD) is a concern.
This manual provides essential information for the safe and effective use, setup, operation, and maintenance of your Vision-Luxo LED Magnifier.
Product Overview
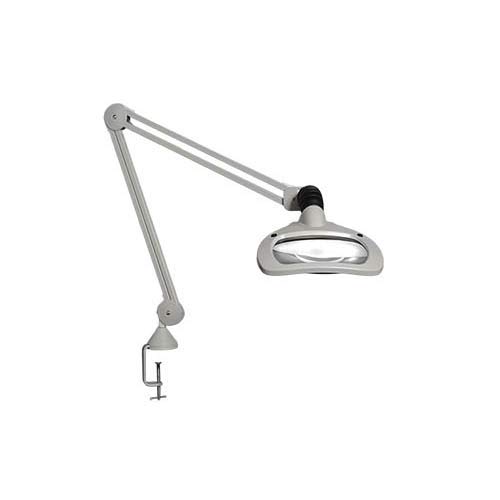
Figure 1: The Vision-Luxo 18946LG LED Magnifier, showcasing its articulated arm, magnifying head with integrated LED lighting, and robust edge clamp for secure mounting to a workbench or table.
The 18946LG model incorporates two 6W dimmable LED modules, providing shadow-free illumination. It also supports three-dimensional magnification lighting, allowing light to be directed from either the left or right side. Energy-saving features include a 9/4 hour automatic shut-off and step dimming (0-50-100 percent).
Setup Instructions
1. Unpacking
- Carefully remove all components from the packaging.
- Verify that all parts are present: Magnifier head with arm, edge clamp, and power cord.
- Inspect for any shipping damage. If damage is found, contact your supplier immediately.
2. Mounting the Clamp
- Choose a stable workbench or table surface with an edge suitable for clamping.
- Position the edge clamp securely on the chosen surface.
- Tighten the clamp screw firmly until the clamp is stable and does not wobble. Do not overtighten.
3. Attaching the Magnifier Arm
- Insert the base of the magnifier arm into the receptacle on the top of the edge clamp.
- Ensure the arm is fully seated and secure. Some models may have a locking screw; if present, tighten it.
4. Power Connection
- Connect the power cord to the magnifier head.
- Plug the power cord into a standard electrical outlet (120V AC, 60Hz).
Operating Instructions
1. Positioning the Magnifier
- The 30-inch K-arm allows for extensive reach and precise positioning. Gently move the arm to position the magnifier head directly over your work area.
- The self-balancing design ensures the head remains in the desired position without drifting.
- Adjust the height and angle of the magnifier head to achieve optimal focus and illumination for your task. The working distance is approximately 200 mm.
2. Powering On/Off and Dimming
- Locate the power button/switch on the magnifier head.
- Press the power button once to turn on the LED lights.
- To adjust brightness, repeatedly press the power button to cycle through the step dimming levels: 0% (off), 50% brightness, and 100% brightness.
- To turn off the unit, cycle through the dimming levels until the lights are off, or press and hold the power button (if applicable, refer to specific product labeling).
3. Automatic Shut-Off Feature
- The magnifier is equipped with an energy-saving automatic shut-off feature.
- The unit will automatically turn off after either 9 hours or 4 hours of continuous operation, depending on the selected mode (refer to product labeling or specific instructions for mode selection, if any). This feature helps conserve energy and extend LED lifespan.
4. Three-Dimensional Magnification Lighting
- The magnifier allows for directing light from the left or right side to enhance three-dimensional viewing.
- Consult the specific controls on the magnifier head to activate or deactivate individual LED segments for this effect. This feature is particularly useful for inspecting objects with depth or texture.
Maintenance
1. Cleaning the Lens and Housing
- Always disconnect the power before cleaning.
- Use a soft, lint-free cloth to gently wipe the lens. For stubborn smudges, a small amount of lens cleaning solution designed for optical surfaces can be applied to the cloth (not directly to the lens).
- Clean the housing and arm with a soft, damp cloth. Avoid abrasive cleaners or solvents, as these can damage the finish.
2. General Care
- Avoid exposing the unit to excessive moisture or extreme temperatures.
- Do not attempt to disassemble the magnifier head or arm assembly. There are no user-serviceable parts inside.
- Regularly check the clamp for tightness to ensure stability.
Troubleshooting
| Problem | Possible Cause | Solution |
|---|---|---|
| Magnifier does not turn on. | No power supply. Power cord not fully connected. Automatic shut-off activated. | Ensure power cord is securely plugged into a live outlet. Check connection at the magnifier head. Press the power button to reactivate the unit. |
| Lights are dim or flickering. | Incorrect dimming setting. Power fluctuation. | Cycle through dimming levels to 100%. Try plugging into a different outlet. |
| Image is blurry or unclear. | Lens is dirty. Incorrect working distance. | Clean the lens according to maintenance instructions. Adjust the magnifier head's height to achieve optimal focus (approx. 200 mm working distance). |
| Arm does not hold position. | Clamp is loose. Internal spring issue (rare). | Tighten the edge clamp. If the issue persists, contact customer support. |
Specifications
- Model: WAL025971
- Magnification: 2.25X
- Diopter Lens: 5 diopter
- Working Distance: 200 mm
- Light Source: Two 6W dimmable LED modules
- Arm Type: Internal spring, 30-inch parallel three-pivot K-arm
- Mounting: Edge Clamp Mount
- Color: Light Grey
- Item Weight: 12 Pounds
- Automatic Shut-off: 9/4 hour feature
- Dimming: Step dimming (0-50-100 percent)