
1. Introduction
This manual provides essential information for the safe and efficient operation of your PRIMECOMTECH Level 2 Electric Vehicle (EV) Charger. Please read this manual thoroughly before installation and use, and retain it for future reference.
2. Safety Information
Always adhere to local electrical codes and safety regulations during installation and use. Improper installation or use can result in electric shock, fire, or serious injury.
- Ensure the electrical outlet is properly grounded and rated for the charger's amperage (32 Amp).
- Do not use the charger if the cable or connector is damaged.
- Keep children and pets away from the charging area.
- The charger is designed with multiple safety protections including overheat, overvoltage, overcurrent, leakage, and flame resistance. It is also IP56/IP67 waterproof, allowing for outdoor use.

3. Package Contents
Verify that all items are present in the package:
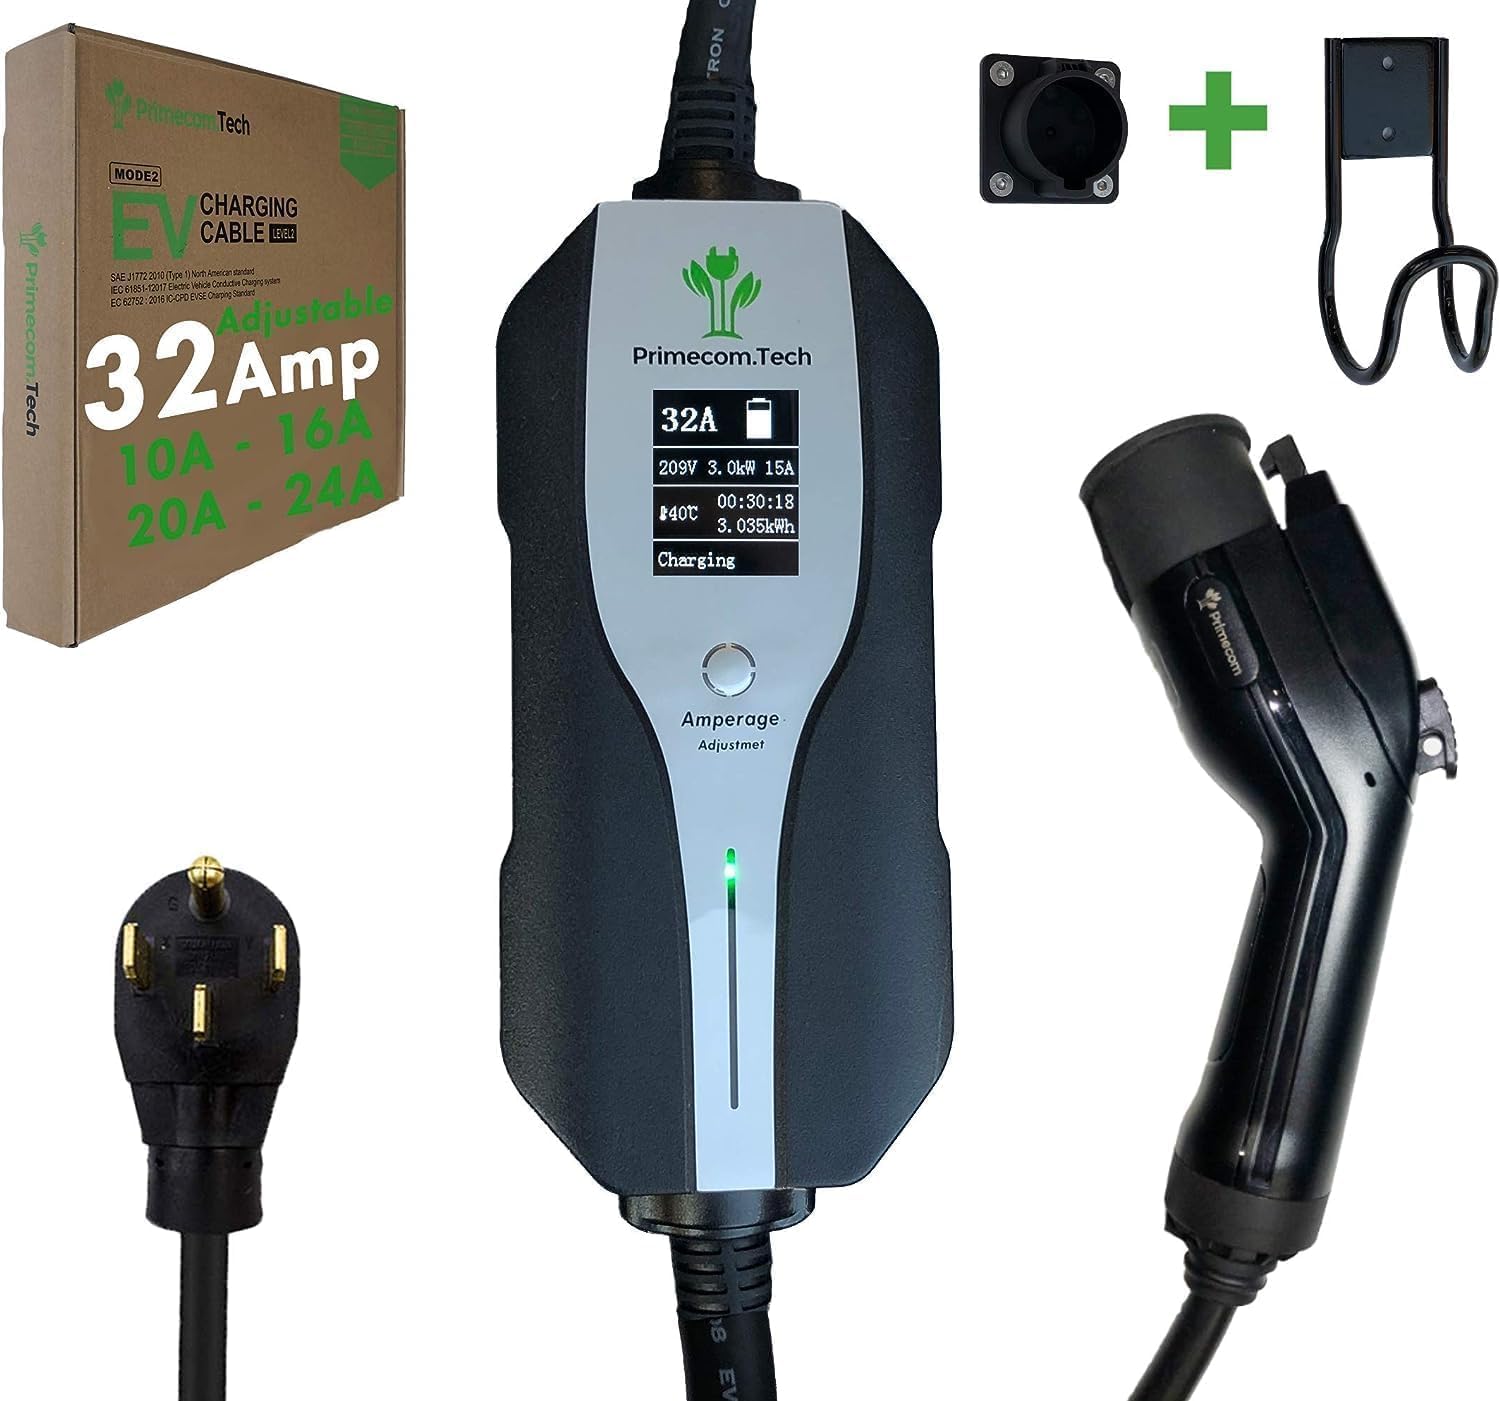
- PRIMECOMTECH Level 2 EV Charger (40-foot cable, 32 Amp)
- NEMA 14-50 Plug (integrated)
- Wall Mount Bracket and Screws
- User Manual
4. Setup
4.1. Mounting the Charger
- Select a suitable location near your NEMA 14-50 outlet, ensuring it is protected from direct impact and allows for easy cable management.
- Use the provided wall mount bracket as a template to mark drilling points.
- Drill holes and secure the bracket to the wall using the supplied screws.
- Mount the charger unit onto the secured bracket.
4.2. Connecting to Power
Plug the NEMA 14-50 connector of the charger into a dedicated 240V NEMA 14-50 outlet. Ensure the outlet is on a circuit rated for at least 40 Amps to safely support the 32 Amp charger.
5. Operating Instructions
5.1. Connecting to Your Electric Vehicle
- Ensure your vehicle is parked and turned off.
- Open the charging port cover on your EV.
- Firmly insert the charging connector into your vehicle's charging port until it clicks into place. The charger's display will indicate connection and charging status.
5.2. Adjusting Amperage
The PRIMECOMTECH charger allows for adjustable amperage settings. For the 32 Amp model, you can typically select between 10, 16, 20, 24, and 32 Amps. Press the 'Amperage Adjustment' button on the charger unit to cycle through available current settings. Select the appropriate amperage based on your vehicle's requirements and your electrical circuit's capacity.

5.3. Understanding the Display and Indicators
The charger features an LED screen and indicator lights to provide real-time charging status and information:
- LED Screen: Displays actual charging voltage, selected amperage limit, actual charging power (kW), actual charging amperage, control box temperature, charging time, and transferred energy (kWh).
- Status Indicators: Lights typically indicate Power, Connection, Charging, and Error status.


5.4. Disconnecting the Charger
- Ensure charging has stopped (indicated on the display or vehicle).
- Press the release button on the charging connector (if applicable) and gently pull it out from the vehicle's charging port.
- Close the vehicle's charging port cover.
- Store the charging cable and connector on the wall mount to prevent damage.
6. Maintenance
Regular maintenance ensures the longevity and safe operation of your charger:
- Keep the charger unit and cable clean and free from dust, dirt, and moisture. Use a soft, dry cloth for cleaning.
- Inspect the charging cable and connector regularly for any signs of wear, cuts, or damage. Do not use if damaged.
- Store the cable properly coiled and secured when not in use to prevent kinks or damage.
7. Troubleshooting
If you encounter issues with your charger, refer to the following common troubleshooting steps:
- Charger Not Powering On: Ensure the NEMA 14-50 plug is fully inserted into the outlet and the circuit breaker is not tripped.
- Charging Not Initiating: Verify the charging connector is securely plugged into the vehicle. Check the vehicle's charging settings. Ensure the selected amperage is compatible with your vehicle and circuit.
- Error Indicator Light: If an error light illuminates, disconnect the charger from both the vehicle and the power outlet, wait a few minutes, and then reconnect. If the error persists, consult the support section.
8. Specifications
| Feature | Specification |
|---|---|
| Brand | PRIMECOMTECH |
| Model Number | 304050FT |
| Amperage | 32 Amps (Adjustable) |
| Output Voltage | 220-240 Volts |
| Wattage | 7.2 KW |
| Cable Length | 40 Feet |
| Connector Type | NEMA 14-50 |
| Special Features | Waterproof (IP56/IP67), Overheat Protection, Overvoltage Protection, Overcurrent Protection, Leakage Protection, Flame Resistance |
| Item Weight | 13 pounds |
| Product Dimensions (Control Box) | 6 x 4 x 3 inches |
9. Warranty and Support
Your PRIMECOMTECH Level 2 EV Charger comes with a 1 Year Parts and Labor Warranty. For technical assistance, troubleshooting, or warranty claims, please contact PRIMECOMTECH customer support. US-based support is available 7 days a week to assist you with any inquiries.