Important Safety Instructions
Please read all instructions carefully before using your HIBREW coffee maker. Retain this manual for future reference.
- Always ensure the coffee maker is placed on a stable, level surface away from the edge of the countertop.
- Do not immerse the appliance, cord, or plug in water or other liquids.
- Close supervision is necessary when any appliance is used by or near children.
- Unplug from outlet when not in use and before cleaning. Allow to cool before putting on or taking off parts, and before cleaning the appliance.
- Do not operate any appliance with a damaged cord or plug, or after the appliance malfunctions or has been damaged in any manner.
- The use of accessory attachments not recommended by the appliance manufacturer may result in fire, electric shock, or injury to persons.
- Do not use outdoors.
- Do not let cord hang over edge of table or counter, or touch hot surfaces.
- Do not place on or near a hot gas or electric burner, or in a heated oven.
- Always fill the water reservoir with fresh, cold water.
- Do not open the K-Cup holder during the brewing process.
- This appliance is for household use only.
Product Overview
The HIBREW Single Serve Programmable Single Cup Coffee Maker is designed for convenient and quick brewing of your favorite beverages. It features a patented heater for instant brewing, a large 45 oz. BPA-free removable water reservoir, and a simple one-touch control panel with programmable brew sizes and an auto-off function.

This image displays the overall design of the HIBREW Single Serve Coffee Maker. It shows the main unit in black, with a silver K-Cup holder and a white mug placed on the drip tray. The water reservoir on the left side is visible with a blue light indicating water level.
Setup
1. Unpacking and Initial Cleaning
- Remove all packaging materials and labels from the coffee maker.
- Wipe the exterior of the coffee maker with a damp cloth.
- Wash the removable water reservoir and drip tray with warm, soapy water. Rinse thoroughly and dry.
2. Filling the Water Reservoir
- Remove the water reservoir from the back of the coffee maker.
- Fill the reservoir with fresh, cold water up to the "Max" fill line. Do not overfill.
- Place the water reservoir back onto the coffee maker, ensuring it is securely seated.

This image highlights the water reservoir on the left side of the coffee maker, showing the "Min" fill line and a blue light indicating the water level. The removable drip tray is also visible at the base of the brewing area.
3. First Brew Cycle (Cleaning Cycle)
Before brewing coffee, perform a cleaning cycle to prime the system and remove any manufacturing residue.
- Ensure the water reservoir is filled.
- Place a large mug on the drip tray.
- Do not insert a K-Cup.
- Press the power button (red circle with vertical line) to turn on the coffee maker.
- Select the largest brew size (e.g., 12 oz) by pressing the corresponding button.
- The coffee maker will dispense hot water. Discard the water.
- Repeat this process 2-3 times.
Operating Instructions
1. Brewing Coffee
- Ensure the water reservoir is filled with fresh, cold water.
- Place a mug on the drip tray.
- Lift the handle to open the K-Cup holder.
- Insert a K-Cup pod into the holder. Close the handle firmly until it clicks.
- Press the power button (red circle with vertical line) to turn on the coffee maker. The brew size buttons will illuminate.
- Select your desired brew size (Small, Medium, or Large) by pressing the corresponding button. The selected button will illuminate.
- The coffee maker will begin brewing. Coffee will dispense into your mug.
- To stop brewing at any time, press the currently illuminated brew size button again.
- Once brewing is complete, carefully remove your mug.
- Lift the handle to eject the used K-Cup pod into a waste bin.

This image shows the top lid of the coffee maker lifted, revealing the K-Cup holder with a coffee pod placed inside, ready for brewing.
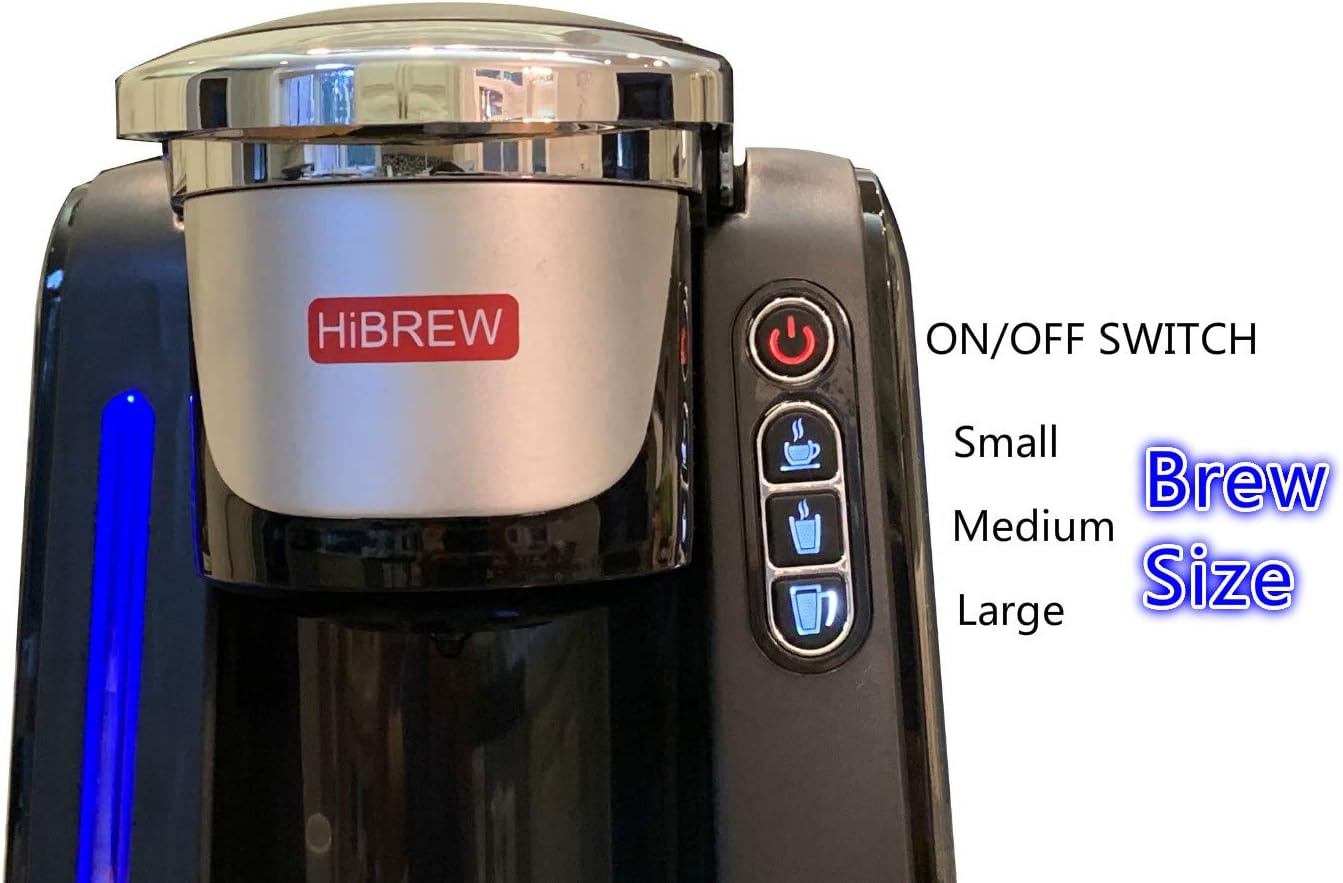
This image provides a detailed view of the control panel. It clearly labels the "ON/OFF SWITCH" (power button) and the three brew size buttons: Small, Medium, and Large, each represented by a coffee cup icon.
2. Programming Brew Sizes
The HIBREW coffee maker allows you to customize the volume for the Small, Medium, and Large brew size buttons. The available options are 4 oz / 6 oz / 8 oz, 6 oz / 8 oz / 10 oz, or 8 oz / 10 oz / 12 oz.
- With the coffee maker powered on, press and hold the desired brew size button (Small, Medium, or Large) for approximately 3 seconds until it flashes.
- While the button is flashing, press it repeatedly to cycle through the available volume options for that size.
- Release the button when your desired volume is displayed or selected (indicated by the button remaining illuminated).
- Repeat for other brew size buttons if desired.
3. Auto-Off Feature
The auto-off feature can be programmed to turn off the coffee maker after 15 minutes, 1 hour, or 2 hours of inactivity, helping to save energy.
- With the coffee maker powered on, press and hold the power button (red circle with vertical line) for approximately 3 seconds until it flashes.
- While the button is flashing, press it repeatedly to cycle through the auto-off time options (15 min, 1 hr, 2 hr).
- Release the button when your desired auto-off time is selected (indicated by the button remaining illuminated).
4. How to Brew Coffee (Video Demonstration)
This video demonstrates the simple steps to brew coffee using the HIBREW Single Serve Coffee Maker, including placing the K-Cup and selecting the brew size.
Maintenance
1. Cleaning the Drip Tray
- The drip tray is removable for easy cleaning.
- Simply slide the drip tray out from the base of the coffee maker.
- Wash with warm, soapy water, rinse, and dry thoroughly.
- Reinsert the drip tray.
2. General Cleaning
- Wipe the exterior of the coffee maker with a damp, non-abrasive cloth.
- Clean the K-Cup holder and needle area regularly to prevent clogs. Use a paperclip to clear any blockages in the needle.
- The water reservoir should be cleaned periodically with warm, soapy water.
3. Descaling
Over time, mineral deposits (scale) can build up in your coffee maker, affecting performance and taste. Descaling is recommended every 3-6 months, or more frequently if you have hard water.
- Empty the water reservoir.
- Fill the reservoir with a descaling solution (e.g., white vinegar or a commercial descaling agent) mixed with water according to the solution's instructions.
- Place a large mug on the drip tray.
- Run several brew cycles (without a K-Cup) until the reservoir is empty.
- Rinse the reservoir thoroughly and fill with fresh water.
- Run several more brew cycles with fresh water to flush out any remaining descaling solution.
Troubleshooting
| Problem | Possible Cause | Solution |
|---|---|---|
| Coffee maker does not turn on. | Not plugged in; power outlet issue. | Ensure the power cord is securely plugged into a working electrical outlet. |
| No water dispenses or brewing is slow. | Low water level; clogged needle; mineral buildup. | Fill water reservoir. Clean the K-Cup holder needle. Perform a descaling cycle. |
| Coffee is weak or watery. | Incorrect brew size selected; K-Cup not properly punctured. | Select a smaller brew size. Ensure K-Cup is firmly seated and punctured. |
| Water leaks from the coffee maker. | Water reservoir not seated correctly; drip tray full. | Ensure the water reservoir is firmly in place. Empty and clean the drip tray. |
| Coffee grounds in cup. | K-Cup lid not sealed; K-Cup overfilled (if using reusable filter). | Ensure K-Cup is properly inserted. If using a reusable filter, do not overfill. |
Specifications
- Brand: HIBREW
- Model Number: d7302b22-21f6-4ef9-9938-d7468a5212e7
- Coffee Maker Type: Single-Serve Brewer
- Operation Mode: Fully Automatic
- Water Reservoir Capacity: 45 oz. (approx. 2.8 lbs)
- Product Dimensions: 15 x 14 x 9 inches
- Item Weight: 7.28 pounds
- Coffee Input Type: PODS
- Special Feature: Programmable Brew Sizes, Auto-Off
- Manufacturer: HIBREW Inc.
- Date First Available: May 23, 2019
Warranty and Support
For warranty information and customer support, please refer to the warranty card included with your product or visit the official HIBREW website. Keep your purchase receipt as proof of purchase for warranty claims.
Contact Information:
- Website: Visit the HIBREW Store on Amazon
- (Specific contact details like phone number or email are not provided in the product data. Please refer to the product packaging or official website for direct support.)


