OOYCYOO 60A
OOYCYOO MPPT Solar Charge Controller 60A User Manual
Model: 60A
1. Introduction and Overview
The OOYCYOO MPPT Charge Controller 60A is an advanced solar charge regulator designed to efficiently manage power flow from your solar panels to your battery bank. Utilizing Maximum Power Point Tracking (MPPT) technology, it optimizes energy harvesting from solar panels, ensuring maximum charging efficiency. This controller is compatible with a wide range of battery types, including LiFePO4, AGM, Sealed, Gel, and Flooded batteries, and automatically identifies 12V or 24V system voltages. Its integrated blacklight LCD display provides real-time monitoring of system parameters, offering comprehensive control and diagnostic capabilities.
2. Safety Information
Please read all safety instructions carefully before installation and operation to prevent injury or damage to the controller and connected components.
- Connection Order: Always connect the battery to the charge controller FIRST. Then connect the DC load (if applicable). Finally, connect the solar panels. Disconnect in the reverse order: solar panels, then DC load, then battery.
- Wire Gauge: Ensure appropriate wire gauge is used for all connections, especially for battery and solar panel terminals. Undersized wires can lead to overheating and potential fire hazards. For the 60A model, 4 AWG multi-strand copper wire is recommended for battery connections to safely handle the current.
- Polarity: Verify correct polarity (+ to + and - to -) for all connections to prevent damage to the controller and batteries.
- Ventilation: Install the controller in a well-ventilated area to ensure proper heat dissipation. Avoid enclosed spaces without airflow.
- Over-voltage Protection: Do not exceed the maximum input power or voltage of the controller. For 12V systems, the maximum PV input power is 750W; for 24V systems, it is 1500W. The maximum open circuit voltage (Voc) for solar panels should not exceed 100V.
- Inverter/Alternator: Do not connect inverters, wind generators, or alternators directly to the charge controller. These devices require separate, appropriate connections.
- Battery Voltage: Ensure the battery voltage is sufficient (typically >9V) for the controller to recognize the system voltage.
3. Product Features
- MPPT Technology: Advanced Maximum Power Point Tracking for optimal solar energy harvesting.
- Wide Battery Compatibility: Supports LiFePO4, AGM, Sealed, Gel, and Flooded lead-acid batteries.
- Automatic System Voltage Identification: Automatically detects 12V/24V system voltage.
- High Charging Current: 60A rated charging current.
- Max PV Input Power: Up to 750W for 12V systems and 1500W for 24V systems.
- Comprehensive Protection: Includes overcharge, overdischarge, overload, overheat, reverse polarity, and lightning protection functions.
- Blacklight LCD Display: Provides clear, real-time system data.
- USB Output: Two 5V 2.4A USB ports for charging external devices.
- RS485 Communication Port: For advanced monitoring and control (additional accessories may be required).
4. Package Contents
Upon opening the package, please verify that all items are present and undamaged:
- OOYCYOO MPPT Solar Charge Controller 60A
- User Manual (this document)
- Remote Temperature Sensor
- Mounting Screws and Wall Anchors
5. Setup and Installation
Follow these steps for proper installation of your MPPT solar charge controller. Refer to the connection diagram for visual guidance.

Figure 1: Connection Diagram
Installation Steps:
- Mounting: Choose a suitable location for mounting the controller. It should be a dry, well-ventilated area, protected from direct sunlight, moisture, and corrosive gases. Use the mounting holes on the controller to secure it to a flat surface with the provided screws and anchors.
- Battery Connection: Connect the battery to the controller's battery terminals (labeled 'BATTERY'). Ensure correct polarity: connect the positive (+) terminal of the battery to the positive (+) terminal of the controller, and the negative (-) terminal of the battery to the negative (-) terminal of the controller. This is the FIRST connection to make.
- DC Load Connection (Optional): If you are connecting a DC load directly to the controller, connect it to the load terminals (labeled 'LOAD'). Ensure correct polarity.
- Solar Panel Connection: Connect your solar panels to the controller's solar panel terminals (labeled 'SOLAR'). Ensure correct polarity: connect the positive (+) terminal of the solar array to the positive (+) terminal of the controller, and the negative (-) terminal of the solar array to the negative (-) terminal of the controller.
- Remote Temperature Sensor (Optional): Connect the remote temperature sensor to the designated port on the controller. This allows for accurate battery temperature compensation during charging.
- USB and RS485 Ports: The USB ports can be used for charging compatible devices. The RS485 port is for communication with external monitoring devices (requires additional accessories and software, documentation for which is not included with this manual).
Important Note: Always ensure all connections are tight and secure to prevent loose contacts and potential hazards.
6. Operation
Once properly installed, the controller will automatically begin operation. The blacklight LCD display provides real-time information about your solar system's performance.
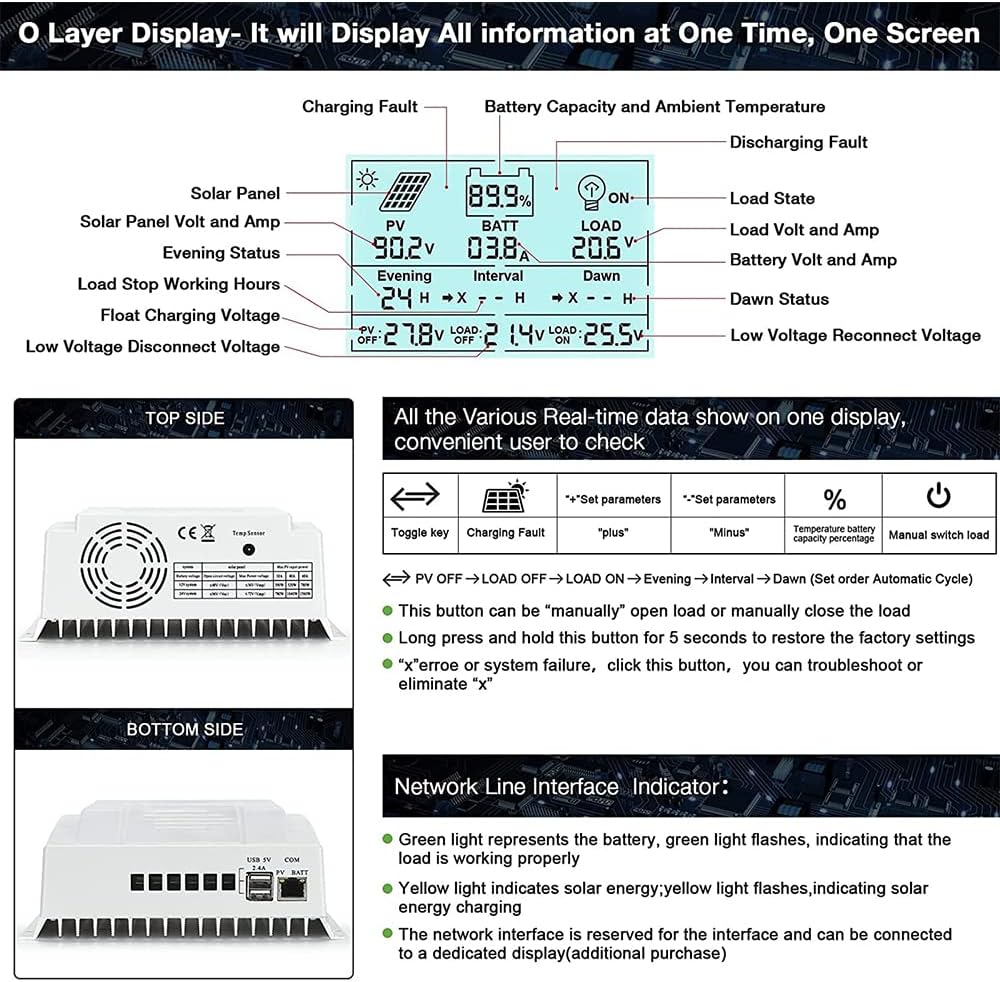
Figure 2: LCD Display Details
LCD Display Information:
- PV: Solar Panel Voltage and Amperage.
- BATT: Battery Voltage and Amperage, Battery Capacity (%).
- LOAD: Load Voltage and Amperage, Load State (ON/OFF).
- Evening/Dawn: Load stop working hours (Evening) and Load start working hours (Dawn).
- Interval: Time interval for load operation.
- PV OFF: Voltage at which PV input is disconnected.
- LOAD OFF: Voltage at which load is disconnected due to low battery.
- LOAD ON: Voltage at which load is reconnected.
- Charging Fault/Discharging Fault: Indicators for system errors.
Control Buttons:
- Toggle Key (Left Arrow): Used to switch between different display screens and navigate menus.
- '+' Button: Used to increase values or move forward in menu options.
- '-' Button: Used to decrease values or move backward in menu options.
- Light Bulb Button: Manually turns the load output ON or OFF.
- 5S Reset (Light Bulb Button Long Press): Press and hold the light bulb button for 5 seconds to restore the controller to factory settings. This can also be used to clear certain error indications.
Network Line Indicator:
- Green Light: Represents the battery charging status. A solid green light indicates the battery is charging.
- Yellow Light: Indicates solar energy charging. A solid yellow light means solar power is actively being converted.
7. Maintenance
Regular maintenance ensures the longevity and optimal performance of your solar charge controller.
- Inspect Connections: Periodically check all wiring connections (battery, solar panel, load) for tightness, corrosion, or damage. Loose connections can cause voltage drops, overheating, and system malfunctions.
- Clean Controller: Keep the controller's exterior clean and free from dust, dirt, and debris. Use a soft, dry cloth for cleaning. Do not use liquid cleaners.
- Ventilation Check: Ensure that the ventilation openings on the controller are not blocked and that there is adequate airflow around the unit to prevent overheating.
- Battery Health: Monitor your battery's health and voltage regularly. Ensure the battery type setting on the controller matches your battery type for proper charging.
- Environmental Conditions: Protect the controller from extreme temperatures, direct water exposure, and high humidity.
8. Troubleshooting
This section provides solutions to common issues you might encounter with your charge controller.
| Problem | Possible Cause | Solution |
|---|---|---|
| Controller display is off / No power. | Battery not connected or low voltage; reversed battery polarity; loose battery connection. | Check battery connections and ensure correct polarity. Verify battery voltage is above 9V. Tighten all battery terminal connections. |
| No charging from solar panels. | Solar panels not connected; reversed solar panel polarity; insufficient sunlight; PV input voltage too low/high; damaged solar panel. | Check solar panel connections and polarity. Ensure adequate sunlight. Verify PV input voltage is within the specified range (e.g., 18V-96V for 12V system). Inspect solar panels for damage. |
| Load output not working or inconsistent. | Load not connected; load overloaded; low battery voltage; load output disabled; internal fault. | Check load connections. Reduce load to within controller's capacity. Charge battery. Ensure load output is enabled via the light bulb button. If issue persists, consider using an external relay for critical loads. |
| Controller fan is loud or runs excessively. | High current draw; high ambient temperature; restricted airflow. | Ensure proper ventilation around the controller. Check for excessive current draw from solar panels or load. Relocate to a cooler environment if possible. |
| Error code displayed. | System fault (e.g., over-voltage, over-current, short circuit). | Identify the specific error code on the display. Check corresponding connections and parameters. Long press the light bulb button for 5 seconds to attempt clearing the error. If the error persists, consult the seller. |
If you encounter problems not listed here or if the suggested solutions do not resolve the issue, please contact customer support.
9. Specifications
| Parameter | Value |
|---|---|
| Brand | OOYCYOO |
| Model | 60A |
| System Voltage | 12V/24V Auto |
| Rated Charge Current | 60A |
| Max PV Input Voltage | 100V |
| Max PV Input Power (12V System) | 750W |
| Max PV Input Power (24V System) | 1500W |
| Battery Types Supported | LiFePO4, AGM, Sealed, Gel, Flooded |
| Display Type | LCD |
| USB Output | 2 x 5V 2.4A |
| Communication Port | RS485 |
| Item Weight | 2.99 pounds (1.36 kg) |
| Package Dimensions | 8.4 x 8.3 x 3.3 inches |
| Manufacturer | OOYCYOO |
10. Warranty Information
Specific warranty terms and conditions for the OOYCYOO MPPT Solar Charge Controller 60A may vary depending on your region and point of purchase. Please refer to the warranty information provided with your original purchase documentation or contact your retailer for details regarding warranty coverage, duration, and claims procedures.
11. Support Contact
For technical assistance, product inquiries, or support, please contact your retailer or visit the official OOYCYOO store on Amazon:
Please have your product model and purchase details ready when contacting support to facilitate a quicker resolution.
Related Documents - 60A
 |
OOYCYOO MPPT Solar Power Generation System Controller User Manual This document provides comprehensive instructions and technical specifications for the OOYCYOO MPPT Solar Power Generation System Controller. Learn about installation, parameter settings, protection features, and system wiring for optimal solar energy utilization. |
 |
Ooycyoo MPPT 'P' Series 40A/60A Solar Charge Controller User Manual Explore the Ooycyoo MPPT 'P' Series 40A/60A Solar Charge Controller. This user manual details advanced MPPT technology, features like real-time display, USB charging, and multi-stage battery charging, along with essential safety and installation guidance for solar energy systems. |
 |
PowMr Solar Charge Controller Troubleshooting Guide A concise troubleshooting guide for PowMr MPPT solar charge controllers, addressing common issues like no display, power-on problems, voltage discrepancies, and charging failures. Includes step-by-step solutions and contact information for warranty support. |
 |
MPPT Solar Charge Controller User Manual User manual for the 60A MPPT Solar Charge Controller, detailing features, installation, operation, settings, and technical specifications for efficient solar energy management. |
 |
BUSBYR White MPPT Solar Charge Controller User Manual Comprehensive user manual for the BUSBYR White MPPT Solar Charge Controller, covering models with 12V-96V voltage, 30A-100A current, and 230V AC output. Features LCD touch interface and compatibility with Lifepo4, Lithium, GEL, and Lead Acid batteries for home solar panel systems. |
 |
PowMr MPPT-60A Solar Charge Controller User Manual PowMr MPPT-60A Solar Charge Controller User Manual providing detailed instructions on installation, operation, safety precautions, troubleshooting, and technical specifications for efficient solar power management. |
Ask a question about this manual
Ask about setup, troubleshooting, compatibility, parts, safety, or missing instructions. Manuals+ will review the question and use this page’s manual context to help answer it.