1. Introduction
This manual provides detailed instructions for the installation, operation, and maintenance of your Astra Depot 12-Piece Amber LED Emergency Strobe Light Kit. This kit includes both ultra-slim 6-LED surface mount strobe lights and 4-LED grille/dash flashing lights, designed for universal application on various vehicles with a DC 12V power source. Please read this manual thoroughly before installation and use to ensure proper function and safety.
2. Safety Information
- Always disconnect the vehicle's battery before performing any electrical work.
- Ensure all wiring connections are secure and properly insulated to prevent short circuits.
- Mount lights in locations that do not obstruct the driver's view or interfere with vehicle operation.
- Verify local regulations regarding the use of emergency and warning lights on public roads.
- Do not modify the product in any way, as this may void the warranty and create safety hazards.
3. Package Contents
Please verify that all components listed below are present in your package:
- 12x Ultra Slim 6-LED Strobe Flash Lights
- 12x Protection Pads (for 6-LED lights)
- 8x 4-LED Amber Strobe Lights
- 8x Mounting Wires (for 4-LED lights)
- 2x Wiring Harnesses with On/Off and Pattern Switch
- 2x Control Boxes (for 4-LED lights)
- Set of Mounting Accessories (screws, etc.)

Image: Overview of all included components in the kit.
4. Specifications
| Feature | 6-LED Strobe Light | 4-LED Flashing Light Kit |
|---|---|---|
| Lens Color | Clear | Clear |
| Light Color | Amber | Amber |
| IP Rate | IP 65 | Not specified (Waterproof) |
| Dimensions (LxWxH) | 11.2 x 2.8 x 1 cm (4.4 x 1.1 x 0.4 inches) | Light Bar: 10 x 2.1 x 2.8 cm (3.9 x 0.8 x 1.1 inches) Control Box: 10 x 2.9 x 5 cm (3.9 x 1.1 x 2.0 inches) |
| Voltage | 12V-24V DC | 12V DC |
| Wattage | 18W (3W per LED) | 4W per light (1W per LED) |
| Number of LEDs | 6 per light | 4 per light bar |
| Cable Length | Approx. 75 cm (29.5 inches) | 100 cm (39.4 inches) |
| Material | Aluminum Alloy Housing + PC Lens | ABS Housing with Clips + PC Lens |
| Weight | 80g per light | 480g per set |
| Special Features | 16 Flashing Patterns, Last Pattern Memory Recall, Waterproof | 7 Flashing Patterns, Last Pattern Memory Recall, On/Off Switch, Waterproof |

Image: Dimensions of the 6-LED Strobe Light.

Image: Dimensions of the 4-LED Flashing Light Bar and Control Box.
5. Installation
This product is designed for universal fit on most trucks, trailers, RVs, cars, SUVs, vans, and pickup trucks with a DC 12V power source. Ensure the mounting surface is clean and flat before installation.
5.1. 6-LED Strobe Light Installation
- Choose a suitable flat surface for mounting the 6-LED strobe light. These lights are ultra-slim and can be surface-mounted.
- Use the provided protection pads between the light and the mounting surface to prevent scratches and ensure a secure fit.
- Secure the light using appropriate screws (not explicitly mentioned if included, but "Set of Mounting Accessories" implies it).
- Connect the wiring as described in the "Wiring Instructions" section below.
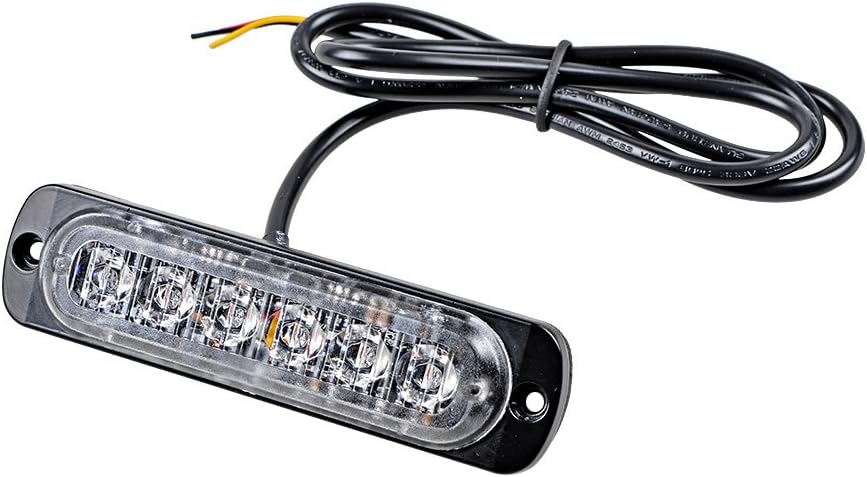
Image: 6-LED Strobe Light with Wiring.
5.2. 4-LED Flashing Light Kit Installation
- Determine the desired location for the 4-LED light bars (e.g., grille, deck, dash).
- Mount the light bars using the provided mounting wires and accessories.
- Position the control box in a secure, accessible location within the vehicle.
- Connect the 4-LED light bars to the control box using the provided wiring.
- Connect the control box to the vehicle's power source as described in the "Wiring Instructions" section below.

Image: Examples of light installation on different vehicles.
5.3. Wiring Instructions
For 6-LED Strobe Lights:
- Black Wire: Connect to Negative (-) terminal.
- Red Wire: Connect to Positive (+) terminal.
- Yellow Wire: Connect to Brake Light Negative to activate strobe light patterns.
Important Note for 6-LED Lights: To activate the strobe light patterns, first connect both the red and yellow wires to the brake light. Then, turn off the vehicle. Finally, connect the red wire to the positive (+) terminal and the black wire to the negative (-) terminal of your power source.
For 4-LED Flashing Light Kit:
The 4-LED kit comes with a wiring harness that includes an On/Off switch and a pattern switch, connecting to the control box. Follow the wiring diagram provided with the kit for specific connections to your vehicle's 12V power source.

Image: Control Switch for 4-LED Flashing Light Kit.
6. Operation
6.1. 6-LED Strobe Lights
- Once properly wired and powered, the 6-LED strobe lights will activate.
- These lights feature 16 different flashing patterns. The patterns are typically changed by momentarily applying power to the yellow wire (or by a dedicated pattern change wire, if present and not specified in the description). The description states "Yellow for Brake Light Negative", and "Only if you connect the light to the brake light that can have strobe light patterns." This implies the brake light signal triggers pattern changes.
- The lights have a last pattern memory recall function, meaning they will resume the last selected pattern when powered on again.
Video: Demonstration of the amber 6-LED flashing strobe lights, showcasing various patterns.
6.2. 4-LED Flashing Light Kit
- Use the On/Off switch on the wiring harness to power the 4-LED lights.
- Press the pattern switch button to cycle through the 7 different flashing patterns.
- The lights have a last pattern memory recall function, retaining the last selected pattern when turned off and on.
7. Maintenance
- Regularly inspect all wiring and connections for signs of wear, corrosion, or damage.
- Keep the light lenses clean to ensure maximum light output. Use a soft cloth and mild cleaning solution.
- Ensure mounting screws remain tight to prevent lights from becoming loose.
- The lights are waterproof (IP65 for 6-LED, generally waterproof for 4-LED), but avoid high-pressure washing directly on the lights.
8. Troubleshooting
| Problem | Possible Cause | Solution |
|---|---|---|
| Lights do not turn on. | No power, incorrect wiring, blown fuse. | Check power connections, ensure correct polarity. Inspect vehicle fuse box for blown fuses. |
| 6-LED lights are on but not flashing. | Yellow wire not connected or improperly connected. | Ensure the yellow wire is correctly connected to the brake light negative as per wiring instructions. |
| 4-LED lights not changing patterns. | Pattern switch malfunction or incorrect connection to control box. | Verify the pattern switch is functioning and properly connected to the control box. |
| Lights flicker or dim. | Loose connection, insufficient power, faulty wiring. | Check all wiring connections for tightness. Ensure the vehicle's electrical system can supply adequate power. |
9. Warranty and Support
For warranty information or technical support, please refer to the Astra Depot official website or contact their customer service directly. Keep your purchase receipt as proof of purchase.
Astra Depot Official Store: Visit Astra Depot Store on Amazon