1. Introduction
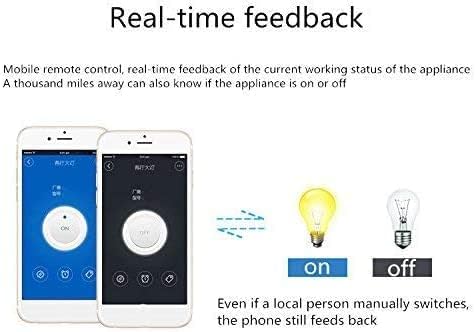
This manual provides detailed instructions for the installation, operation, and maintenance of your Yueyang Wireless WiFi Switch Relay Module. This smart home automation module allows you to remotely control connected devices using the eWeLink mobile application, offering convenience and enhanced control over your electrical appliances.
2. Safety Information
WARNING: Risk of Electric Shock. Always disconnect power before installation or servicing.
- Ensure all wiring is performed by a qualified electrician or knowledgeable individual.
- Do not exceed the specified voltage and current ratings of the module.
- Keep the device away from water, moisture, and high temperatures.
- Do not attempt to disassemble or modify the module.
- Use only with compatible power sources as specified.
3. Product Overview
The Yueyang Wireless WiFi Switch Relay Module is a versatile device designed for various automation tasks. It supports multiple input voltages and integrates with the eWeLink app for smart control.
3.1 Key Features
- Remote Control: Control devices from anywhere via the eWeLink app (Android/iOS).
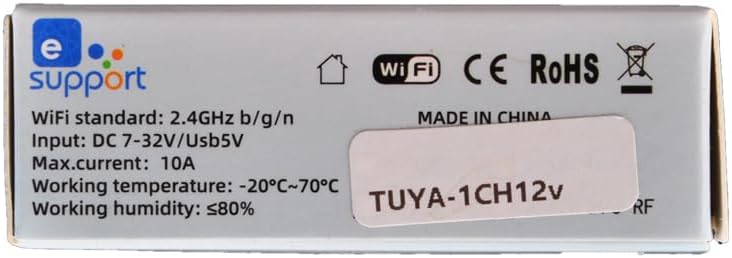
- WiFi Connectivity: Supports 2.4GHz WiFi (IEEE 802.11 b/g/n). 5G WiFi networks are not supported.
- Multiple Operating Modes: Features self-locking (toggle ON/OFF) and inching (momentary pulse) modes, configurable via the eWeLink app.
- Voice Control: Compatible with Amazon Alexa and Google Home for hands-free operation.
- Scheduling & Automation: Set timing schedules, share device control, manage groups, and create scene-triggered automations based on environmental conditions (e.g., temperature, humidity).
- Wide Voltage Input: Operates on DC 5V or AC/DC 7-32V.
3.2 Component Identification
Familiarize yourself with the components of the relay module:


4. Setup
4.1 Network Requirements
- The module supports 2.4GHz WiFi networks only. It does not support 5GHz WiFi.
- If your router has a dual-band network with the same SSID, disable the 5GHz band or create a separate SSID for the 2.4GHz band during the pairing process.
- Ensure your smartphone and the relay module are connected to the same 2.4GHz WiFi network during pairing.
- Avoid using special characters in your WiFi SSID or password, as this may prevent the eWeLink app from finding your network. Use standard alphanumeric characters.
4.2 Wiring the Module
The relay module acts as a switch. The power input (DC 5V or AC/DC 7-32V) is solely for powering the module's internal PCBA. The relay contacts (NC, COM, NO) are voltage-free and are used to switch the external device's power circuit.
- Power Input: Connect your chosen power source (DC 5V via USB or AC/DC 7-32V to the designated terminals) to power the module. Refer to Figure 1 for terminal locations.
- Device Connection: Connect the device you wish to control to the relay terminals (NC, COM, NO) according to your application's requirements.
4.3 eWeLink App Installation
- Download the eWeLink app from the Google Play Store (for Android) or Apple App Store (for iOS).
- Register an account and log in.
4.4 Device Pairing
- Ensure the module is powered on and within range of your 2.4GHz WiFi network.
- Open the eWeLink app and tap the '+' icon to add a new device.
- Follow the on-screen instructions in the app. You may need to press and hold the 'APP Pairing button' on the module (refer to Figure 1) until the APP matched indicator light blinks in a specific pattern, indicating it's in pairing mode.
- Once paired, the device will appear in your eWeLink app.
5. Operating Instructions
5.1 Operating Modes
The module supports two main operating modes, configurable within the eWeLink app:
- Self-locking Mode: In this mode, the relay acts as a standard toggle switch. One command turns the device ON, and another command turns it OFF. This is suitable for applications like controlling lights or power supplies.
- Inching Mode (Momentary): In this mode, the relay activates for a brief, configurable duration (e.g., 1 second) and then automatically deactivates. This is ideal for applications requiring a momentary pulse, such as garage door openers, PC power buttons, or access control systems.
5.2 Remote Control via eWeLink App
After successful pairing, you can control your device using the eWeLink app:
- ON/OFF Control: Tap the device icon in the app to toggle its state.
- Timing Schedules: Set up one-time, repeating, or countdown timers to automate device operation.
- Device Sharing: Share control of the device with other eWeLink users.
- Group Management: Organize multiple devices into groups for simultaneous control.
- Scene Automation: Create smart scenes where the module's state changes based on triggers like temperature, humidity, or other smart devices.

5.3 Voice Control (Alexa/Google Home)
To enable voice control:
- Ensure your eWeLink account is linked to your Amazon Alexa or Google Home account through their respective apps.
- Discover new devices in your Alexa or Google Home app.
- Once discovered, you can use voice commands such as "Alexa, turn on [device name]" or "Hey Google, turn off [device name]".
5.4 Application Examples
The module's versatile modes allow for various applications:
Inching Mode Applications:

Self-locking Mode Applications:
6. Maintenance
- Keep the module clean and free from dust. Use a dry, soft cloth for cleaning.
- Avoid exposing the module to extreme temperatures, direct sunlight, or corrosive environments.
- Regularly check wiring connections to ensure they are secure.
- Ensure your eWeLink app and module firmware are updated to the latest versions for optimal performance and security.
7. Troubleshooting
7.1 Common Issues and Solutions
| Problem | Possible Cause | Solution |
|---|---|---|
| Module cannot connect to WiFi. | Incorrect WiFi band (5GHz), wrong password, special characters in SSID/password, module too far from router. | Ensure 2.4GHz WiFi is used. Verify SSID and password. Remove special characters. Move module closer to router. Restart router. |
| Device unresponsive in eWeLink app. | No power to module, WiFi disconnected, app glitch. | Check power supply to the module. Verify WiFi connection status. Restart the eWeLink app. Re-pair the device if necessary. |
| Voice control not working. | eWeLink account not linked, device not discovered by voice assistant. | Ensure eWeLink is linked in Alexa/Google Home app. Ask voice assistant to discover devices. Check device name for clarity. |
| Relay not switching external device. | Incorrect wiring, external device fault, relay contacts damaged. | Review wiring diagram and ensure correct connections. Test the external device independently. If module is faulty, replace it. |
8. Specifications
| Feature | Specification |
|---|---|
| Brand | Yueyang |
| Model Number | module |
| Input Voltage | DC 5V or AC/DC 7-32V |
| Max Current | 10A |
| Power Consumption | 3 Watts |
| WiFi Standard | 2.4GHz b/g/n |
| Operating Temperature | -20°C to 70°C |
| Operating Humidity | ≤80% |
| Material | Polycarbonate |
| Contact Type | Normally Open |
| Connector Type | Screw |
| Coil Voltage | 12 Volts (DC) |
| Minimum Switching Voltage | 5 Volts (DC) |
| Approx. Dimensions (Package) | 12 x 9.5 x 2 cm |
| Approx. Weight | 60 g |
9. Warranty and Support
For warranty information and technical support, please refer to the documentation provided with your purchase or contact the seller directly. Keep your proof of purchase for any warranty claims.