1. Introduction
This manual provides detailed instructions for the installation and proper use of the DYNAVIN Ashtray Infill Tray (Model DVN-ASHBOX-S). This product is designed to facilitate the relocation of vehicle control buttons, such as those for heated seats, parking sensors, and start-stop functions, into the ashtray area of specific BMW 3 Series models. Please read these instructions thoroughly before beginning installation to ensure correct procedure and optimal functionality.
2. Product Overview
The DYNAVIN Ashtray Infill Tray is a custom-designed component for BMW 3 Series vehicles, specifically models E90, E91, E92, and E93 manufactured between 2005 and 2012. It serves as a replacement for the factory ashtray, providing a dedicated space to relocate various control buttons, particularly useful when installing aftermarket head units or other modifications that require freeing up dashboard space.
- Purpose: Relocates HVAC, heated seat, parking sensor, and start-stop buttons.
- Material: High-quality plastic with a silver finish, designed to integrate seamlessly with the vehicle's interior.
- Design: Features a pocket for storage and specific cutouts for button integration.

Figure 1: Front view of the DYNAVIN Ashtray Infill Tray with the lid open, showing the internal pocket and button relocation area.
3. Compatibility
This Ashtray Infill Tray is compatible with the following BMW 3 Series models:
- BMW 3 Series E90 (Sedan) - 2005-2012
- BMW 3 Series E91 (Touring/Wagon) - 2005-2012
- BMW 3 Series E92 (Coupe) - 2005-2012
- BMW 3 Series E93 (Convertible) - 2005-2012
Specific Conditions:
- Designed for vehicles equipped with automatic air conditioning.
- Intended for use in cars with factory-fitted heated seats, parking sensors, or start-stop buttons that require relocation.
- Primarily for E90 models that do not have factory-fitted navigation, as this often dictates the original button layout.
4. Package Contents
The package should contain the following items:
- DYNAVIN Ashtray Infill Tray (Model DVN-ASHBOX-S) - Silver
- (Note: Buttons, wiring, and tools for installation are not included and must be sourced separately.)
5. Installation Instructions (Setup)
Installation of the DYNAVIN Ashtray Infill Tray involves removing the existing ashtray unit and relocating specific control buttons. Professional installation is recommended. If performing self-installation, ensure you have the necessary tools and technical knowledge.
Required Tools (Not Included):
- Trim removal tools
- Screwdrivers (Torx and Phillips may be required)
- Small pry tools
- Gloves (optional, to prevent fingerprints)
Installation Steps:
- Prepare the Vehicle: Ensure the vehicle is turned off and the parking brake is engaged. Disconnect the negative terminal of the car battery to prevent electrical shorts during installation.
- Remove Existing Trim: Carefully use trim removal tools to pry off the surrounding trim pieces around the gear shifter and the existing ashtray unit. Refer to your vehicle's service manual for specific trim removal procedures.
- Disconnect Original Ashtray: Once the trim is removed, locate and disconnect any wiring harnesses connected to the original ashtray unit (e.g., for the cigarette lighter or illumination). Remove the screws securing the ashtray unit and carefully extract it.
- Relocate Buttons: Identify the control buttons (heated seats, parking sensors, start-stop, etc.) that need to be moved. Carefully detach these buttons from their original housing.
- Install Buttons into Infill Tray: Insert the detached control buttons into the designated slots on the DYNAVIN Ashtray Infill Tray. Ensure they click securely into place and are oriented correctly.
- Connect Wiring: Reconnect the wiring harnesses to the relocated buttons within the new infill tray. Ensure all connections are firm and correct.
- Install Infill Tray: Position the DYNAVIN Ashtray Infill Tray into the dashboard opening. Secure it with the original screws or any provided fasteners.
- Reinstall Trim: Carefully reattach all removed trim pieces, ensuring they snap back into place without force.
- Reconnect Battery: Reconnect the negative terminal of the car battery.
- Test Functionality: Turn on the vehicle and test all relocated buttons and any other affected functions to ensure they operate correctly.

Figure 2: Angled view of the infill tray, showing the internal structure and potential button mounting points.
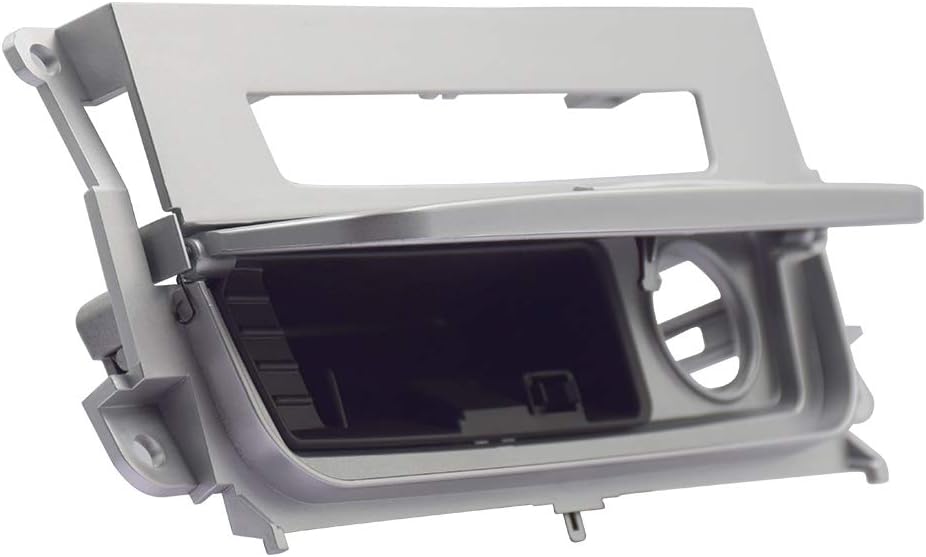
Figure 3: Rear view of the infill tray, illustrating the mounting tabs and internal wiring channels.
6. Operating Instructions
Once installed, the DYNAVIN Ashtray Infill Tray functions as a new housing for your relocated control buttons and provides a small storage pocket. Operate the relocated buttons as you would their original counterparts. The lid can be opened and closed to access the storage area.
7. Maintenance
To maintain the appearance and functionality of your Ashtray Infill Tray:
- Cleaning: Wipe the surface with a soft, damp cloth. Avoid abrasive cleaners or solvents that may damage the finish.
- Care: Do not place heavy or sharp objects in the storage pocket that could scratch or damage the interior.
8. Troubleshooting
If you encounter issues after installation, consider the following:
- Buttons Not Functioning:
- Check all wiring connections to ensure they are secure and correctly attached to the relocated buttons.
- Verify that the buttons are fully seated in their respective slots within the infill tray.
- Ensure the vehicle battery was reconnected properly.
- Poor Fitment:
- Double-check that the infill tray is correctly aligned with the dashboard opening.
- Ensure no wires or other components are obstructing the tray from seating properly.
- Confirm your vehicle model and year are within the specified compatibility range.
- Damage During Installation:
- If any part of the infill tray or vehicle trim is damaged, cease installation and contact customer support or a professional installer.
9. Specifications
| Model Number: | DVN-ASHBOX-S |
| Brand: | Dynavin |
| Color: | Silver |
| Material: | Plastic (Silver finish) |
| Item Weight: | 8 Ounces (approx. 227 grams) |
| Compatibility: | BMW 3 Series E90/E91/E92/E93 (2005-2012) |
10. Warranty and Support
DYNAVIN products are manufactured to high-quality standards. For information regarding warranty coverage, technical support, or replacement parts, please contact your authorized DYNAVIN dealer or visit the official DYNAVIN website. Keep your purchase receipt as proof of purchase.