HYCHIKA BETTER TOOLS FOR BETTER LIFE JS-100C
HYCHIKA 6.7A Jig Saw Instruction Manual
Model: JS-100C
1. Product Overview
The HYCHIKA 6.7A Jig Saw (Model JS-100C) is a versatile power tool designed for precise cutting of various materials including wood, metal, and plastic. It features an 800W pure copper motor, variable speed control, adjustable cutting angles, and orbital action settings to optimize performance for different applications. This manual provides essential information for safe and effective operation, setup, and maintenance of your jig saw.
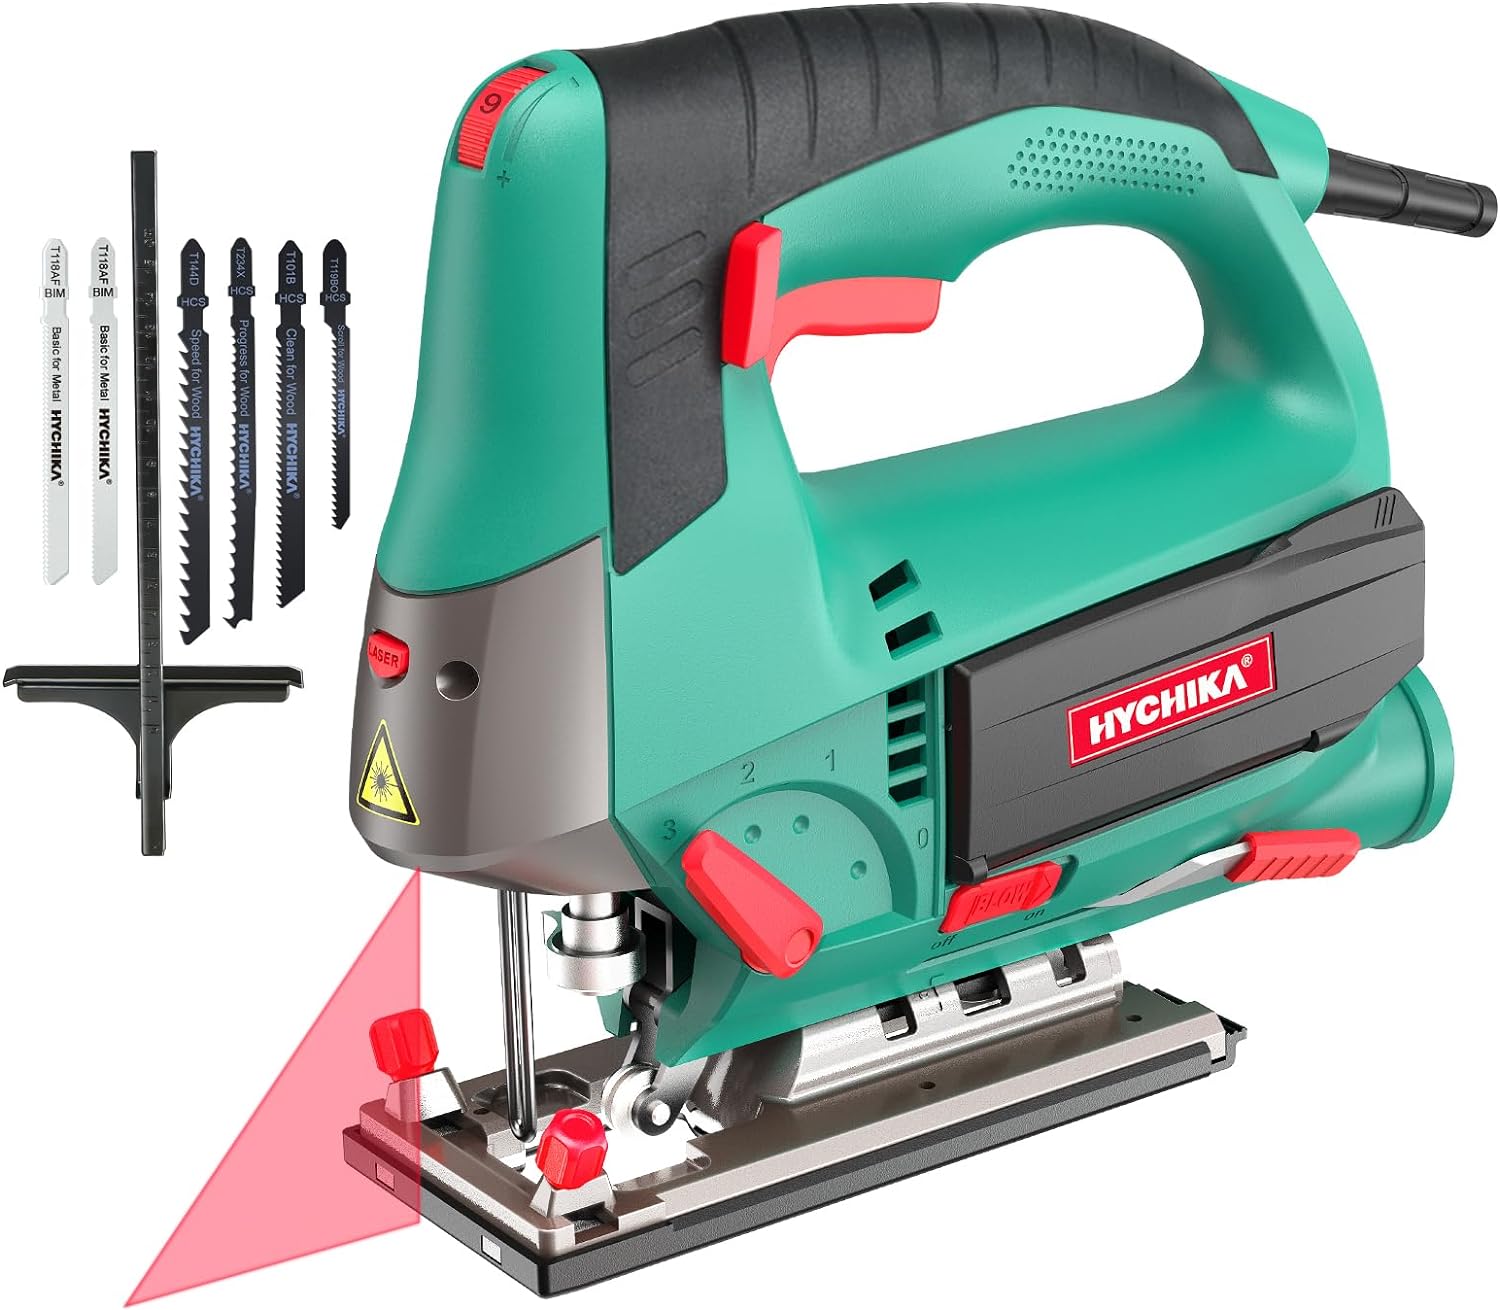
Figure 1.1: HYCHIKA 6.7A Jig Saw with accessories.
2. Safety Instructions
Always follow basic safety precautions to reduce the risk of fire, electric shock, and personal injury when operating power tools.
- Read the Manual: Familiarize yourself with all instructions and warnings before use.
- Personal Protective Equipment (PPE): Always wear safety glasses, hearing protection, and a dust mask. Use gloves when handling blades.
- Work Area: Keep the work area clean and well-lit. Cluttered or dark areas invite accidents.
- Electrical Safety: Ensure the power source matches the tool's requirements (110 Volts AC). Do not expose power tools to rain or wet conditions.
- Secure Workpiece: Always clamp or otherwise secure the material being cut to prevent movement during operation.
- Blade Safety: Ensure the blade is correctly installed and secured before starting. Never touch the blade while the tool is running.
- Avoid Overreaching: Maintain proper footing and balance at all times.
- Unplug When Not in Use: Disconnect the tool from the power source before making any adjustments, changing accessories, or storing the tool.
3. Product Components
Understand the different parts of your HYCHIKA Jig Saw for proper operation and maintenance.

Figure 3.1: Key components of the Jig Saw.
- Speed Adjusting Knob: Controls the cutting speed.
- Lock-on Button: Locks the trigger for continuous operation.
- On/Off Switch: Activates/deactivates the tool.
- On/Off Switch for Laser: Activates/deactivates the laser guide.
- Tool-Free Chuck: Mechanism for quick blade changes.
- Blade Storage Box: Conveniently stores extra saw blades.
- Blow Button: Activates the dust blower function.
- Pendulum Selector: Adjusts the orbital action setting.
- Base Plate: Supports the tool on the workpiece.
4. Setup
4.1 Blade Installation
The HYCHIKA Jig Saw features a quick-release chuck for tool-free blade changes.
- Rotate the blade switch 90 degrees.
- Insert the saw blade with the saw teeth facing outward until you hear a 'bip' sound, indicating it is securely seated.
- Release the blade switch to its original position. Ensure the blade switch is fully returned to its original position; otherwise, the blade may fall off during operation.
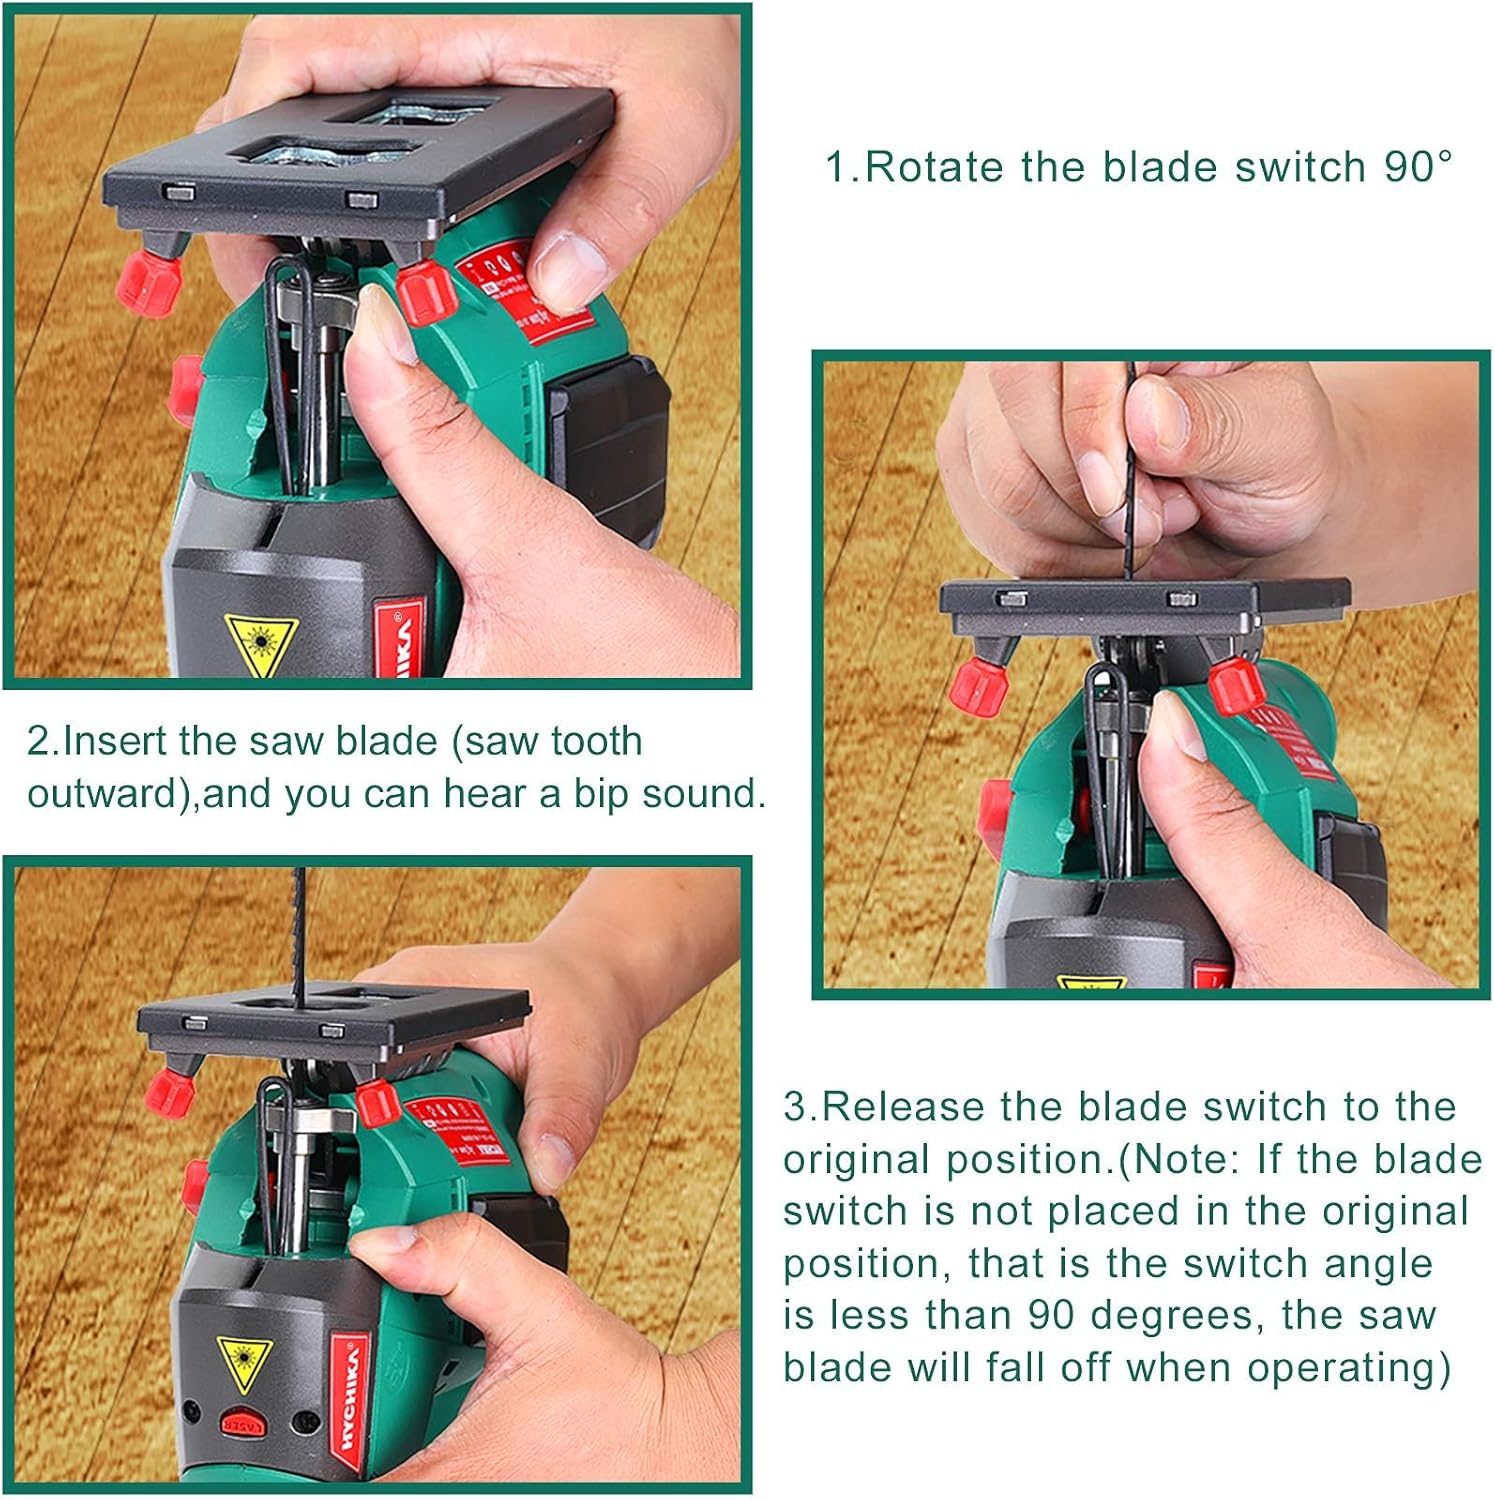
Figure 4.1: Blade installation process.
4.2 Adjusting Cutting Angle (Bevel Cutting)
The base plate can be adjusted for bevel cuts from -45° to 45°.
- Loosen the screws on the base plate.
- Tilt the base plate to the desired angle. Use a protractor for precise angles if needed.
- Tighten the screws securely to lock the base plate in position.

Figure 4.2: Bevel cutting angle adjustment.
4.3 Orbital Action Settings
The jig saw offers 0-3 orbital settings to suit different cutting materials and desired cut quality. Use the pendulum selector to choose the appropriate setting.
- Position 0 (Straight Cutting): For fine, precise cuts in wood, metal, or plastic.
- Position 1 (Small Curve Cutting): For small curve cuts or general cutting in harder materials.
- Position 2 (Middle Curve Cutting): For medium curve cuts or faster cutting in softer materials.
- Position 3 (Large Curve Cutting): For aggressive, fast cuts in soft materials like wood.

Figure 4.3: Orbital action and speed dial controls.
5. Operating Instructions
5.1 Powering On/Off and Speed Control
To start the jig saw, press the On/Off switch. To maintain continuous operation, press the lock-on button while the trigger is engaged. To stop, release the On/Off switch or press it again if the lock-on button is active.
The jig saw features 6 variable speed settings (800-3000 SPM) controlled by the speed adjusting knob. Adjust the speed according to the material being cut:
- Position 1-2: Plastic, Steel Plate
- Position 3-4: Stainless Plate, Aluminum
- Position 5-6: Wood
5.2 Cutting Materials
The jig saw is suitable for cutting wood, metal, and plastic. Always select the appropriate blade and orbital setting for the material.

Figure 5.1: Jig Saw in use for different materials.
When cutting, hold the jig saw firmly with enough force to decrease vibration, ensuring the base plate remains flush with the material for more precise cutting. The maximum cutting depth is 110 mm for wood and 10 mm for metal.
5.3 Laser Guide and Scale Ruler
Activate the built-in laser guide using its dedicated On/Off switch to assist with cutting direction and improve precision. The included guide ruler can be used to maintain a consistent cutting width.

Figure 5.2: Using the scale ruler and performing bevel cuts.
5.4 Dust Collection System
The jig saw features a dust blow button to clear the cutting line. For more comprehensive dust management, connect a vacuum cleaner to the dust extraction port (if applicable to your model) to keep your work area clean.

Figure 5.3: Features including laser guide, blade storage, and dust collection.
6. Maintenance
6.1 Cleaning
Regularly clean the tool to ensure optimal performance and longevity. Disconnect from power before cleaning.
- Use a soft cloth to wipe down the exterior of the tool.
- Clear any sawdust or debris from the ventilation openings and around the blade area.
- Do not use harsh chemicals or abrasive cleaners.
6.2 Blade Storage
The jig saw features magnetic blade storage boxes on both sides for convenient and secure storage of saw blades, preventing loss and keeping them readily accessible.

Figure 6.1: Integrated blade storage box.
7. Troubleshooting
| Problem | Possible Cause | Solution |
|---|---|---|
| Tool does not start | No power supply; Faulty switch | Check power connection; Contact customer support |
| Blade falls out during operation | Blade not inserted correctly; Blade switch not fully returned | Ensure blade is fully seated and 'bips'; Verify blade switch is in original position |
| Excessive vibration | Loose blade; Incorrect orbital setting for material; Workpiece not secured | Check blade installation; Adjust orbital setting; Secure workpiece firmly |
| Poor cutting performance | Dull or incorrect blade; Incorrect speed setting | Replace blade; Use appropriate blade type; Adjust speed setting |
8. Specifications
| Feature | Specification |
|---|---|
| Model | JS-100C |
| Power Source | Corded Electric |
| Voltage | 110 Volts (AC) |
| Current Rating | 6.7 Amps |
| Wattage | 800 watts |
| Speed | 800-3000 SPM (Strokes Per Minute) |
| Stroke Length | 0.87 inches (22mm) |
| Cutting Depth (Wood) | 4.33 inches (110 mm) |
| Cutting Depth (Metal) | 0.39 inches (10 mm) |
| Adjustable Cutting Angle | -45° to 45° |
| Orbital Settings | 0-3 Positions |
| Included Components | 6 x T-shank Blades, 1 x Guide Ruler, 1 x User Manual |
| Item Weight | 6.6 pounds |
| Product Dimensions | 13.2"L x 12"W x 3.9"H |
9. Warranty and Support
The HYCHIKA Jig Saw comes with a limited warranty. For detailed warranty information, please refer to the warranty card included with your product or visit the official HYCHIKA website. For technical support, replacement parts, or any inquiries, please contact HYCHIKA customer service through their official channels.
Manufacturer: HYCHIKA BETTER TOOLS FOR BETTER LIFE
UPC: 632111630007
Part Number: E0009US-ZW
Related Documents - JS-100C
 |
Jackery Solar Generator Connection Guide: SolarSaga Panels to Explorer Power Stations A comprehensive guide detailing how to connect Jackery SolarSaga solar panels (models JS-40A, SPL061, JS-80A, JS-100A, JS-100C, JS-100D, JS-100E, JS-100F, JS-200A, JS-200C, JS-200D, JS-85A, JS-500A) to various Jackery Explorer power station models using USB-C, DC7909, and DC8020 input ports. |
 |
Jackery Solar Generator Connection Guide: SolarSaga Panels to Power Stations Comprehensive guide detailing how to connect various Jackery SolarSaga solar panel models (JS-80A, JS-100F, JS-200D, SPL061, JS-40A, JS-100D, JS-100E, JS-100C, SPL101, JS-200C, SPL201) to compatible Jackery portable power stations using different DC input types and adapters. |
 |
Panasonic POS Workstation JS-960WS Series Operating Instructions Operating instructions for the Panasonic POS Workstation, JS-960WS Series. This manual provides detailed information on installation, usage, maintenance, and troubleshooting. |
 |
Panasonic JS-950 Series POS Workstation User Manual User's manual for the Panasonic JS-950 series POS Workstation, providing setup, operation, and safety guidelines. Includes product details and troubleshooting information. |
 |
FAR TOOLS JS 570C Professional Jig Saw User Manual Comprehensive user manual for the FAR TOOLS JS 570C Professional Jig Saw, covering operation, safety instructions, parts identification, assembly, maintenance, technical specifications, and warranty information. |
 |
Benchdog Tools Essential Hinge Jig Setup Instructions Comprehensive guide detailing the setup and usage of the Benchdog Tools Essential Hinge Jig for precise door hinge routing. Includes component identification and step-by-step assembly instructions. |
Ask a question about this manual
Ask about setup, troubleshooting, compatibility, parts, safety, or missing instructions. Manuals+ will review the question and use this page’s manual context to help answer it.