Introduction
Thank you for choosing the ARCORA Pull-Out Kitchen Faucet, Model 2310300. This manual provides essential information for the safe installation, proper operation, and effective maintenance of your new kitchen faucet. Please read these instructions thoroughly before installation and keep them for future reference.
Safety Information
- Always turn off the main water supply before beginning any installation or maintenance.
- Wear appropriate personal protective equipment, such as safety glasses and gloves, during installation.
- Ensure all connections are secure to prevent leaks. Do not overtighten.
- If you are unsure about any part of the installation, consult a qualified plumber.
- Keep small parts away from children to prevent choking hazards.
Package Contents
Verify that all components are present before beginning installation:
- Kitchen Faucet (Main Unit)
- 2 Flexible Connection Hoses (50 cm)
- Gravity Ball
- Mounting Hardware
- Installation Gloves
- User Manual

Figure 1: Included Components
Specifications
| Feature | Detail |
|---|---|
| Brand | ARCORA |
| Model Number | 2310300 |
| Color | Brushed Nickel |
| Material | Stainless Steel |
| Product Dimensions (L x W x H) | 10 x 28 x 38 cm |
| Item Weight | 1.46 Kilograms |
| Mounting Type | Deck Mounted |
| Number of Handles | 1 |
| Number of Holes Required | 1 |
| Special Feature | 360° Swivel Spout, Pull-Out Spray Head |

Figure 2: Faucet Dimensions and Installation Requirements
Setup and Installation
Before you begin, ensure you have the necessary tools: adjustable wrench, screwdriver, plumber's tape, and a bucket.
- Prepare the Sink: Turn off the main water supply. Clear the area under the sink. Remove any existing faucet. Ensure the mounting hole in your sink or countertop is 35mm in diameter and the countertop thickness does not exceed 35mm.
- Install the Faucet: Insert the faucet body into the mounting hole. From underneath the sink, slide the rubber washer, metal washer, and then the mounting nut onto the threaded shank. Tighten the mounting nut securely using the provided mounting hardware.
- Connect Water Supply Hoses: Attach the hot and cold flexible connection hoses to the corresponding water supply lines (typically red for hot, blue for cold). Use plumber's tape on the threads and tighten with an adjustable wrench. Connect the other end of the hoses to the faucet's inlets.
- Install the Gravity Ball: Attach the gravity ball to the pull-out hose underneath the sink. This weight helps the spray head retract smoothly. Position it approximately 15-20 cm from the end of the hose connection.
- Test for Leaks: Once all connections are made, slowly turn on the main water supply. Check all connections for any signs of leaks. If leaks occur, tighten the connections as needed.

Figure 3: Securing the Faucet with Mounting Wedge

Figure 4: Connecting the Pull-Out Hose
Operating Instructions
Your ARCORA kitchen faucet is designed for ease of use and versatility.
Water Flow and Temperature Control
The single lever handle controls both water flow and temperature. Lift the handle to increase water flow. Move the handle left for hot water and right for cold water.
Spray Head Functions
The pull-out spray head features multiple spray modes for various tasks:
- Stream Mode: Provides a soft, aerated flow suitable for filling pots and general washing.
- Spray Mode: Delivers a high-pressure spray for rinsing dishes and removing stubborn food particles.
- Sweep Mode (Blade Spray): A powerful, wide blade of water for efficient cleaning of the sink and large surfaces.
Press the button on the spray head to switch between these modes.

Figure 5: Switching Between Spray Modes

Figure 6: Faucet Features Overview
Pull-Out and Swivel Functionality
The spray head can be pulled out from the spout for extended reach, making it easy to clean all areas of your sink. The faucet also features a 360° swivel spout, allowing for flexible positioning and use across multiple sink basins.
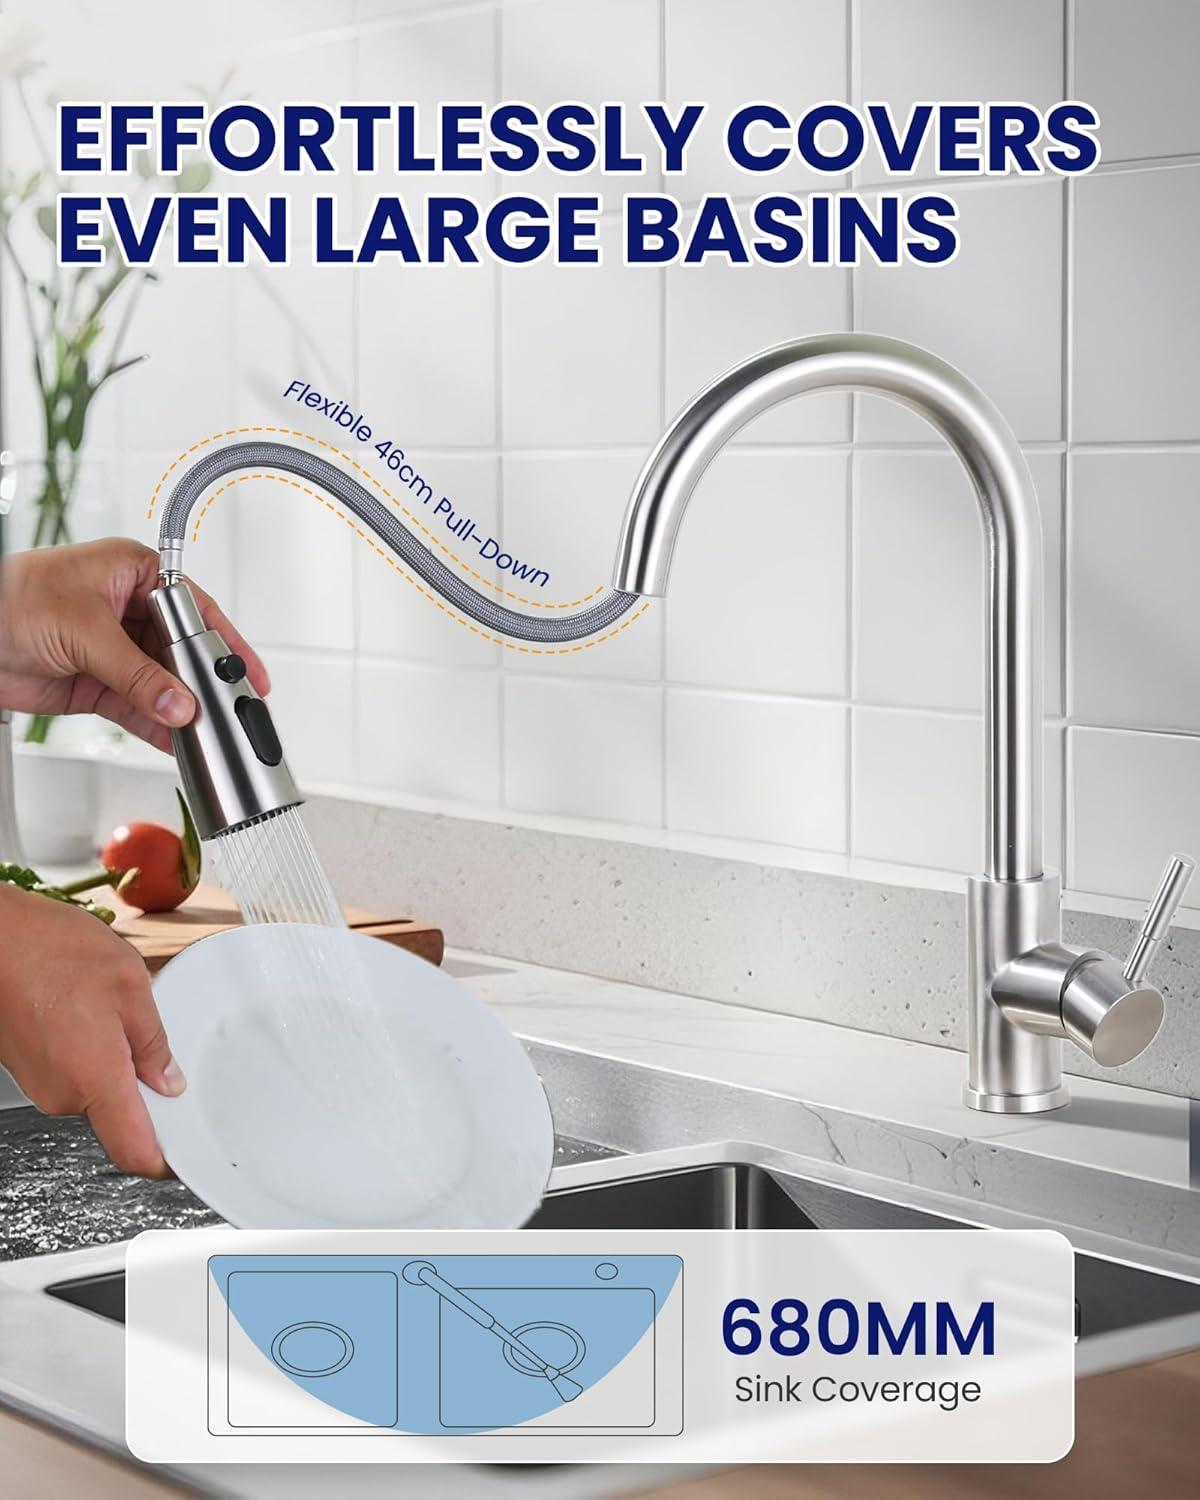
Figure 7: Pull-Out Feature for Wide Sink Coverage

Figure 8: 360° Swivel Spout and Multi-Directional Spray
Maintenance
Cleaning the Faucet
To maintain the finish of your faucet, clean it regularly with a soft cloth and mild soap. Avoid abrasive cleaners, harsh chemicals, or scouring pads, as these can damage the brushed nickel finish.
Cleaning the Aerator
If water flow becomes restricted, the aerator may be clogged with mineral deposits. The aerator is detachable for easy cleaning. Unscrew the aerator from the spray head, rinse it under running water, and use a soft brush to remove any debris. Reattach the aerator securely.
Ceramic Cartridge
The faucet is equipped with a high-quality ceramic cartridge designed for drip-free performance and long-lasting durability. No regular maintenance is required for the cartridge itself, but ensuring clean water supply can prolong its lifespan.

Figure 9: Drip-Free Ceramic Cartridge
Troubleshooting
| Problem | Possible Cause | Solution |
|---|---|---|
| Low Water Flow | Clogged aerator; partially closed shut-off valve; kinked supply hose. | Clean the aerator. Ensure shut-off valves are fully open. Check supply hoses for kinks. |
| Leaks from Faucet Base | Loose mounting nut; damaged O-rings. | Tighten the mounting nut. Inspect and replace O-rings if damaged. |
| Leaks from Hose Connections | Loose connections; missing or damaged washers. | Ensure all hose connections are tight. Check for and replace any damaged washers. |
| Spray Head Does Not Retract | Gravity ball improperly positioned or obstructed. | Check the position of the gravity ball and ensure it moves freely without obstruction. |
Warranty
This ARCORA product comes with a 3-year warranty from the date of purchase. This warranty covers manufacturing defects under normal use. It does not cover damage caused by improper installation, misuse, abuse, accident, or normal wear and tear. Please retain your proof of purchase for warranty claims.
Support
For further assistance, technical support, or warranty inquiries, please contact ARCORA customer service through the retailer where the product was purchased or visit the official ARCORA website for contact information.