1. Introduction
Thank you for choosing the ChefWave 12.6 Quart Air Fryer and Dehydrator. This versatile appliance is designed to provide a healthier alternative to traditional frying, utilizing 1600W of power for efficient cooking. It features an upgraded dial and blue light touch controls, 16 preset functions, and a large capacity suitable for various culinary tasks, including air frying, dehydrating, roasting, broiling, and baking. This manual provides essential information for safe operation, maintenance, and troubleshooting to ensure optimal performance of your appliance.
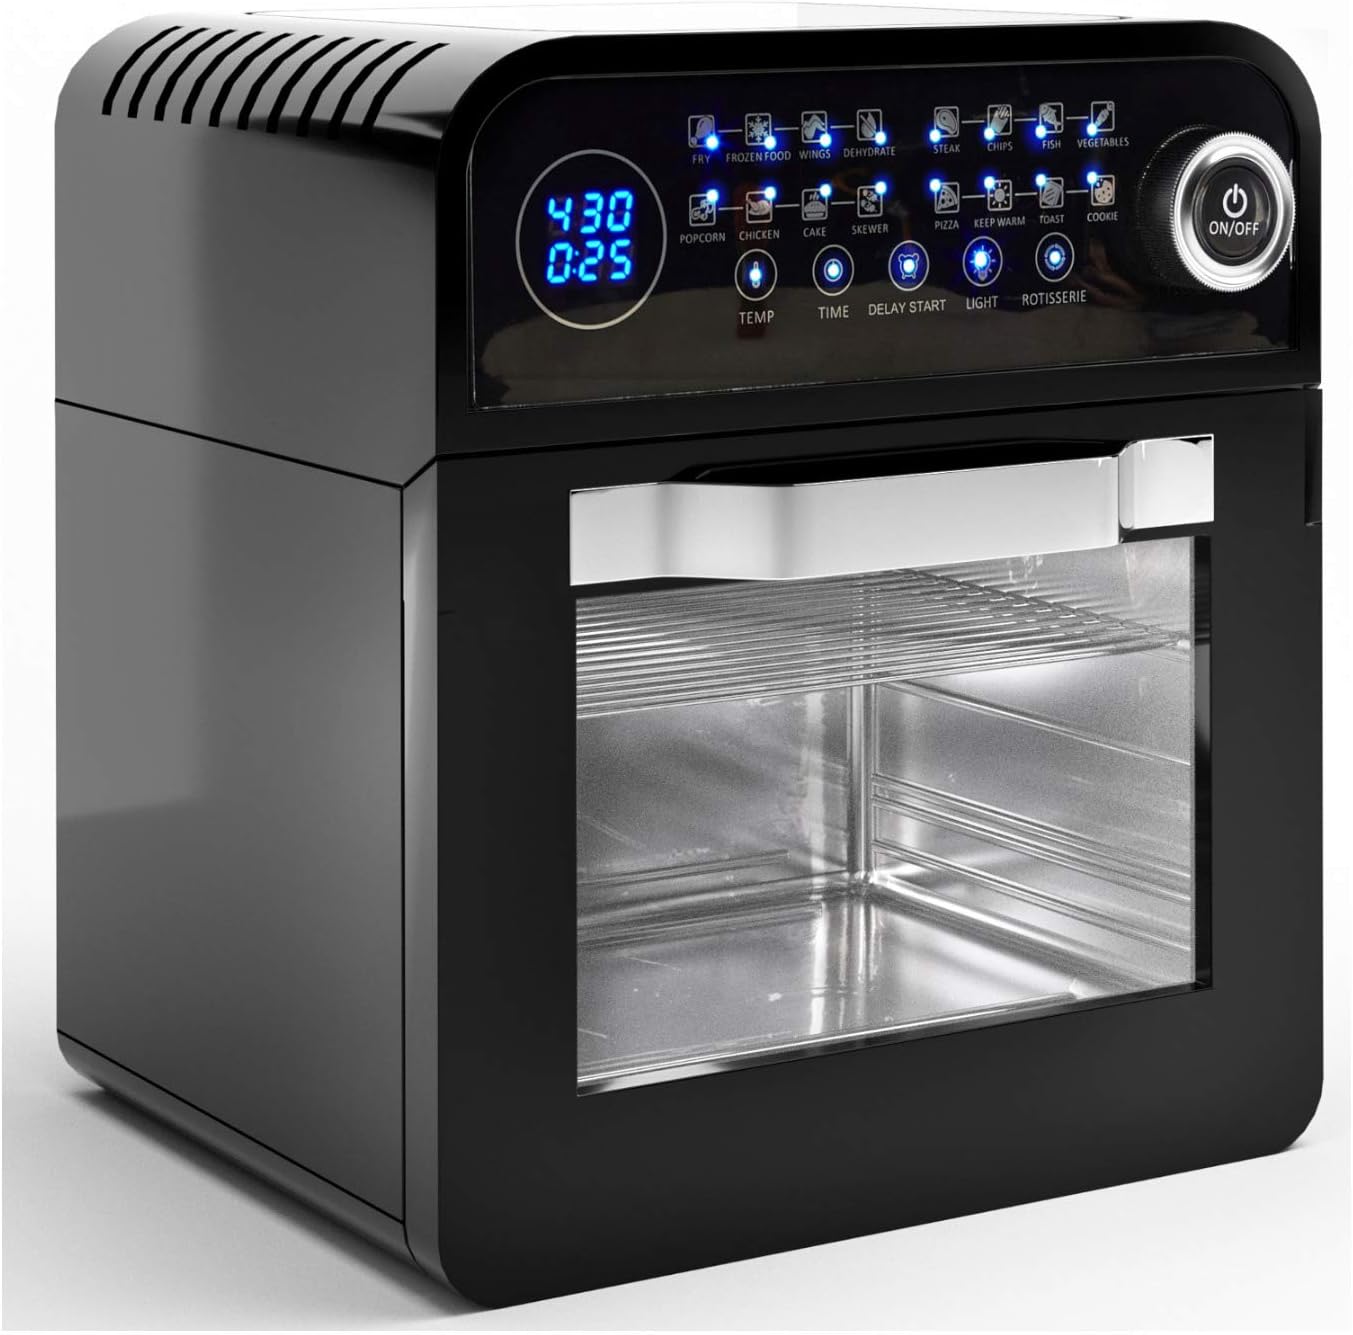
Image: Front view of the ChefWave 12.6 Quart Air Fryer and Dehydrator, showcasing its digital display and control panel.
2. Important Safety Instructions
WARNING: To reduce the risk of fire, electric shock, or injury, always follow these basic safety precautions.
- Read all instructions before using the appliance.
- Do not touch hot surfaces. Use handles or knobs.
- To protect against electrical shock, do not immerse cord, plugs, or the main unit in water or other liquid.
- Close supervision is necessary when any appliance is used by or near children.
- Unplug from outlet when not in use and before cleaning. Allow to cool before putting on or taking off parts.
- Do not operate any appliance with a damaged cord or plug, or after the appliance malfunctions or has been damaged in any manner.
- The use of accessory attachments not recommended by the appliance manufacturer may cause injuries.
- Do not use outdoors.
- Do not let cord hang over edge of table or counter, or touch hot surfaces.
- Do not place on or near a hot gas or electric burner, or in a heated oven.
- Extreme caution must be used when moving an appliance containing hot oil or other hot liquids.
- Always attach plug to appliance first, then plug cord into the wall outlet. To disconnect, turn any control to "off", then remove plug from wall outlet.
- Do not use appliance for other than intended use.
- Ensure adequate ventilation around the appliance during use.
3. Product Components and Accessories
Your ChefWave Air Fryer comes with a variety of accessories to enhance your cooking experience. Familiarize yourself with each component:
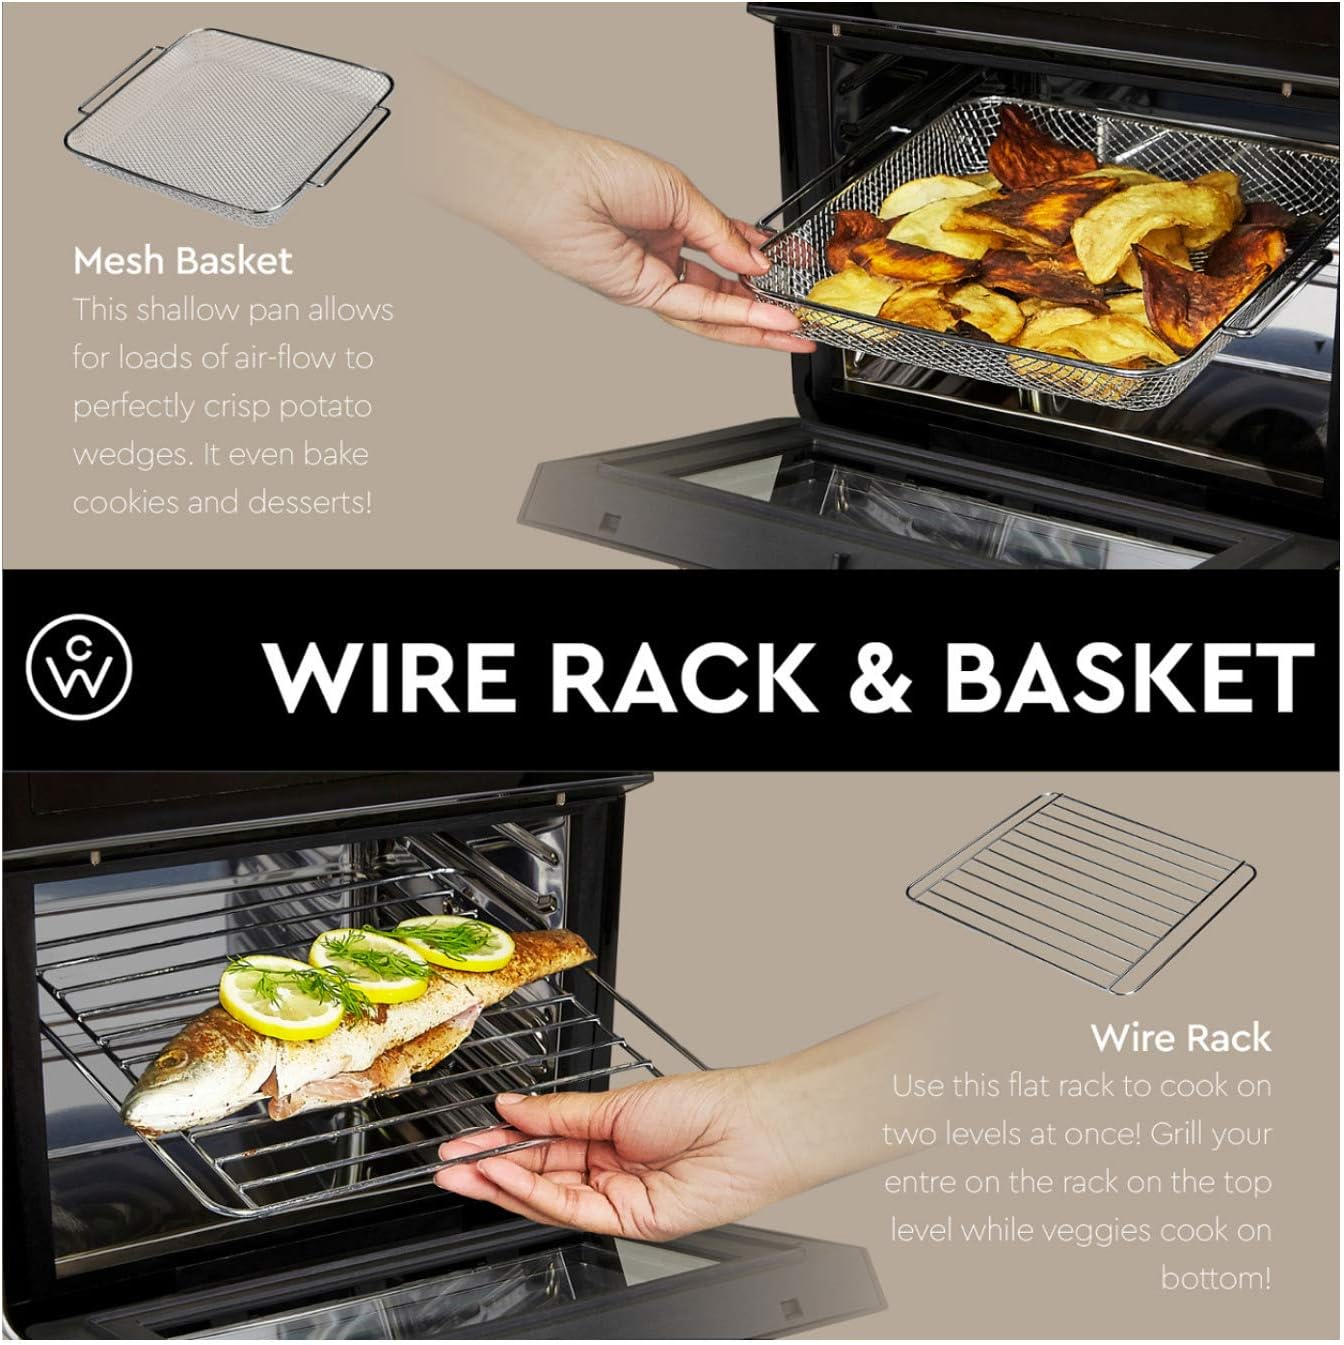
Image: Visual representation of the eight cooking accessories included with the ChefWave Air Fryer.
Skewer Rack
Used for cooking kebabs and other skewered items. Designed to hold multiple skewers for even cooking.
Drip Tray
Placed at the bottom of the unit to catch excess oil and food drippings, making cleanup easier.
Baking Cage
Ideal for tumbling foods like french fries, nuts, or coffee beans, ensuring even crisping and cooking.
Mesh Basket
A shallow pan with a mesh bottom, perfect for air-frying smaller items like potato wedges or for baking cookies.
Frying Basket
A deep basket with a handle, suitable for sautéing vegetables, frying meats, and chicken.
Wire Rack
A flat rack used for cooking on multiple levels or for grilling various food items.
Rotisserie Spit
Used in conjunction with the rotisserie tool to roast whole chickens or other large cuts of meat, ensuring even cooking and browning.
Handle Tool
A specialized tool designed to safely remove hot accessories like the rotisserie spit or baking cage from the appliance.
Recipe Book
Provides a collection of recipes tailored for use with your ChefWave Air Fryer.
4. Setup and First Use
- Unpacking: Carefully remove all components and accessories from the packaging. Retain the packaging for future storage or transport.
- Initial Cleaning: Before first use, wash all removable accessories (drip tray, baskets, racks, rotisserie tools) with warm soapy water. Wipe the interior and exterior of the main unit with a damp cloth. Ensure all parts are completely dry before assembly.
- Placement: Place the air fryer on a stable, heat-resistant, and level surface. Ensure there is at least 6 inches of clear space on all sides and above the appliance to allow for proper air circulation. Do not place it directly against a wall or under cabinets.
- Power Connection: Plug the power cord into a grounded electrical outlet. Ensure the voltage matches the specifications of your appliance (120V).
- Pre-heating (Optional): For the first use, it is recommended to run the air fryer empty for about 10-15 minutes at 350°F (175°C) to burn off any manufacturing residues. A slight odor may be present, which is normal. Ensure the area is well-ventilated.

Image: Diagram showing the dimensions of the ChefWave Air Fryer and highlighting features like the rotating dial and dual cooking levels.
5. Operating Instructions
5.1 Control Panel Overview
The ChefWave Air Fryer features an intuitive control panel with an upgraded dial and blue light touch controls. The digital display shows time and temperature settings.

Image: Close-up of the ChefWave Air Fryer's control panel, showing the digital display, touch buttons, and rotating dial.
- Power Button: Turns the unit on/off.
- Rotating Dial: Used to adjust temperature and time, and to select presets.
- Temperature (TEMP) Button: Activates temperature adjustment mode.
- Time (TIME) Button: Activates time adjustment mode.
- Delay Start Button: Allows you to set a delayed start time for cooking.
- Light Button: Turns the interior light on/off to monitor cooking progress.
- Rotisserie Button: Activates the rotisserie function for rotating foods.
- Preset Icons: 16 dedicated icons for various food types (e.g., Fry, Frozen Food, Wings, Dehydrate, Steak, Chips, Fish, Vegetables, Popcorn, Chicken, Cake, Skewer, Pizza, Keep Warm, Cookie).
5.2 Basic Operation
- Power On: Plug in the appliance. Press the Power button to turn on the display.
- Select Function/Preset:
- Using Presets: Touch the desired preset icon (e.g., "Wings"). The appliance will automatically set the optimal time and temperature for that food.
- Manual Setting: Press the TEMP button, then use the rotating dial to adjust the temperature. Press the TIME button, then use the rotating dial to adjust the cooking time.
- Start Cooking: Once settings are confirmed, press the Power button again to start the cooking cycle.
- Monitoring: Use the Light button to check on your food without opening the door.
- Completion: The appliance will beep when the cooking cycle is complete. Carefully remove food using heat-resistant mitts and the handle tool for accessories.
5.3 Using Specific Accessories
The ChefWave Air Fryer supports various cooking methods with its included accessories:

Image: Demonstration of using the rotisserie tool to cook a whole chicken, highlighting the even cooking provided by rotation.
- Rotisserie Cooking:
Assemble the rotisserie spit with your food (e.g., whole chicken). Insert the spit into the rotisserie slots inside the oven. Press the Rotisserie button on the control panel to activate rotation. This ensures succulent, juicy, and crispy results.
- Baking Cage & Frying Basket:

Image: Visual guide for using the baking cage for french fries and the frying basket for chicken and vegetables.
The baking cage is ideal for foods that benefit from tumbling, such as french fries or roasted vegetables, for even crisping. The frying basket is suitable for larger quantities of food or items that require less movement. Use the handle tool to insert and remove these accessories safely.
- Mesh Basket & Wire Rack:

Image: Examples of using the mesh basket for potato wedges and the wire rack for grilling fish, demonstrating multi-level cooking.
The mesh basket provides excellent air-flow for crispy results on items like potato wedges or even cookies. The wire rack can be used for grilling, toasting, or for multi-level cooking, allowing you to cook different items simultaneously.
6. Cleaning and Maintenance
Regular cleaning ensures the longevity and optimal performance of your ChefWave Air Fryer. Always unplug the appliance and allow it to cool completely before cleaning.
- Main Unit: Wipe the exterior with a soft, damp cloth. Do not use abrasive cleaners or scourers. Never immerse the main unit in water or any other liquid.
- Interior: Wipe the interior walls with a damp cloth and mild detergent. For stubborn food residue, a non-abrasive sponge can be used. Ensure the interior is completely dry before next use.
- Accessories: All removable accessories (drip tray, baskets, racks, rotisserie tools) are dishwasher safe for convenient cleaning. Alternatively, wash them with warm soapy water and a non-abrasive sponge. Rinse thoroughly and dry completely.
- Heating Element: If necessary, gently clean the heating element with a soft brush to remove any food particles. Do not use water or cleaning solutions directly on the heating element.
- Storage: Store the appliance in a cool, dry place when not in use. Ensure it is clean and dry before storing.
7. Troubleshooting Guide
If you encounter issues with your ChefWave Air Fryer, consult the following table for common problems and solutions:
| Problem | Possible Cause | Solution |
|---|---|---|
| Appliance does not turn on. | Not plugged in; Power button not pressed; Power outlet malfunction. | Ensure the power cord is securely plugged into a working outlet. Press the Power button firmly. Test the outlet with another appliance. |
| Food is not cooked evenly. | Overcrowding the basket; Incorrect temperature/time; Food not rotated/shaken. | Cook food in smaller batches. Adjust temperature and time as per recipe. Shake or turn food halfway through cooking for even results. |
| White smoke coming from the appliance. | Grease/oil residue from previous use; High-fat food cooking. | Clean the drip tray and interior thoroughly after each use. For high-fat foods, place a small amount of water in the drip tray to prevent smoke. |
| Appliance door does not close properly. | Food or accessory obstructing the door; Misalignment. | Ensure no food or accessories are blocking the door. Gently push the door firmly until it latches. If persistent, contact customer support. |
| Food is not crispy. | Too much moisture; Overcrowding; Insufficient cooking time/temperature. | Pat food dry before air frying. Do not overcrowd the basket. Increase cooking time or temperature slightly. A light coating of oil can also help. |
8. Product Specifications
| Feature | Detail |
|---|---|
| Brand | ChefWave |
| Model | 12.6 Quart Air Fryer and Dehydrator |
| Capacity | 12.6 Quarts (2.27 Liters) |
| Wattage | 1600 Watts |
| Voltage | 120 Volts |
| Control Method | Touch and Dial |
| Material | Plastic, Glass |
| Product Dimensions | 9.1 x 9.1 x 9.1 inches |
| Item Weight | 21.5 pounds |
| Dishwasher Safe Parts | Yes (Accessories) |
| Special Features | Temperature Control, 16 Presets, Dehydrator Function, Rotisserie Function |
| Recommended Uses | Roast, Broil, Bake, Defrost, Dehydrate |
| UPC | 663701805970 |
| ASIN | B07RZ8L841 |
9. Warranty Information
Specific warranty details for your ChefWave 12.6 Quart Air Fryer and Dehydrator are typically provided with your purchase documentation or on the manufacturer's official website. Please refer to these resources for comprehensive information regarding warranty coverage, terms, and conditions.
10. Customer Support
For technical assistance, parts replacement, or any inquiries not covered in this manual, please contact ChefWave customer support. Contact information can typically be found on the product packaging, the official ChefWave website, or your purchase receipt.
For more information, visit the official ChefWave Store: ChefWave Store on Amazon