1. Introduction
This manual provides comprehensive instructions for the installation, operation, and maintenance of your Dyno Racing 2-inch (52mm) Digital LED Exhaust Gas Temperature (EGT) Gauge. This instrument is designed to accurately monitor exhaust gas temperature in 12-volt gasoline vehicles, offering both digital and analog LED displays for clear readings and an integrated warning function.
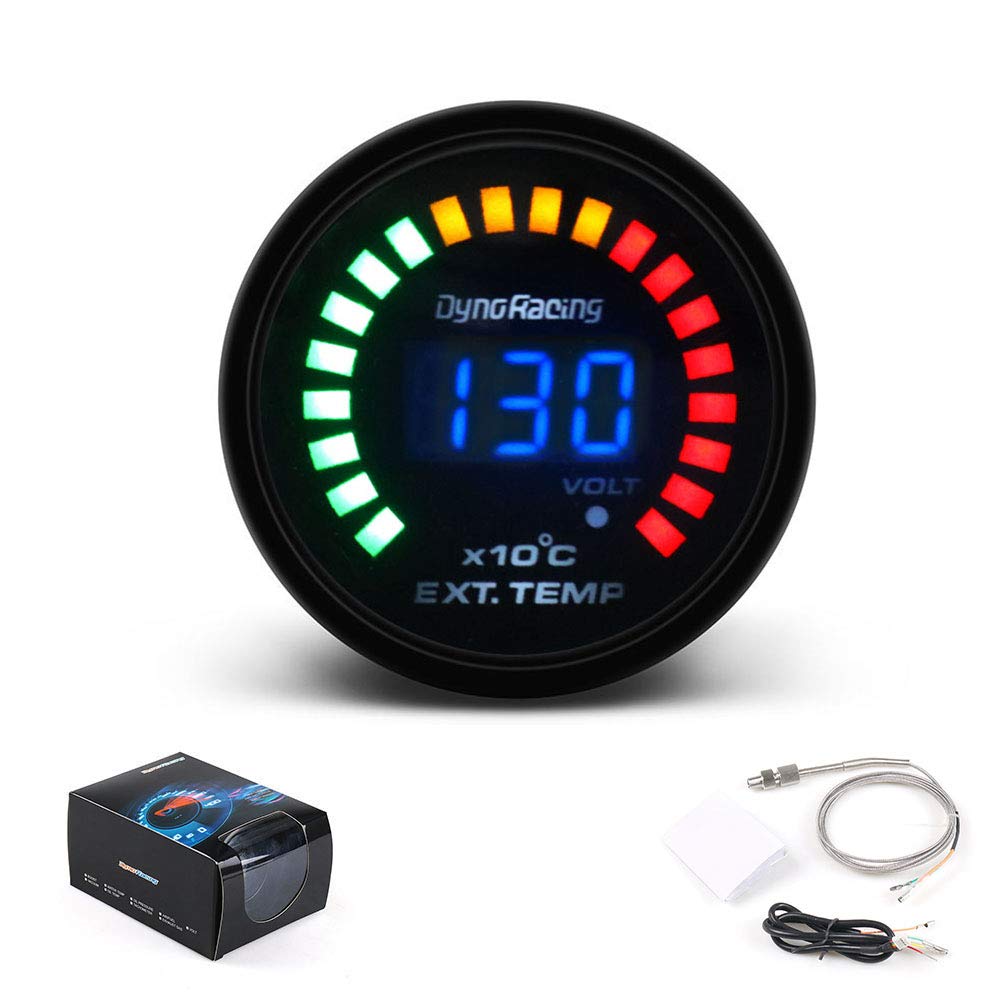
Figure 1.1: Front view of the Dyno Racing EGT Gauge, showing its digital temperature and voltage display along with the LED bar graph.
2. Product Features
- Size: 2-inch (52 mm) diameter gauge.
- Compatibility: Suitable for most 12-volt gasoline vehicles.
- Mounting: Designed to fit 2-inch or 52mm diameter gauge pod holders.
- Display Scan: Features a dynamic LED scanning display (green-yellow-RED-yellow-green) for quick visual reference.
- Visibility: Smoked tint lens when the gauge is off, revealing a vibrant color LED display when powered on.
- Functionality: Includes electrics voltage display and a warning function.
3. Package Contents
Verify that all components listed below are present in your package. If any items are missing or damaged, please contact your retailer.

Figure 3.1: Overview of the items included in the product package.
- Dyno Racing 2-inch (52mm) Digital LED EGT Gauge
- EGT Sensor (Probe)
- Wiring Harness
- Mounting Ring/Bracket
- Instruction Sheet (basic)

Figure 3.2: Detailed view of the EGT sensor and its wiring.
4. Specifications
| Specification | Value |
|---|---|
| Brand | Dyno Racing |
| Model Number | BX101458 |
| Gauge Diameter | 2 inches (52 mm) |
| Item Weight | 240 g |
| Package Dimensions | 15.9 x 11.91 x 8.41 cm |
| UPC | 723990850690 |
| Power Requirement | 12-volt DC (Gasoline Vehicle) |
| Display Type | Digital and Analog LED |
| Lens Type | Smoked Tint (when off) |

Figure 4.1: Key dimensions of the EGT Gauge for installation planning.
5. Setup and Installation
5.1 Safety Precautions
- Disconnect the vehicle's battery before beginning any electrical work.
- Ensure proper insulation for all wiring connections to prevent short circuits.
- Mount the gauge securely to avoid vibration damage or obstruction of driver's view.
- Consult a professional automotive technician if you are unsure about any installation steps.
5.2 Mounting the Gauge
The gauge is designed to fit into a standard 2-inch (52mm) diameter opening. Use the provided mounting ring or a compatible gauge pod holder to secure the gauge in your desired location within the vehicle's cabin.

Figure 5.1: Rear view of the gauge, illustrating mounting points and electrical terminals.
5.3 Wiring Instructions
Refer to the electrical diagram below for correct wiring connections. Ensure all connections are tight and properly insulated.

Figure 5.2: Electrical wiring diagram for the Exhaust Gas Temperature Gauge.
- Red Wire: Connect to a switched 12V (+) power source (e.g., Ignition Switch 12V+). This provides power when the ignition is on.
- Yellow Wire: Connect to a switched 12V (+) power source (e.g., Ignition Switch 12V+). This typically provides power for illumination or memory.
- Black Wire: Connect to a reliable chassis ground or battery negative (-).
- Orange Wire: Connect to one terminal of the EGT sensor.
- Green Wire: Connect to the other terminal of the EGT sensor.
EGT Sensor Installation: Install the EGT sensor probe into the exhaust manifold or exhaust pipe at a location that provides an accurate reading of exhaust gas temperature. Ensure the sensor is securely tightened and sealed to prevent exhaust leaks.
6. Operating Instructions
Once properly installed and powered, the gauge will perform a self-test sequence and then display the current exhaust gas temperature and vehicle voltage.
6.1 Reading the Display
- The central digital display shows the exhaust gas temperature in degrees Celsius (x10°C) and the vehicle's voltage (VOLT).
- The outer LED bar graph provides an analog representation of the temperature, with colors typically indicating temperature ranges: green for normal, yellow for elevated, and red for high/critical temperatures.
- The gauge features a scanning display (green-yellow-RED-yellow-green) during startup or as a visual indicator.

Figure 6.1: Examples of the gauge display under different operating conditions.
6.2 Warning Function
The gauge is equipped with a warning function. If the exhaust gas temperature exceeds a pre-set critical level, the gauge's display, particularly the red LEDs, will activate or flash to alert the driver. Consult the specific warning threshold in the included basic instruction sheet if available, or observe the red LED activation as an indicator of high EGT.
7. Maintenance
- Cleaning: Use a soft, dry cloth to clean the gauge face. Avoid abrasive cleaners or solvents that could damage the lens or housing.
- Inspection: Periodically check all wiring connections for tightness and signs of wear or corrosion. Ensure the EGT sensor is securely mounted and free from damage.
- Sensor Longevity: EGT sensors are exposed to extreme conditions. While durable, they may require replacement over time due to wear. Monitor for inconsistent readings as an indicator of sensor degradation.
8. Troubleshooting
- Gauge Does Not Power On:
- Check all power (Red, Yellow) and ground (Black) connections for proper contact and voltage.
- Verify that the vehicle's ignition is on.
- Check for blown fuses in the vehicle's electrical system.
- Incorrect or Erratic Readings:
- Ensure the EGT sensor is correctly wired (Orange and Green wires).
- Check the EGT sensor for damage or improper installation in the exhaust.
- Verify that the sensor cable is not pinched or damaged.
- LEDs Not Functioning Correctly:
- Confirm stable 12V power supply.
- If only certain LEDs are affected, there might be an internal fault requiring professional service.
9. Warranty and Support
Dyno Racing products are manufactured to high-quality standards. For specific warranty information, please refer to the documentation provided with your purchase or contact your retailer. For technical support or inquiries regarding your EGT gauge, please reach out to the Dyno Racing customer service department or your authorized dealer.