Product Overview
The QIACHIP Universal Wireless Ceiling Fan Remote Control Kit is designed to convert traditional ceiling fans with lights into remote-controlled units. This kit includes a remote control transmitter and a receiver, offering convenient control over fan speeds, light operation, and timing functions. It is compatible with most major ceiling fan brands, providing an updated and safer control solution.

Image: The QIACHIP remote control transmitter and receiver unit.
Key Features
- Universal Compatibility: Works with most ceiling fan lights, including popular brands like Hunter, Harbor Breeze, Westinghouse, and Honeywell.
- 3-Speed Fan Control: Offers High, Medium, and Low fan speed settings.
- Light Control: Dedicated button for turning the fan light On/Off (non-dimming).
- 4 Timing Settings: Includes 1-hour, 2-hour, 4-hour, and 8-hour timer functions for automatic fan shutdown.
- Silent Operation: Utilizes semiconductor switches instead of mechanical relays to reduce switching noise.
- Compact Receiver: Designed to fit within most fan housings (verify dimensions before purchase).

Image: Illustration of the remote control highlighting the timing function buttons.
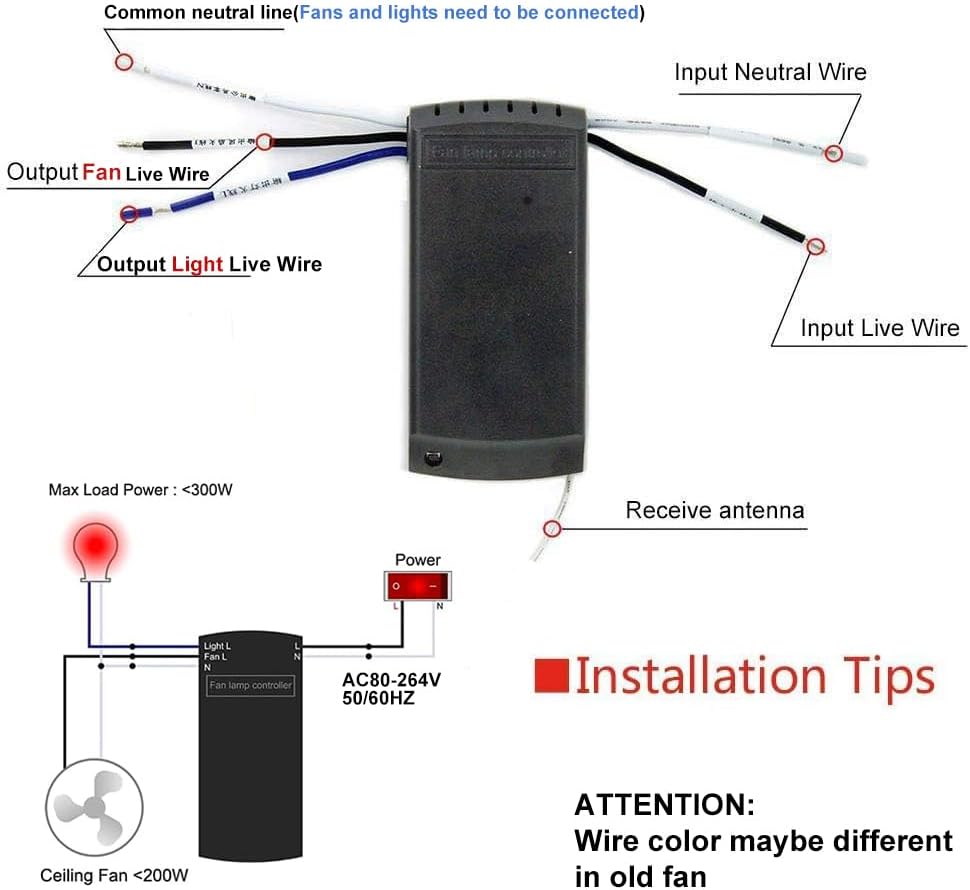
Image: Visual representation of the three fan speed settings (Low, Medium, High) controlled by the remote.
Package Contents
Please ensure all items are present before beginning installation:
- 1 x Remote Control Transmitter
- 1 x Receiver Unit
- Wire Nuts (for electrical connections)

Image: The QIACHIP Ceiling Fan Remote Control Kit, including the remote, receiver, and wire nuts, as packaged.
Technical Specifications
| Specification | Value |
|---|---|
| Model Number | KLC-220V |
| Material | Acrylonitrile Butadiene Styrene (ABS) |
| Receiver Dimensions (LxWxH) | 4.53" x 2.13" x 1.06" (11.5cm x 5.4cm x 2.7cm) |
| Input Voltage | AC80-264V, 50/60Hz |
| Max Load Power (Fan) | <200W |
| Max Load Power (Light) | <300W (Incandescent), <1000W (LED/Energy Saving Lamp) |
| Control Method | Remote Control (Wireless) |
| Remote Batteries Required | 2 x AAA batteries (not included) |
| Capacitor Compatibility | T4+5 µF (starting 4 µF/running 5 µF) - most compatible if existing running capacitor is 5 µF. |
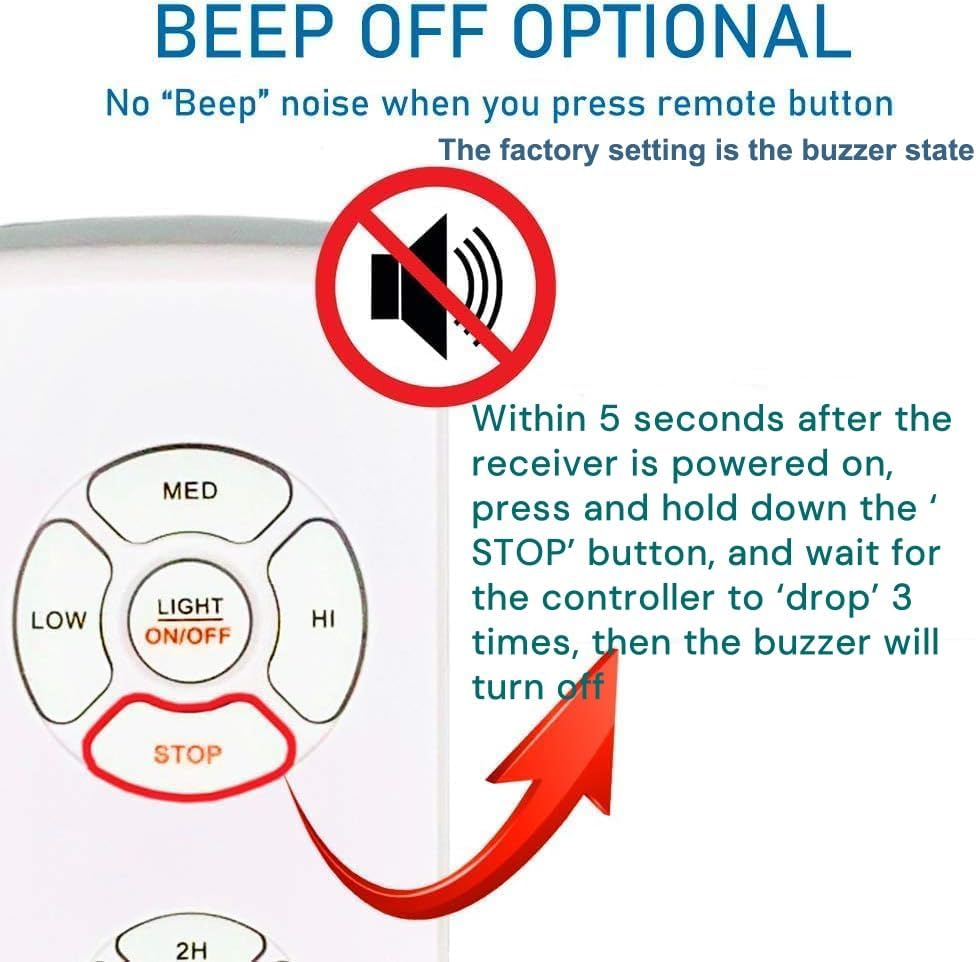
Image: Diagram showing the dimensions of the receiver unit and indicating compatibility with AC motors.
Important Safety Information
Please read and understand all instructions before installation and use. Failure to follow these instructions may result in electric shock, fire, or serious injury.
- Electrical Safety: Always turn off power at the circuit breaker or fuse box before installing, cleaning, or servicing the fan or remote control kit.
- Qualified Electrician: If you are unsure about wiring or electrical connections, consult a qualified electrician.
- Proper Wiring: Ensure all wire connections are secure and properly insulated.
- Load Limits: Do not exceed the maximum load power ratings for the fan and light as specified in the Technical Specifications.
- Receiver Placement: Ensure there is sufficient space within the fan's canopy or housing for the receiver unit to prevent overheating or damage.
- Battery Safety: Do not mix old and new batteries. Do not mix alkaline, standard (carbon-zinc), or rechargeable (nickel-cadmium) batteries. Dispose of used batteries properly.
Installation Guide
This kit is designed for easy installation, but basic electrical knowledge is recommended. Ensure power is OFF before proceeding.
- Prepare for Installation: Turn off the main power to the ceiling fan at the circuit breaker. Verify power is off by attempting to turn on the fan or light.
- Access Fan Wiring: Carefully lower the fan canopy to expose the existing wiring connections.
- Disconnect Existing Wiring: Disconnect the existing wiring from the ceiling fan, noting which wires connect to the fan motor and which to the light fixture.
- Connect Receiver: Connect the receiver unit's wires to the household and fan/light wires using the provided wire nuts according to the wiring diagram below. Ensure the antenna wire is pulled out from the receiver box.
- Input Live Wire (Black): Connect to the household's live wire.
- Input Neutral Wire (White): Connect to the household's neutral wire.
- Output Fan Live Wire (Blue): Connect to the fan motor's live wire.
- Output Light Live Wire (Black): Connect to the light fixture's live wire.
- Common Neutral Line (White): Connect to the common neutral wire for both fan and light.
- Position Receiver: Carefully tuck the receiver unit into the fan canopy, ensuring it does not interfere with fan operation or wiring. Make sure there is enough space for the receiver (4.53"L x 2.13"W x 1.06"H).
- Secure Canopy: Reattach the fan canopy securely.
- Restore Power: Turn the main power back on at the circuit breaker.
- Install Remote Batteries: Insert 2 AAA batteries into the remote control transmitter (ensure correct polarity).
- Test Operation: Test all functions of the remote control to ensure proper operation.

Image: Detailed wiring diagram for connecting the QIACHIP receiver to the ceiling fan and household power.
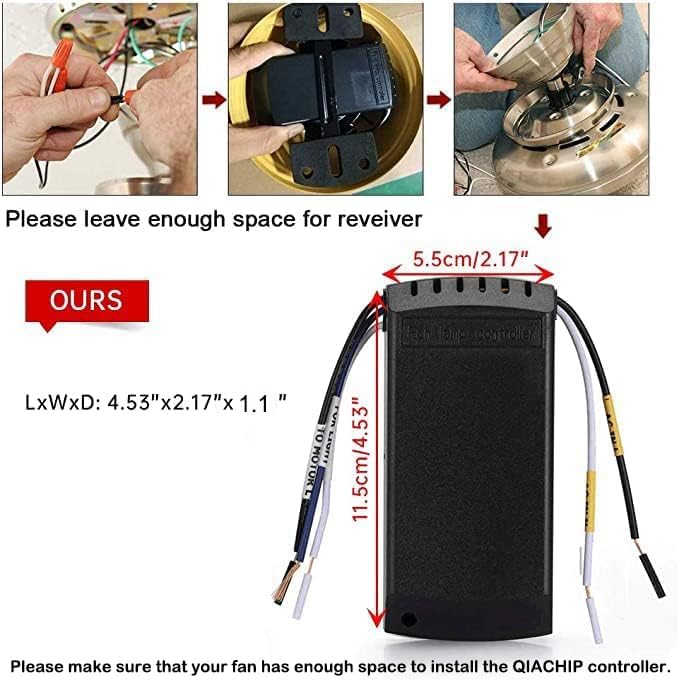
Image: Simplified wiring diagram showing connections from main power to the receiver, then to the fan and light.

Image: Step-by-step visual guide for physically installing the receiver unit into the fan housing.
Important Note on Capacitor Compatibility:
The product's capacitors are T4+5 µF (starting 4 µF/running 5 µF). For optimal compatibility, your existing fan's running capacitor should ideally be 5 µF. A deviation of 1 µF is generally acceptable. A deviation of 2 µF may cause a 1-2 step speed difference. If the deviation is 3 µF or more, significant speed variation may occur, and purchase is not recommended.
Operating Instructions
Familiarize yourself with the remote control buttons for optimal use.
- Fan Speed Buttons (LOW, MED, HI): Press to select the desired fan speed.
- STOP Button: Press to turn the fan off.
- LIGHT ON/OFF Button: Press to turn the fan light on or off. This button does not control dimming.
- Timing Buttons (1H, 2H, 4H, 8H): Press to set the fan to turn off automatically after the selected duration (1, 2, 4, or 8 hours).
Turning Off the Beep Sound
The receiver emits a beep sound when a button is pressed on the remote. To disable this sound:
- Ensure the receiver is powered on.
- Within 5 seconds of powering on, press and hold the 'STOP' button on the remote.
- Continue holding until the controller 'drops' (clicks) 3 times. The buzzer will then be turned off.
To turn the beep sound back on, repeat the same steps.

Image: Visual guide on how to disable the beep sound from the receiver using the remote control's STOP button.
Troubleshooting
If you encounter issues with your QIACHIP remote control kit, refer to the following common problems and solutions:
- Remote Not Controlling Receiver:
- Ensure batteries are correctly installed in the remote and are not depleted. Replace if necessary.
- Turn off the main power to the fan for a few seconds, then turn it back on.
- Within 5 seconds of restoring power, press and hold the 'LIGHT' and 'HI' buttons simultaneously on the remote until the receiver responds (e.g., light flashes or fan moves). This may re-pair the remote.
- Fan Not Spinning or Abnormal Noise:
- Verify all wiring connections are secure and correct according to the installation diagram.
- Ensure the fan's pull chain switch (if applicable) is set to the HIGH speed setting before using the remote. If left on a lower setting or off, the remote may not function correctly.
- Check the capacitor compatibility as noted in the Technical Specifications. Incompatible capacitors can affect fan speed and performance.
- Ensure the fan motor is AC, as this kit is designed for AC motors.
- Light Not Working:
- Check the light bulb to ensure it is not burnt out and is properly screwed in.
- Verify the light wiring connection to the receiver is correct.
- Ensure the light's pull chain switch (if applicable) is in the ON position.
- Receiver Gets Hot:
- Ensure the receiver is not exceeding its maximum load power for the fan or light.
- Verify there is adequate ventilation and space for the receiver within the fan canopy to prevent overheating.
- Beep Sound Cannot Be Turned Off:
- Ensure you are pressing and holding the 'STOP' button within 5 seconds of the receiver being powered on.
- Hold the button firmly and continuously until the confirmation clicks are heard.
Care and Maintenance
To ensure the longevity and proper functioning of your QIACHIP remote control kit, follow these simple care guidelines:
- Cleaning: Wipe the remote control and receiver (when power is off) with a soft, dry cloth. Do not use abrasive cleaners, solvents, or harsh chemicals.
- Battery Replacement: Replace remote control batteries when the signal weakens or the remote stops responding. Always use new AAA batteries and dispose of old ones responsibly.
- Environment: Keep the remote control and receiver away from excessive moisture, direct sunlight, and extreme temperatures.
- Avoid Physical Damage: Do not drop the remote control or subject it to strong impacts.
Warranty and Support
For any issues, questions, or support regarding your QIACHIP Universal Wireless Ceiling Fan Remote Control Kit, please contact QIACHIP customer service. Refer to the product packaging or the QIACHIP official website for contact information.
Please note that any modifications or improper installation not in accordance with this manual may void the product warranty.


