1. Introduction and Safety Information
Thank you for choosing the ELG F90USB Ergonomic Gas Spring Articulated Monitor Desk Mount. This manual provides essential instructions for safe installation, operation, and maintenance of your product. Please read it thoroughly before proceeding with installation or use.
Important Safety Warnings:
- Read All Instructions: Ensure you understand all instructions before assembly and installation. Incorrect assembly or installation can cause damage or serious injury.
- Weight Capacity: This mount is designed for monitors weighing between 2kg and 9kg (4.4 lbs to 19.8 lbs). Do not exceed this weight limit. Using with monitors heavier than the maximum weight indicated may result in instability causing possible injury.
- Monitor Size: Compatible with monitors from 17 to 35 inches.
- VESA Compatibility: Ensure your monitor has VESA mounting patterns of 75x75mm or 100x100mm.
- Desk Stability: Verify that the mounting surface (desk) has sufficient strength and thickness to support the combined weight of the mount and your monitor.
- Children: Keep children away from the product during assembly. Small parts may be a choking hazard.
- Tools: Use appropriate tools for installation.
- Maintenance: Regularly check that the mount is secure and all fasteners are tight.
2. Package Contents
Please verify that all components are present and undamaged before beginning installation. If any parts are missing or damaged, contact ELG customer support.
- Articulated Monitor Arm with Gas Spring
- Desk Clamp Base
- Grommet Mount Base (optional installation)
- VESA Mounting Plate
- Hardware Kit (screws, washers, spacers for monitor attachment)
- Tools (Allen keys for assembly and adjustment)
- Cable Management Clips/Covers
- USB 3.0 Cables (for integrated USB ports)
- Instruction Manual
3. Setup and Installation
The ELG F90USB offers two installation methods: desk clamp or grommet mount.
Step 1: Attach VESA Plate to Monitor
- Carefully place your monitor face down on a soft, clean surface.
- Identify the VESA mounting holes on the back of your monitor (75x75mm or 100x100mm pattern).
- Attach the VESA mounting plate to your monitor using the appropriate screws, washers, and spacers from the hardware kit. Ensure it is securely fastened.

A visual guide showing how to attach the VESA mounting plate to the back of a monitor, a crucial step before mounting it onto the ELG F90USB arm.
Step 2: Choose and Install Desk Mount Method
Option A: Desk Clamp Installation
- Assemble the desk clamp base according to the diagrams in the included manual.
- Position the clamp base at the desired location on your desk edge.
- Tighten the clamp screw until the base is firmly secured to the desk. Ensure the desk thickness is within the specified range (typically 10-90mm).

This image provides a close-up of the desk clamp mechanism, one of the two installation options for the ELG F90USB monitor arm, showing how it secures to the desk edge.
Option B: Grommet Mount Installation
- If your desk has a grommet hole, or if you plan to drill one (consult a professional if drilling), use the grommet mount base.
- Assemble the grommet base components as shown in the manual.
- Insert the grommet base through the desk hole and secure it from underneath with the provided plate and nut.

This image illustrates the grommet installation method, an alternative way to secure the ELG F90USB monitor arm through a desk hole.
Step 3: Attach Monitor to Arm
- Carefully lift the monitor (with the VESA plate attached) and slide it onto the mounting head of the articulated arm.
- Ensure the monitor is securely seated and tighten any locking screws if present.
Step 4: Connect USB Cables
- Locate the two integrated USB 3.0 ports on the base of the monitor arm.
- Connect the provided USB 3.0 cables from the arm's base to available USB ports on your computer. This enables the arm's USB ports for data transfer and charging.
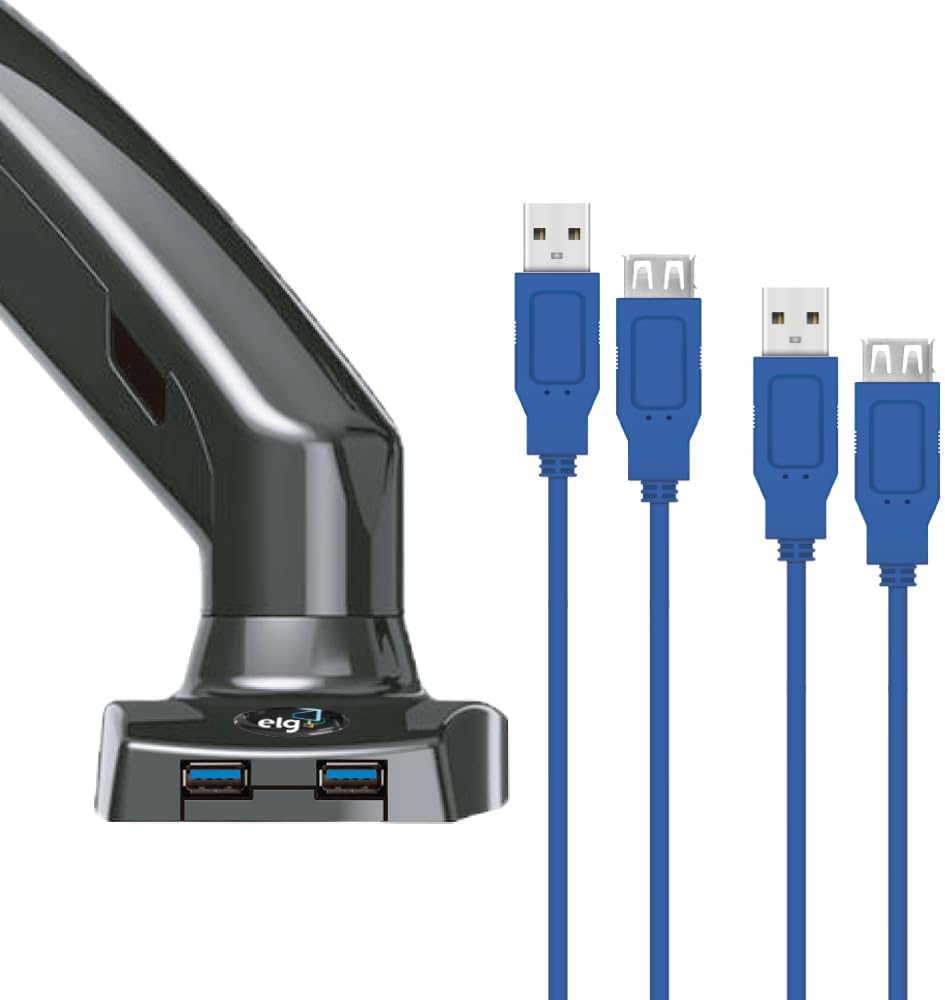
A close-up view of the ELG F90USB monitor arm's base, highlighting the two integrated USB 3.0 ports and connected cables for convenient access.
4. Operating Instructions
The ELG F90USB monitor arm provides flexible adjustments for optimal ergonomic positioning.
Gas Spring Tension Adjustment
The gas spring allows for smooth, tool-free height adjustments. It must be calibrated to your monitor's weight for proper function.
- If the monitor drifts down, the tension is too low. Use the provided Allen key to turn the adjustment screw clockwise (towards '+') to increase tension.
- If the monitor floats up or is difficult to push down, the tension is too high. Turn the adjustment screw counter-clockwise (towards '-') to decrease tension.
- Adjust gradually until the monitor stays at any desired height with minimal effort.

This image shows the adjustment point for the gas spring tension on the ELG F90USB monitor arm, allowing users to fine-tune it for their monitor's weight.
Monitor Positioning
- Height Adjustment: Gently push or pull the monitor to raise or lower it. The gas spring will assist in holding the position. The arm allows for a height adjustment range of 150mm to 400mm.
- Tilt: Tilt the monitor screen up or down to achieve the desired viewing angle. The tilt range is +85° to -30°.
- Swivel: Rotate the monitor horizontally (left or right) up to 220° at the arm joints.
- Rotation: Rotate the monitor 360° from landscape to portrait orientation.

This image shows the ELG F90USB monitor arm fully extended, holding a monitor. The arm's articulation allows for flexible positioning.

This image illustrates the ELG F90USB monitor arm in a more compact, retracted position, demonstrating its space-saving capability.
Cable Management
The ELG F90USB features integrated cable management to keep your workspace tidy. Route your monitor's power and video cables, as well as the USB cables, through the designated clips or channels along the arm. Close the covers to conceal the cables.
Using the USB Ports
The two USB 3.0 ports on the base of the arm provide convenient access for connecting peripherals or charging devices. Once the arm's USB cables are connected to your computer, these ports will function as standard USB ports.

An ELG F90USB monitor arm setup on a desk, showing a monitor mounted and two smartphones charging via the arm's USB ports, demonstrating its practical utility.
5. Maintenance
- Cleaning: Wipe the mount with a soft, damp cloth. Avoid abrasive cleaners or solvents that could damage the finish.
- Regular Checks: Periodically check all screws and fasteners to ensure they remain tight. Re-tighten if necessary.
- Gas Spring: If the gas spring performance changes over time, re-adjust the tension as described in the Operating Instructions.
6. Troubleshooting
| Problem | Possible Cause | Solution |
|---|---|---|
| Monitor drifts down or cannot hold position. | Gas spring tension is too low for the monitor's weight. | Increase gas spring tension by turning the adjustment screw clockwise with the Allen key. |
| Monitor floats up or is difficult to push down. | Gas spring tension is too high for the monitor's weight. | Decrease gas spring tension by turning the adjustment screw counter-clockwise with the Allen key. |
| Monitor is wobbly or unstable. | Mounting screws are loose, or desk clamp/grommet is not tight. | Check and tighten all mounting screws, including those securing the VESA plate to the monitor and the base to the desk. |
| USB ports on the base are not working. | USB cables from the arm are not connected to the computer, or there is a cable issue. | Ensure the USB 3.0 cables from the arm's base are securely connected to functional USB ports on your computer. Try connecting a different device to test the ports. If issues persist, try different USB cables. |
| Monitor cannot be rotated 360 degrees. | Obstruction or incorrect VESA plate attachment. | Ensure no cables or parts are obstructing the rotation. Verify the VESA plate is centered and correctly attached. |
7. Specifications
| Feature | Detail |
|---|---|
| Brand | ELG |
| Model Number | F90USB |
| Compatible Monitor Size | 17 to 35 inches |
| Weight Capacity | 2 kg to 9 kg (4.4 lbs to 19.8 lbs) |
| VESA Compatibility | 75x75mm, 100x100mm |
| Material | Injected Aluminum, Carbon Steel |
| Color | Black |
| Mounting Type | Desk Clamp or Grommet Mount |
| Desk Thickness (Clamp) | 10mm to 90mm (max) |
| Movement Type | Articulated, Gas Spring |
| Height Adjustment Range | 150mm to 400mm |
| Tilt Angle | +85° / -30° |
| Swivel Angle | 220° |
| Rotation | 360° (Landscape to Portrait) |
| Integrated Ports | 2 x USB 3.0 |
| Product Weight | 2.93 kg (6.46 lbs) |

A detailed technical drawing of the ELG F90USB monitor arm, illustrating its maximum reach, height adjustment range, tilt angles (+85°/-30°), swivel (220°), and 360° rotation, along with desk clamp dimensions.
8. Warranty and Support
Warranty Information
The ELG F90USB monitor arm comes with a 12-month warranty from the date of purchase. This warranty covers manufacturing defects and material flaws under normal use. It does not cover damage caused by improper installation, misuse, accidents, or unauthorized modifications.
Customer Support
For technical assistance, warranty claims, or any questions regarding your ELG F90USB monitor arm, please contact ELG customer support through their official website or the retailer where the product was purchased.
Please have your product model number (F90USB) and proof of purchase ready when contacting support.