Sunbuck AS-29BU
Sunbuck AS-29BU Stereo Amplifier User Manual
Model: AS-29BU | Brand: Sunbuck
Introduction
This user manual provides detailed instructions for the operation and maintenance of your Sunbuck AS-29BU Karaoke Wireless Bluetooth Stereo Amplifier System. Please read this manual thoroughly before using the device to ensure proper functionality and to prevent damage.
The Sunbuck AS-29BU is a compact yet powerful home audio amplifier receiver designed to enhance your listening experience. It features built-in Bluetooth for wireless audio streaming, support for SD cards and USB flash drives, FM radio, and RCA audio inputs. It is compatible with a wide range of devices including smartphones, tablets, PCs, and traditional audio equipment.
Package Contents
Upon opening the package, please verify that all items listed below are present and in good condition:
- 1 x Sunbuck AS-29BU Bluetooth Amplifier (110V)
- 1 x Remote Control
- 1 x User Manual (this document)
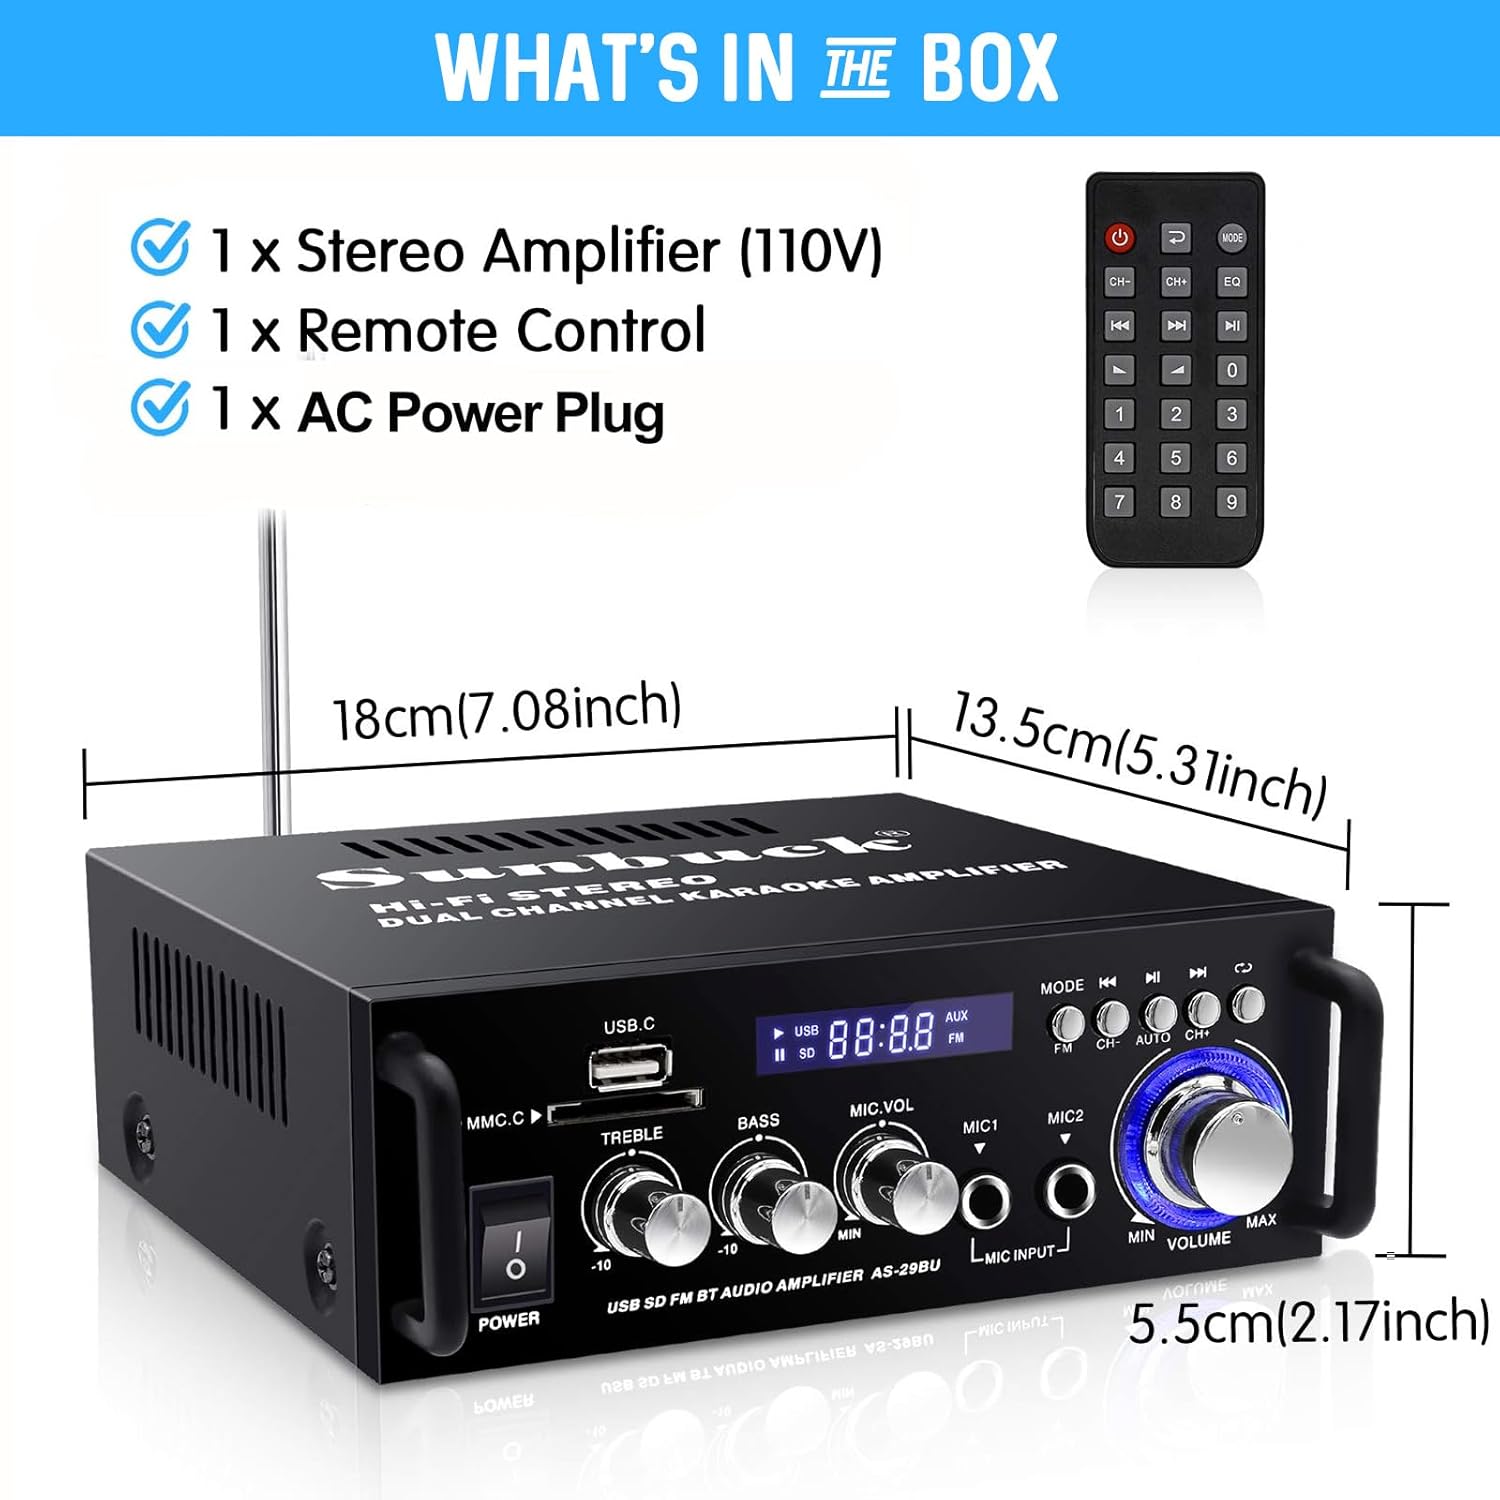
Figure 1: Package Contents and Dimensions. This image displays the amplifier unit, the remote control, and indicates the product dimensions: 18cm (7.08 inches) length, 13.5cm (5.31 inches) width, and 5.5cm (2.17 inches) height.
Product Overview
The Sunbuck AS-29BU amplifier features a user-friendly front panel and comprehensive rear panel connections for versatile audio setups.

Figure 2: Front Panel and Remote Control. This image shows the front of the amplifier with its various controls including power switch, USB and SD card slots, treble, bass, microphone volume controls, microphone inputs, mode selection, and master volume knob. The included remote control is also visible.

Figure 3: Rear Panel Connections. This image illustrates the rear panel of the amplifier, highlighting the RCA audio input (L/R), speaker system outputs (4Ω-16Ω), FM antenna input, and power input (DC12V/5A). It also shows various compatible devices such as TVs, Blu-ray players, outdoor speakers, computer speakers, ceiling speakers, and car/motorcycle speakers.

Figure 4: Compact Desktop Placement. This image shows the amplifier placed on a desk in front of a television, illustrating its compact size and suitability for various home or office environments.
Setup Guide
1. Power Connection
- Ensure the amplifier's power switch is in the OFF position.
- Connect the provided AC power plug to the "POWER DC INPUT" port on the rear panel of the amplifier.
- Plug the other end of the power cable into a standard 110V AC power outlet.
2. Speaker Connection
The amplifier supports 2.0 channel stereo output. Connect your passive speakers to the "SPEAKER SYSTEM 4Ω-16Ω" terminals on the rear panel.
- Identify the positive (+) and negative (-) terminals on your speakers and on the amplifier.
- Connect the positive terminal of the left speaker to the "L+" terminal on the amplifier and the negative terminal to the "L-" terminal.
- Repeat the process for the right speaker, connecting to the "R+" and "R-" terminals.
- Ensure all connections are secure to prevent short circuits or poor audio quality.
3. Audio Input Connection
The amplifier offers multiple input methods:

Figure 5: Flexible and Diverse Input Methods. This image visually represents the various audio input options available on the amplifier, including Bluetooth, USB, SD card, CD/DVD players, microphone inputs, and FM radio.
- RCA Audio Input: Connect external audio sources (e.g., CD/DVD players, TVs, computers) to the "AUDIO INPUT (L/R)" RCA ports on the rear panel using an RCA cable.
- USB/SD Card: Insert a USB flash drive or SD memory card into the respective slots on the front panel. The amplifier will automatically detect and play compatible audio files (WMA, WAV).
- Microphone Input: Connect up to two microphones to the "MIC INPUT" jacks on the front panel for karaoke or public address functions.
- FM Antenna: Connect the FM antenna to the "FM ANT" port on the rear panel for improved radio reception.
Operating Instructions
1. Power On/Off
Press the "POWER" button on the front panel to turn the amplifier ON or OFF. The display will illuminate when the unit is powered on.
2. Volume Control
- Master Volume: Rotate the large "VOLUME" knob on the front panel to adjust the overall output volume.
- Microphone Volume: Use the "MIC.VOL" knob to adjust the volume of the connected microphones.
3. Tone Control
Adjust the "TREBLE" and "BASS" knobs on the front panel to fine-tune the audio's high and low frequencies according to your preference.
4. Input Mode Selection
Press the "MODE" button on the front panel or the remote control to cycle through available input sources: Bluetooth, USB, SD Card, FM Radio, and AUX (RCA input).
5. Bluetooth Operation

Figure 6: Excellent Bluetooth Compatibility. This image demonstrates the amplifier's Bluetooth connectivity, showing a smartphone wirelessly streaming music to the unit.
- Select "Bluetooth" mode using the "MODE" button. The display will show "BLUE" or a similar indicator.
- On your Bluetooth-enabled device (smartphone, tablet, PC), search for available Bluetooth devices.
- Select "Sunbuck AS-29BU" or a similar name from the list to pair.
- Once paired, you can stream audio wirelessly from your device to the amplifier.
6. USB/SD Card Playback
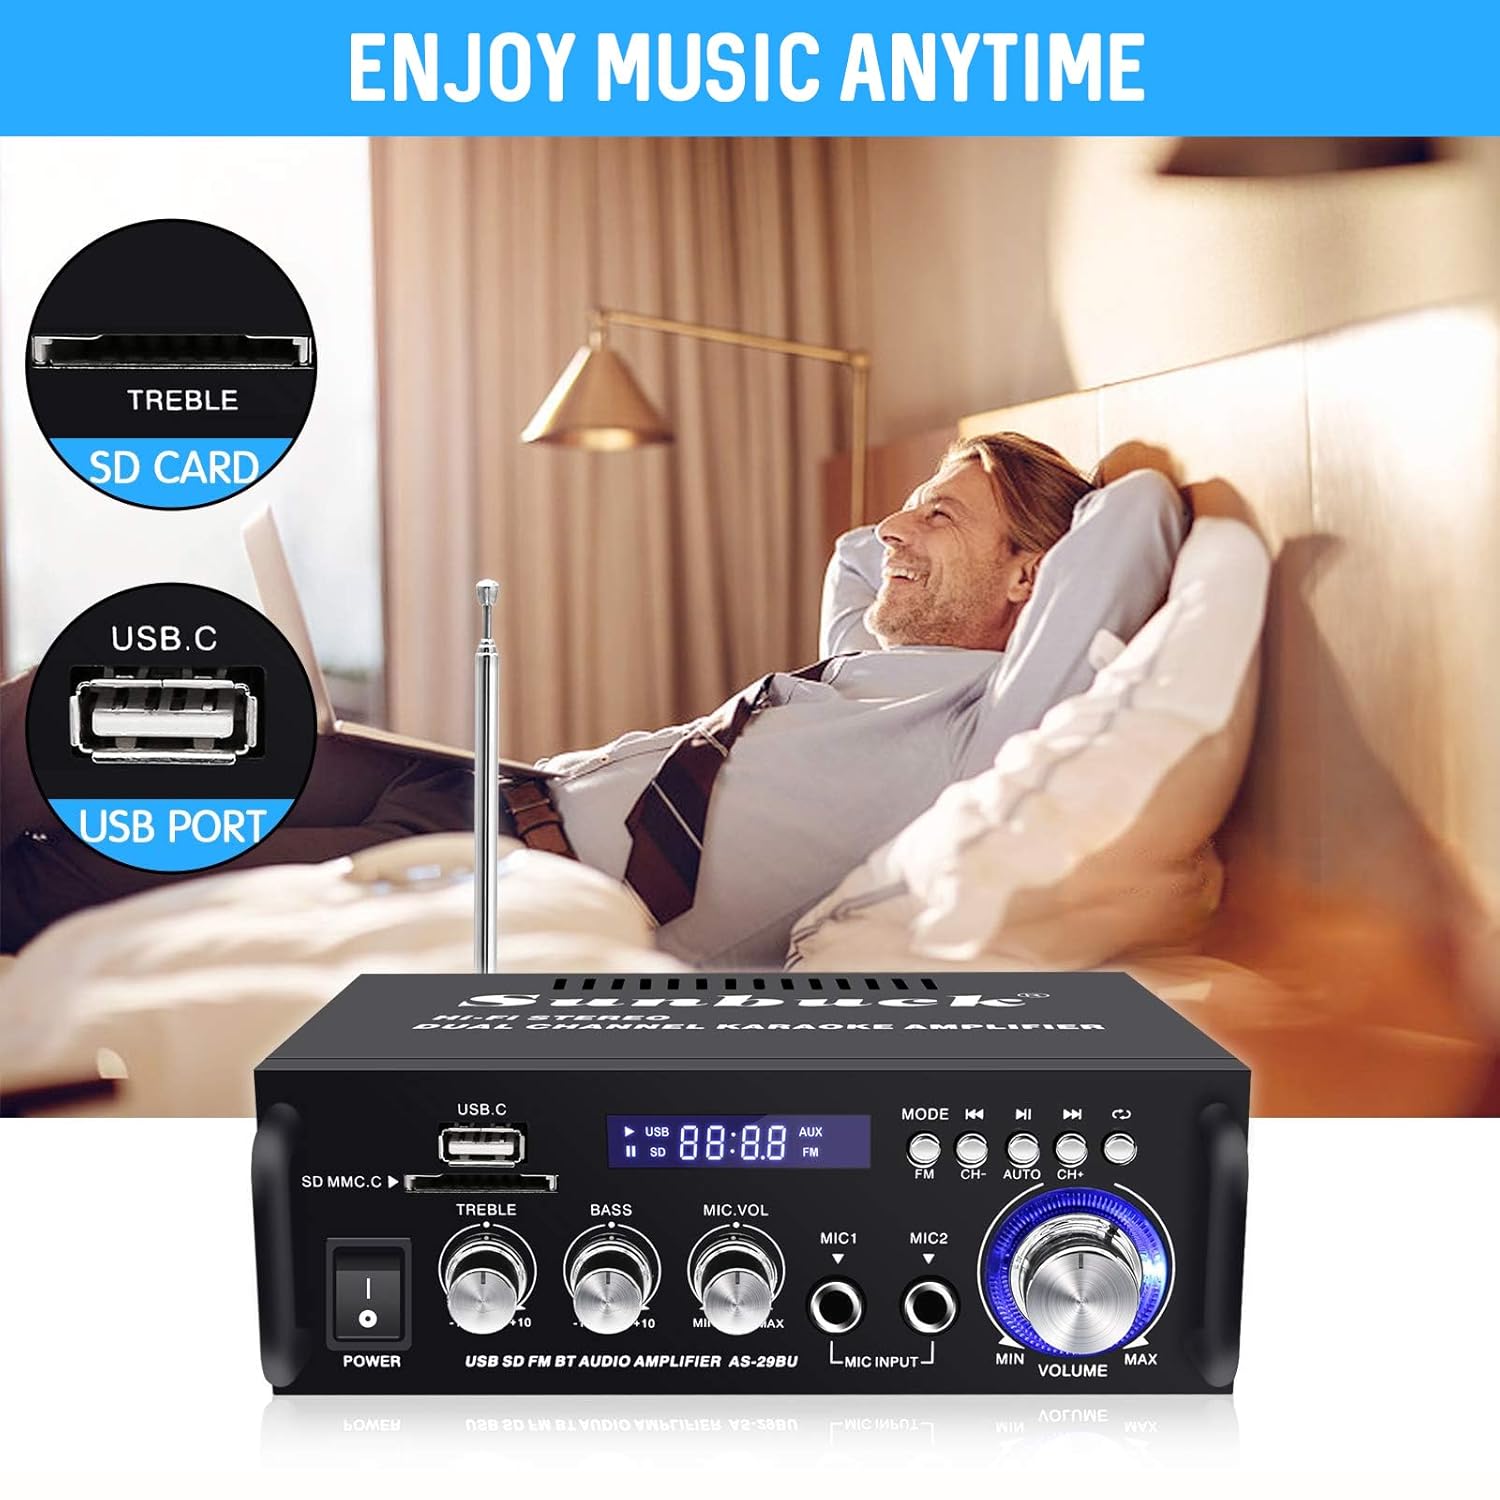
Figure 7: Enjoy Music Anytime with USB/SD Card. This image highlights the convenience of playing music directly from USB drives and SD cards inserted into the amplifier's front panel slots.
- Insert a USB flash drive or SD card containing WMA or WAV audio files into the corresponding slot.
- The amplifier will automatically switch to USB/SD mode and begin playback.
- Use the playback controls (Play/Pause, Next/Previous Track) on the front panel or remote control.
7. FM Radio Operation
- Select "FM" mode using the "MODE" button.
- Press the "AUTO" button (or "CH+" / "CH-" for manual tuning) to scan and save available FM stations.
- Use the "CH+" and "CH-" buttons to navigate through saved stations.
8. Remote Control
The included remote control provides convenient access to all amplifier functions from a distance. Ensure line of sight to the amplifier's IR receiver for optimal performance.
Maintenance and Care
- Cleaning: Use a soft, dry cloth to clean the amplifier's exterior. Do not use liquid cleaners or abrasive materials, as they may damage the finish or internal components.
- Ventilation: Ensure adequate ventilation around the amplifier. Do not block the ventilation openings, as this can lead to overheating.
- Placement: Place the amplifier on a stable, flat surface away from direct sunlight, heat sources, and excessive moisture.
- Power Off: Always turn off the amplifier and unplug it from the power outlet before performing any cleaning or maintenance.
Troubleshooting
| Problem | Possible Cause | Solution |
|---|---|---|
| No power | Power cable not connected; Power outlet faulty; Amplifier switch off. | Ensure power cable is securely connected. Test power outlet with another device. Turn amplifier power switch ON. |
| No sound output | Speakers not connected correctly; Volume too low; Incorrect input mode selected; Audio source issue. | Check speaker wire connections (positive/negative). Increase master volume. Select correct input mode. Verify audio source is playing and connected properly. |
| Bluetooth pairing failure | Amplifier not in Bluetooth mode; Device too far; Bluetooth interference; Device already paired. | Ensure amplifier is in Bluetooth mode. Move device closer to amplifier. Reduce interference from other wireless devices. Disconnect from previously paired devices. |
| USB/SD card not playing | Unsupported file format; Card/drive not inserted correctly; Corrupted files. | Ensure files are WMA or WAV format. Reinsert card/drive. Try a different USB/SD card. |
| Poor FM radio reception | Antenna not connected; Weak signal. | Connect the FM antenna. Adjust antenna position for better reception. |
Specifications
| Brand | Sunbuck |
| Model Number | AS-29BU |
| Color | Black & Silver |
| Output Wattage | 180 Watts |
| Channels | 2.0 Stereo |
| Connectivity Technology | Bluetooth, USB |
| Special Features | Built-In Bluetooth, FM Tuner, SD Card Input |
| Compatible Devices | Speakers |
| Digital Media Format | WMA, WAV |
| Item Weight | 1.2 kg (2.65 lbs) |
| Product Dimensions (LxWxH) | 18.01 x 13.49 x 5.51 cm (7.09 x 5.31 x 2.17 inches) |
| Voltage | 12 Volts (DC Input) |
| Controller Type | Remote Control |
Warranty and Support
For warranty information and technical support, please refer to the documentation provided at the time of purchase or contact Sunbuck customer service. Keep your purchase receipt as proof of purchase for warranty claims.
For further assistance, please visit the official Sunbuck website or contact their support channels.
Related Documents - AS-29BU
 |
Sunbuck AV-999BT 7-Channel Power Amplifier: User Manual & Features Explore the Sunbuck AV-999BT, a versatile 7-channel power amplifier for home theater and KTV. This manual covers features, installation, operation, and troubleshooting for immersive audio experiences. |
 |
Sunbuck AV-555BT Power Amplifier: User Manual, Features, and Specifications Detailed user manual for the Sunbuck AV-555BT power amplifier. Covers product overview, core specifications, features, installation, operation, precautions, troubleshooting, packaging, and after-sales support for this versatile audio amplifier. |
 |
Sunbuck AV-325BT Power Amplifier: User Manual and Specifications Comprehensive user manual for the Sunbuck AV-325BT high-power, multifunctional audio power amplifier. Features include Bluetooth connectivity, multiple inputs, independent channel controls, and dual microphone inputs for home theater, KTV, and commercial applications. |
 |
Руководство пользователя аудиоусилителя Sunbuck AS-U336BU с Bluetooth Полное руководство пользователя для аудиоусилителя Sunbuck AS-U336BU. Описание функций, подключений, настроек Bluetooth, эквалайзера и устранения неполадок. |
 |
SUNBUCK AV-660BT Amplifier Product Manual User manual for the SUNBUCK AV-660BT 2.0-channel AV power amplifier, detailing its features, specifications, setup, operation, precautions, and troubleshooting for home, car, and meeting environments. |
 |
Sunbuck AV-660BT 2-Channel Bluetooth Karaoke Amplifier User Manual Detailed user manual for the Sunbuck AV-660BT 2-Channel Bluetooth Karaoke Amplifier, covering product overview, specifications, features, installation, operation, safety, troubleshooting, and warranty information. |
Ask a question about this manual
Ask about setup, troubleshooting, compatibility, parts, safety, or missing instructions. Manuals+ will review the question and use this page’s manual context to help answer it.