Diyeeni Y-501
Diyeeni Y-501 Portable FM Radio User Manual
Model: Y-501 | Brand: Diyeeni
1. Introduction
Thank you for choosing the Diyeeni Y-501 Portable FM Radio. This device is a versatile audio player featuring FM radio, MP3 playback from TF cards and USB disks, and an AUX input. It is designed for portability and ease of use, making it an excellent companion for various activities. Please read this manual carefully before operating the device to ensure proper use and to maximize its performance and lifespan.
2. Safety Information
- Do not expose the device to extreme temperatures, direct sunlight, or high humidity.
- Avoid dropping or subjecting the device to strong impacts.
- Do not disassemble, repair, or modify the device yourself. Refer all servicing to qualified personnel.
- Keep the device away from water and other liquids.
- Use only the specified charging cable and power adapter (DC 5V) to charge the device.
- Dispose of batteries according to local regulations. Do not incinerate.
3. Package Contents
Please check the package for the following items:
- 1 x Diyeeni Y-501 Audio Player
- 1 x USB Charging Cable
- 1 x Li-Ion Battery (800mAh)
- 1 x User Manual
4. Product Overview
Familiarize yourself with the various parts and controls of your Diyeeni Y-501 radio.

Figure 4.1: Front view of the Diyeeni Y-501 portable FM radio, showing the dual speakers, digital display, and numeric keypad.
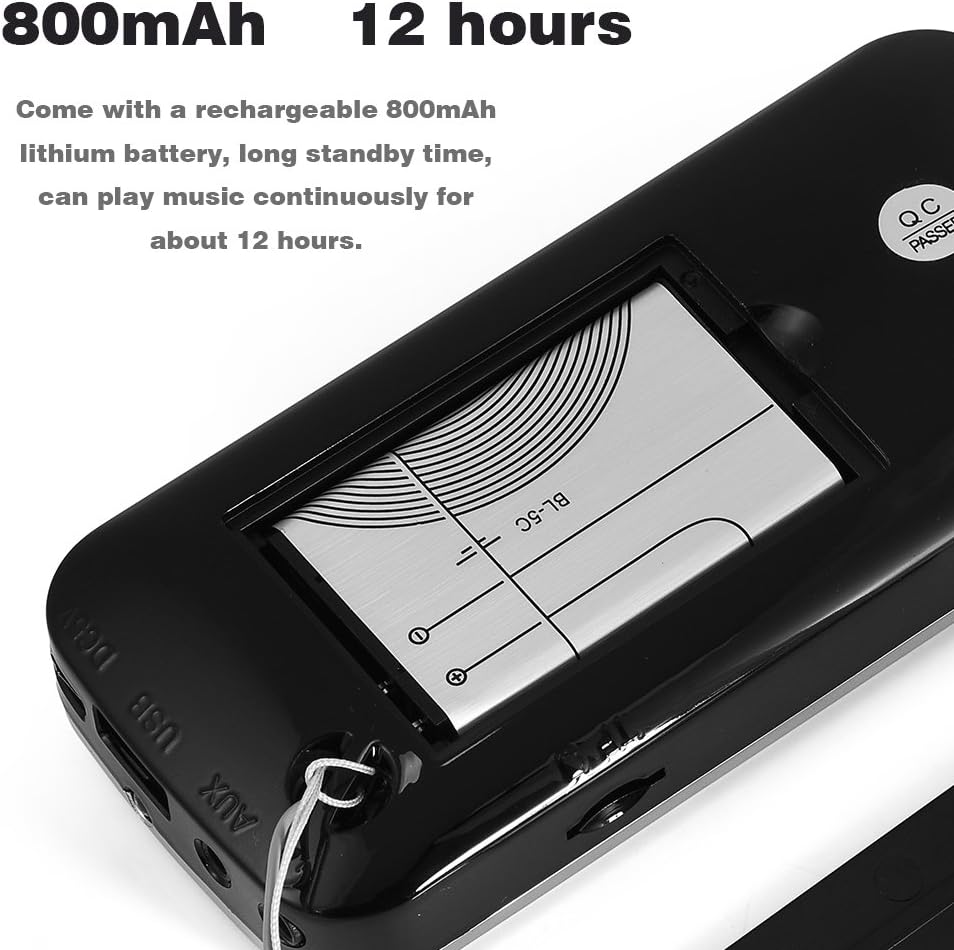
Figure 4.2: Close-up of the control panel, showing the digital display and numeric keypad.

Figure 4.3: Side view with USB, AUX, headphone ports, and LED flashlight.

Figure 4.4: Side view showing lanyard attachment and ports.
Key Components:
- Speakers: High-performance audio output.
- LCD Display: Shows frequency, mode, and other information.
- Numeric Keypad (0-9): For direct frequency input or track selection.
- M Button: Mode switch (USB / TF / FM / AUX).
- LED Button: Activates/deactivates the LED flashlight.
- REP Button: Repeat function (current track or all MP3s).
- Play/Pause Button: Controls playback.
- Previous/Next Track Buttons: Navigates through tracks or radio stations.
- Volume Control Wheel: Adjusts audio volume (located near power switch).
- USB Port: For USB disk playback.
- TF Card Slot: For TF card playback.
- AUX Input: For connecting external audio devices.
- Headphone Jack: For private listening.
- Charging Port: Micro USB port for charging.
- LED Indicator: Shows charging status.
5. Setup
5.1. Battery Installation
The Diyeeni Y-501 uses an 800mAh Li-Ion battery. Ensure the battery is correctly installed before first use.
- Locate the battery compartment cover on the back of the device.
- Gently slide or lift the cover to open the compartment.
- Insert the 800mAh Li-Ion battery, ensuring the contacts align correctly with the terminals inside the compartment.
- Close the battery compartment cover securely.

Figure 5.1: Battery compartment with battery inserted.
5.2. Charging the Battery
Before first use, fully charge the device. A full charge provides approximately 12 hours of continuous playback.
- Connect the small end of the provided USB charging cable to the charging port on the side of the radio.
- Connect the larger end of the USB cable to a USB power source (e.g., computer USB port, USB wall adapter, power bank).
- The LED indicator light will illuminate during charging. Once charging is complete, the LED indicator will turn off or change color (depending on the model).

Figure 5.2: Radio with USB charging cable.
6. Operating Instructions
6.1. Power On/Off
To power on the device, slide the power switch (usually located on the side or top) to the 'ON' position. To power off, slide it to the 'OFF' position.
6.2. Mode Switching (USB / TF / FM / AUX)
Press the M (Mode) button repeatedly to cycle through the available modes: USB, TF (MicroSD), FM Radio, and AUX.

Figure 6.1: Top-down view showing button layout.
6.3. FM Radio Function
In FM mode:
- Automatic Scan: Press and hold the Play/Pause button to automatically scan and save available FM stations.
- Manual Tuning: Use the Previous/Next Track buttons to fine-tune the frequency or navigate between saved stations.
- Direct Frequency Input: Use the numeric keypad to directly enter the desired FM frequency (e.g., 87.5).

Figure 6.2: Using the numeric keypad for direct input.
6.4. Music Playback (TF Card / USB Disk / MP3)
Insert a TF card or USB disk containing MP3 music files into the respective slot/port. The device will automatically switch to TF or USB mode and begin playback.
- Play/Pause: Press the Play/Pause button to start or pause playback.
- Next/Previous Track: Use the Previous/Next Track buttons to skip to the next or previous song.
- Repeat Function: Press the REP button to repeat the current track or all tracks.
6.5. AUX Input
Connect an external audio device (e.g., smartphone, MP3 player) to the AUX input port using a 3.5mm audio cable. Switch the radio to AUX mode using the M button. Audio will then be played through the radio's speaker.
6.6. Volume Control
Adjust the volume by rotating the volume control wheel, typically located next to the power switch.
6.7. LED Flashlight Function
Press the LED button to turn the integrated flashlight on or off. This feature is useful for illuminating dark areas or for emergency situations.

Figure 6.3: LED flashlight in operation.
7. Maintenance
- Cleaning: Use a soft, dry cloth to clean the exterior of the device. Do not use abrasive cleaners or solvents.
- Storage: When not in use for extended periods, store the device in a cool, dry place, away from direct sunlight and extreme temperatures.
- Battery Care: If the device will not be used for a long time, it is recommended to charge the battery at least once every three months to maintain its lifespan.
8. Troubleshooting
| Problem | Possible Cause | Solution |
|---|---|---|
| Device does not power on. | Battery is low or depleted. Battery not installed correctly. | Charge the battery. Ensure the battery is inserted with correct polarity. |
| No sound or low volume. | Volume is too low. Incorrect mode selected. Audio file issue (for TF/USB). | Increase volume using the control wheel. Press 'M' button to select correct mode. Check audio files for corruption. |
| FM radio reception is poor. | Weak signal in current location. | Move to a location with better signal. Extend the antenna if available (not explicitly mentioned but common for radios). |
| Cannot read TF card or USB disk. | Card/disk not inserted correctly. Incompatible format. Corrupted files. | Reinsert the card/disk. Ensure it is formatted to FAT32. Try a different card/disk. |
9. Specifications
| Color | Black |
| Material | ABS |
| Interface | Headphone, AUX, USB, Charging Port, TF Card Slot |
| Power Input | DC 5V |
| Output Power | 3W |
| Frequency Response | 200Hz-21KHz |
| Radio Frequency | 78MHz-108MHz |
| SNR (Signal-to-Noise Ratio) | 85 dB |
| Impedance | 5 Ohm ("Ω") |
| Output Voltage | 3.7V ~ 4.2V + 0.05V |
| Input Voltage | 5V |
| Li-Ion Battery Capacity | 800mAh |
| Compatibility | Most mobile phones, tablets, laptops, MP3, MP4, etc. |
| Package Weight | Approx. 164g |
10. Warranty and Support
For warranty information and customer support, please refer to the purchase documentation or contact your retailer. Keep your proof of purchase for any warranty claims.
Related Documents - Y-501
 |
Bradford White RTG 199HE Cascade Venting System Installation Guide Installation instructions and accessory assembly guide for the Bradford White RTG 199HE Cascade Venting System, covering safety, components, and vent length requirements. |
 |
Bradford White RTG 199HE Cascade Venting System Installation Guide This document provides essential installation instructions for the Bradford White RTG 199HE Cascade Venting System. It details accessory assembly, critical safety warnings, and vent length requirements to ensure proper and safe operation of the system. |
 |
Bradford White Cascade Venting System for RTG 199HE: Side-by-Side Installation Instructions Comprehensive installation instructions for the Bradford White Cascade Venting System for RTG 199HE, focusing on side-by-side unit configurations. Includes safety guidelines, component assembly, vent length requirements, and termination details. |
 |
Honeywell UDC2500 and UDC3200 Replacement Printed Wiring Boards Instruction Sheet Instruction sheet for replacing printed wiring boards in Honeywell UDC2500 and UDC3200 Universal Digital Controllers. Details kit contents, equipment needed, and step-by-step procedures for chassis and board removal and replacement. |
 |
Charlton Home Bookshelf Assembly Instructions Detailed assembly instructions for the Charlton Home bookshelf, including parts list, hardware, tools required, step-by-step guidance, and safety warnings. |
 |
Charlton Home® Entertainment Center & Bookshelf Assembly Instructions Comprehensive assembly guide for the Charlton Home® Entertainment Center and Bookshelf. This manual provides detailed step-by-step instructions, a complete parts list, and safety warnings for proper installation. Compatible with multiple models in the series. |
Ask a question about this manual
Ask about setup, troubleshooting, compatibility, parts, safety, or missing instructions. Manuals+ will review the question and use this page’s manual context to help answer it.