XYC XYC 12V Motorcycle Bluetooth Amplifier Sound System
XYC 12V Motorcycle Bluetooth Amplifier Sound System User Manual
Model: XYC 12V Motorcycle Bluetooth Amplifier Sound System
1. Introduction
This manual provides detailed instructions for the installation, operation, and maintenance of your XYC 12V Motorcycle Waterproof FM USB 4 Channel Bluetooth Amplifier Sound System. Please read this manual thoroughly before use to ensure proper functionality and safety.
2. Safety Information
- Ensure all connections are secure and properly insulated to prevent short circuits.
- Do not operate the system if any components are damaged.
- Avoid exposing the main unit to direct water spray or submersion, despite its waterproof features, to prolong product life.
- Installation should be performed by a qualified technician if you are unsure about electrical wiring.
- Always ensure the vehicle's power is off before attempting installation or maintenance.
3. Package Contents
Verify that all items listed below are included in your package:
- 1x Main Amplifier Unit
- 4x Speakers
- 1x Mounting Bracket for Main Unit
- 1x Wired Remote Control
- 1x Wireless Remote Control
- Speaker Connectors and Wiring Harness
- Various Mounting Hardware (screws, brackets, handlebar clamps)

4. Specifications
| Feature | Specification |
|---|---|
| Input Voltage | DC 12V (36V-72V models require an adapter) |
| Power Output | 4x25W |
| Speaker Impedance | 4-8Ω |
| Speaker Size | 3 inches (83.5mm diameter, 102mm length) |
| Main Unit Size | Approx. 100mm (4") x 60mm (2-3/8") x 44mm (1-3/4") |
| Bluetooth Version | V3.0+EDR (supports AVRCP1.0, GAVDP1.0, AVDTP1.0, A2DP1.0) |
| Bluetooth Frequency Response | 2.402GHz-2.480GHz |
| Effective Transmission Distance | >10 meters |
| FM Frequency Range | 87-108MHz (AM band not available) |
| Connectivity | Bluetooth, USB, SD/TF Card |
| Special Features | Waterproof, Hands-free calling, Alarm function, LCD display with clock |
| Speaker Cable Length | 250cm (2.5 meters) |

5. Setup and Installation
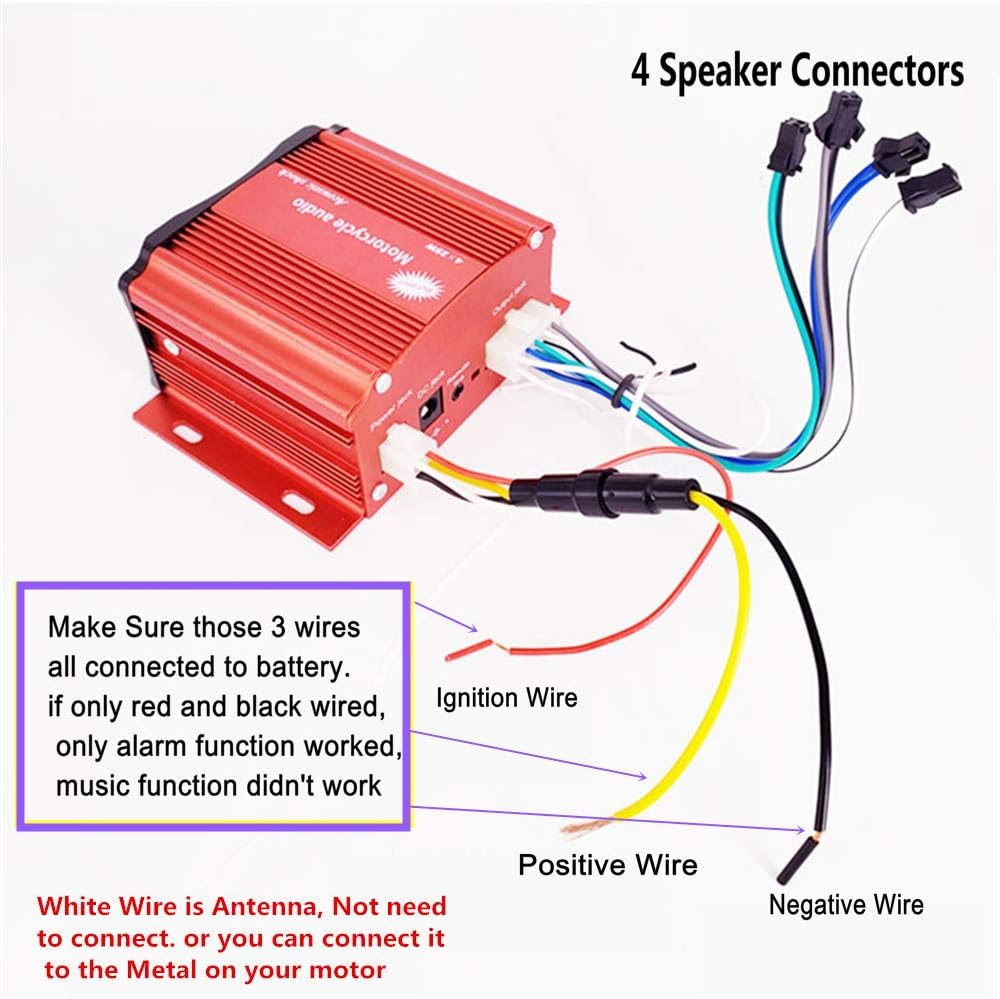
5.1 Wiring Connections
Proper wiring is crucial for the system's functionality. Refer to the diagram below for correct connections. Ensure all three main power wires (Red, Yellow, Black) are connected to the battery for full functionality (music and alarm). If only Red and Black are connected, only the alarm function will work, and music playback will be disabled.
- Red Wire: Positive Wire (connect to battery positive terminal).
- Black Wire: Negative Wire (connect to battery negative terminal or vehicle chassis).
- Yellow Wire: Ignition Wire (connect to a switched 12V source, typically ignition).
- White Wire: Antenna (can be connected to metal on your motor for improved FM reception, or left unconnected if not needed).
5.2 Speaker Installation
The speakers come with a 250cm (2.5 meter) long cable, allowing flexible placement on your vehicle. Two styles of speaker holders are provided to accommodate various mounting needs:
- Handlebar Mount: Clamps designed for 22mm (0.87") to 30mm (1.18") handlebars.
- Thread Mount: Brackets for 10MM thread mounting points.


6. Operating Instructions
6.1 Power On/Off
Press the 'POW' button on the main unit or remote control to turn the system on or off.
6.2 Mode Selection
Press the 'MOD' button on the main unit or remote control to cycle through available modes: Bluetooth, FM Radio, USB, SD/TF Card.
6.3 Bluetooth Pairing
- Switch the system to Bluetooth mode. The LCD display will indicate 'BT'.
- On your mobile device, enable Bluetooth and search for available devices.
- Select 'XYC Audio' (or similar) from the list to pair.
- Once paired, you can stream audio wirelessly from your device.
6.4 FM Radio Operation
- Switch the system to FM mode.
- Use the '◀◀' and '▶▶' buttons to manually tune frequencies or long-press to auto-scan for stations.
- The system supports full-band FM channels (87-108MHz).
6.5 USB/SD/TF Card Playback
- Insert a USB drive or SD/TF card (with MP3 music files) into the respective slot on the main unit.
- Switch the system to USB or SD mode. The system will automatically begin playing music.
- Use the '◀◀' and '▶▶' buttons to skip tracks.
6.6 Hands-Free Calling
When a phone call is received while in Bluetooth mode, the system will provide a warning bell and voice prompt. Use the built-in high-sensitive microphone for hands-free communication.
6.7 Alarm Function
The system includes an alarm function to enhance vehicle security. If someone attempts to move your vehicle without authorization, the alarm will activate. Ensure the yellow ignition wire is connected for this feature to function correctly.
7. Maintenance
- Cleaning: Use a soft, dry cloth to clean the main unit and speakers. Avoid abrasive cleaners or solvents.
- Connections: Periodically check all wiring connections to ensure they are secure and free from corrosion.
- Water Exposure: While waterproof, prolonged exposure to heavy rain or direct water jets should be minimized. Ensure all covers and seals are intact.
8. Troubleshooting
| Problem | Possible Cause | Solution |
|---|---|---|
| No power | Loose power connection; Blown fuse; Incorrect wiring. | Check all power wires (Red, Black, Yellow) for secure connection. Inspect vehicle's fuse box. Ensure correct polarity. |
| No sound from speakers | Loose speaker connections; Speakers damaged; Volume too low. | Verify speaker wire connections. Increase volume. Test speakers individually if possible. |
| Bluetooth not connecting | System not in Bluetooth mode; Device too far; Interference. | Ensure system is in BT mode. Move device closer. Restart both devices. |
| FM radio poor reception | Antenna not connected; Weak signal area; Interference. | Connect the white antenna wire to a metal part of the vehicle. Try auto-scanning for stations. Move to an area with better signal. |
| USB/SD card not playing | Incorrect file format; Card/drive not inserted correctly; Corrupted files. | Ensure files are MP3 format. Reinsert card/drive. Try a different card/drive. |
| Alarm function not working | Yellow ignition wire not connected. | Verify the yellow ignition wire is properly connected to a switched 12V source. |
9. Warranty and Support
This product comes with a limited warranty. Please refer to your purchase documentation for specific warranty terms and conditions. For technical support or service inquiries, please contact your retailer or the manufacturer directly. Keep your purchase receipt as proof of purchase.