1. Introduction
This manual provides essential information for the safe and effective operation, setup, maintenance, and troubleshooting of your Succebuy MIG-250 200A Welding Machine. This versatile machine supports MIG/MAG (Gas Metal Arc Welding) and MMA (Manual Metal Arc Welding) processes, suitable for various metal fabrication tasks. Please read this manual thoroughly before operating the equipment.
2. Safety Instructions
Welding operations involve significant risks. Adhering to safety precautions is crucial to prevent injury or damage. Always wear appropriate personal protective equipment (PPE) including a welding helmet with suitable shade, welding gloves, protective clothing, and safety shoes. Ensure adequate ventilation to avoid inhaling welding fumes. Keep a fire extinguisher nearby. Never operate the machine in damp conditions or near flammable materials.
- Electric Shock: Welding current can cause severe electric shock. Ensure proper grounding and inspect cables for damage.
- Fumes and Gases: Welding produces fumes and gases that can be hazardous. Work in a well-ventilated area or use fume extraction.
- Arc Rays: Arc rays can burn eyes and skin. Use a welding helmet with a proper filter shade and protective clothing.
- Fire and Explosion: Sparks and hot metal can cause fires. Keep flammable materials away from the welding area.
- Burns: Hot metal and equipment can cause severe burns. Handle hot parts with insulated gloves.
3. Product Features
The Succebuy MIG-250 welding machine incorporates advanced technology and design for reliable performance.

IGBT Inverter Technology
Utilizes advanced Insulated Gate Bipolar Transistor (IGBT) inverter technology for stable arc, high efficiency, and energy saving.

Multi-Function Control Panel
Features intuitive controls with digital displays for precise adjustment of welding voltage, current, and inductance for both MIG/MAG and MMA modes.

Integrated Wire Feeder
Equipped with an internal wire feeder that supports 0.8mm and 1.0mm welding wire, ensuring smooth and consistent wire delivery.

Efficient Cooling System
An integrated efficient cooling fan prevents overheating, extending the lifespan and ensuring stable operation during prolonged use.

Compact and Portable Design
Designed for portability with a compact form factor and a robust carrying handle, making it easy to transport to various job sites.

Wide Application Range
Ideal for welding thin sheets of steel, stainless steel, and aluminum, suitable for various professional and DIY applications.
4. Setup
Before operating the welding machine, ensure it is properly set up according to these instructions.
- Unpacking: Carefully remove the welding machine and all accessories from the packaging. Inspect for any shipping damage.
- Power Connection: Connect the machine to a suitable power supply. Ensure the voltage and current ratings match the machine's requirements.
- Ground Clamp Connection: Attach the ground clamp cable to the appropriate terminal on the machine and securely clamp it to the workpiece or welding table. Ensure good electrical contact.
- MIG Torch Connection: For MIG/MAG welding, connect the MIG torch to the Euro connector on the front panel. Ensure it is tightened securely.
- MMA Electrode Holder Connection: For MMA welding, connect the electrode holder cable to the positive (+) terminal and the ground clamp to the negative (-) terminal (or vice-versa depending on electrode type).
- Gas Connection (MIG/MAG): If using shielding gas for MIG/MAG welding, connect the gas hose from your gas cylinder regulator to the gas inlet on the machine. Ensure all connections are leak-free.
- Wire Spool Installation (MIG/MAG): Open the wire feeder compartment. Place the wire spool (up to 200mm diameter) onto the spool holder. Thread the welding wire through the guide and feed rollers, then into the torch liner. Ensure the correct drive roller size (0.8mm or 1.0mm) is installed for your wire.
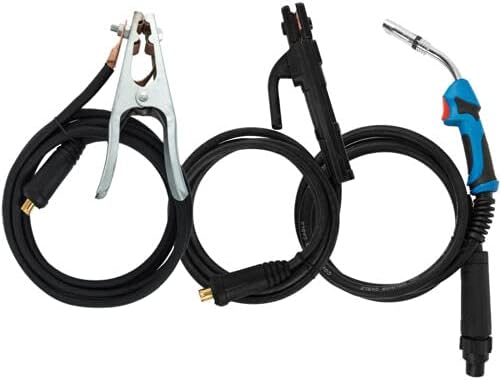
Included accessories: MIG torch, ground clamp, and electrode holder.
5. Operating Instructions
Follow these steps for safe and effective welding.
- Power On: Turn on the main power switch located on the front or rear of the machine.
- Select Welding Mode: Use the mode selection switch on the control panel to choose between MIG/MAG or MMA welding.
- Adjust Parameters:
- MIG/MAG: Adjust welding voltage, current (wire feed speed), and inductance using the respective knobs. Refer to welding charts for recommended settings based on material thickness and wire type.
- MMA: Adjust the welding current (amperage) according to the electrode manufacturer's recommendations.
- Gas Flow (MIG/MAG): If using shielding gas, open the gas cylinder valve and adjust the flow rate on the regulator to the recommended level (typically 8-15 L/min).
- Test Weld: Perform a test weld on a scrap piece of material to verify settings and make any necessary adjustments before welding your actual workpiece.
- Welding: Begin welding, maintaining a consistent arc length and travel speed.
- Power Off: After welding, turn off the machine, close the gas cylinder valve (if applicable), and disconnect the ground clamp.
6. Maintenance
Regular maintenance ensures the longevity and optimal performance of your welding machine.
- Cleaning: Periodically clean the machine's exterior with a dry, soft cloth. Use compressed air to blow out dust and debris from inside the machine, especially around the cooling fan and circuit boards. Ensure the machine is unplugged before cleaning.
- Cable Inspection: Regularly inspect all welding cables, including the ground clamp and torch cables, for cuts, cracks, or damaged insulation. Replace damaged cables immediately.
- Wire Feeder: Clean the wire feed rollers and guide tubes to prevent wire feeding issues. Check for wear on the drive rollers and replace if necessary.
- MIG Torch: Regularly clean or replace the contact tip, gas nozzle, and diffuser. Ensure the torch liner is free of kinks and blockages.
- Electrode Holder: Inspect the electrode holder for damage and ensure good electrical contact.
7. Troubleshooting
This section addresses common issues you might encounter during operation.
| Problem | Possible Cause | Solution |
|---|---|---|
| No power to machine | Power cable disconnected, circuit breaker tripped, machine switch off | Check power cable, reset circuit breaker, turn on machine switch |
| No welding arc | Poor ground connection, incorrect settings, damaged cables, wrong mode selected | Ensure good ground contact, adjust settings, inspect cables, verify mode selection |
| Wire feed issues (MIG) | Wire tangled, wrong drive roller size, clogged liner, worn contact tip, incorrect tension | Untangle wire, use correct drive rollers, clean/replace liner, replace contact tip, adjust tension |
| Poor weld quality | Incorrect parameters, improper technique, contaminated workpiece, insufficient gas flow (MIG) | Adjust voltage/current/wire speed, improve technique, clean workpiece, check gas flow/leaks |
| Overheating protection activated | Exceeded duty cycle, blocked ventilation, high ambient temperature | Allow machine to cool down, clear ventilation openings, operate in cooler environment |
If problems persist after attempting these solutions, please contact customer support.
8. Specifications
Key technical specifications for the Succebuy MIG-250 welding machine:
| Feature | Specification |
|---|---|
| Model | MIG-250 |
| MIG Welding Current Range | 30-250A |
| MMA Welding Current Range | 20-200A |
| MIG Wire Diameter | 0.8 / 1.0mm |
| Wire Spool Diameter | 200mm |
| Technology | IGBT Inverter |
| Dimensions (L x W x H) | Approx. 53 x 41 x 27 cm (20.8" x 16.1" x 10.6") |
| Manufacturer | Succebuy |

Approximate dimensions of the Succebuy MIG-250 welding machine.
9. Warranty and Support
For warranty information, please refer to the documentation provided with your purchase or contact the retailer. For technical support, spare parts, or service inquiries, please contact Succebuy customer service directly. Have your model number (MIG-250) and purchase details ready when contacting support.


