XYC MP-D056
XYC 12V Waterproof Bluetooth Audio System User Manual
Model: MP-D056
Introduction
This manual provides detailed instructions for the installation, operation, and maintenance of your XYC 12V Waterproof Bluetooth Audio System. This system is designed for motorcycles, UTVs, and ATVs, offering a robust and waterproof audio solution with Bluetooth connectivity, FM radio, and USB/SD card playback.
Please read this manual thoroughly before using the product to ensure proper function and safety.
Safety Information
- Ensure the power supply is 12V DC. Connecting to an incorrect voltage may damage the unit.
- Do not disassemble or modify the unit. This may void the warranty and cause damage.
- Keep the unit away from extreme temperatures and direct sunlight for prolonged periods.
- Ensure all connections are secure and properly insulated to prevent short circuits.
- Always prioritize safe operation of your vehicle. Adjust audio settings only when it is safe to do so.
Package Contents
Verify that all items listed below are included in your package:
- 1x Main Unit (Amplifier)
- 4x Speakers (3-inch, 2-way)
- 1x Mounting Bracket for Main Unit
- Speaker Mounting Brackets (for handlebars and 10MM thread)
- Remote Control
- Wired Control Panel
- Power and Speaker Wiring Harness
- Installation Hardware (screws, nuts)

Image: Overview of all components included in the package, showing the main unit, four speakers, remote controls, wiring, and various mounting hardware.
Product Overview
The XYC audio system consists of a main amplifier unit and four waterproof speakers, designed for outdoor vehicle use. It features a large LCD display, Bluetooth for wireless audio streaming and hands-free calls, FM radio, and playback from USB drives or SD/TF cards.
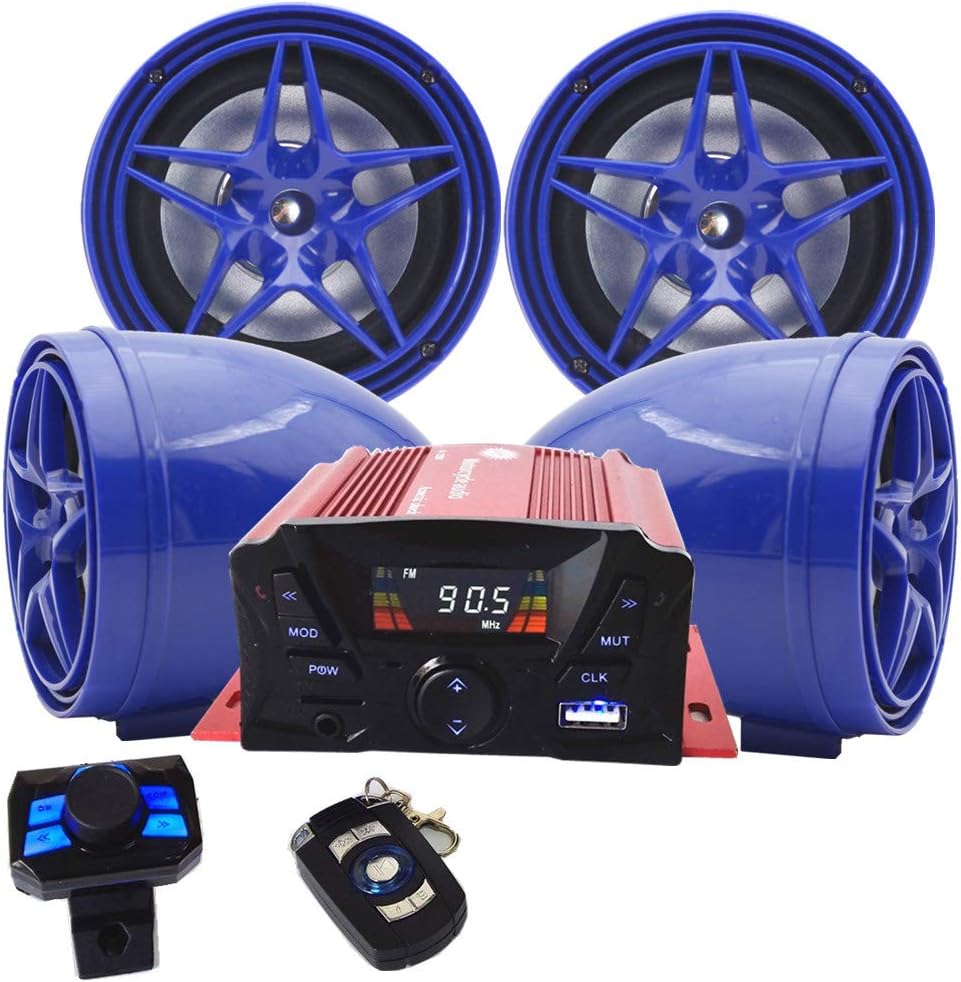
Image: The main unit, four blue speakers, wired control panel, and key fob remote control are displayed together.
Main Unit Features

Image: Detailed view of the main unit's front panel with labels for LED display, PREV, MODE, POW, TF slot, AUX IN, VOL-, VOL+, USB slot, CLK, MUTE, NEXT. The rear panel shows POWER Jack, DC Jack, remote code button, control line slot, and OUTPUT Jack. Also shown are the key fob remote and wired control panel with their respective buttons labeled.
- Front Panel: LED display, control buttons (PREV, MODE, POW, VOL-, VOL+, MUTE, NEXT, CLK), TF card slot, USB slot, AUX IN.
- Rear Panel: Power input, DC jack, remote control code button, control line slot, speaker output jacks.
Speakers
The system includes four 3-inch, 2-way speakers. They are designed to be waterproof and can be mounted using the provided brackets.

Image: Two different styles of speaker holders are shown: one for handlebar mounting (22mm-30mm) and another for 10MM thread mounting.

Image: A single speaker is shown with its attached wiring, indicating a length of 250cm (2.5 meters) for flexible placement.
Setup and Installation
Careful installation is crucial for optimal performance and safety. If you are unsure about any steps, consult a professional.
Wiring Connections
The system requires a 12V DC power source. Ensure proper polarity and secure connections.
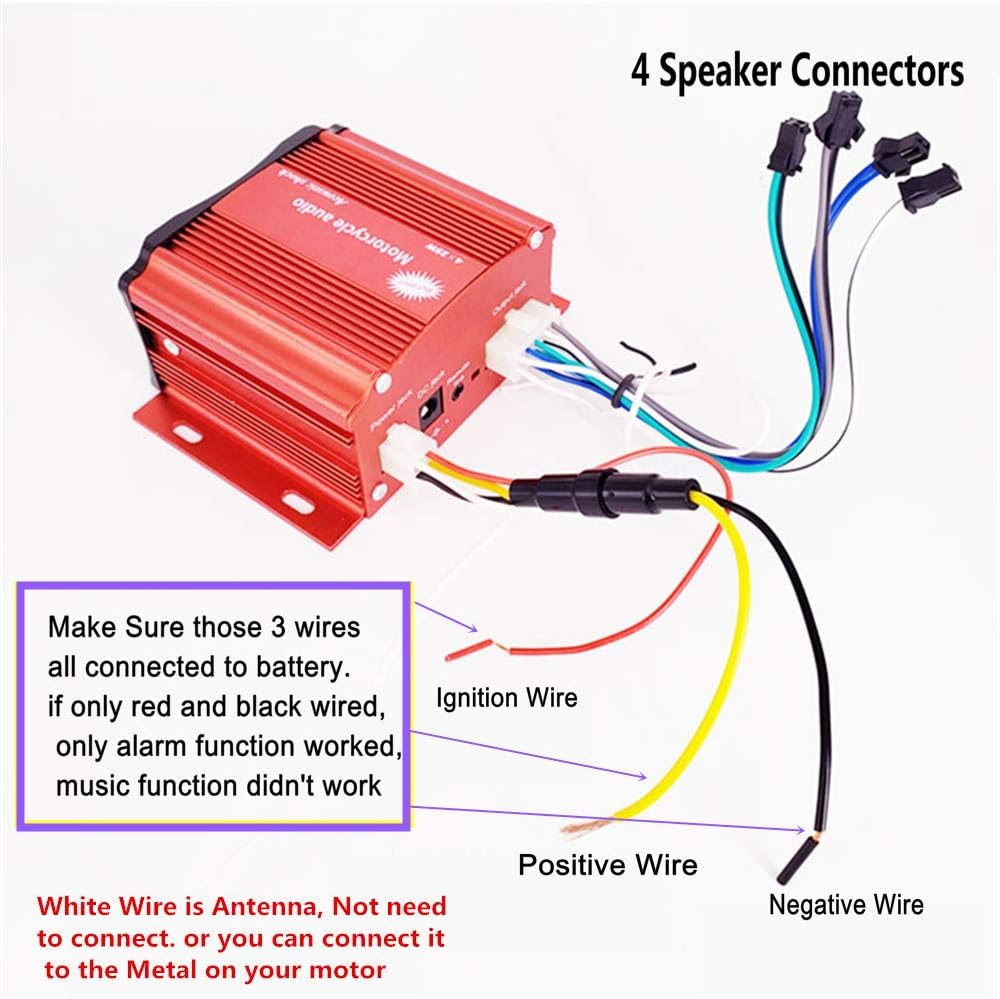
Image: A diagram illustrating the wiring connections. It shows four speaker connectors, an ignition wire, a positive wire, a negative wire, and a white antenna wire. Important note: all three wires (ignition, positive, negative) must be connected to the battery for full functionality (music and alarm). If only red and black are wired, only the alarm function may work, and music playback will not. The white wire is an antenna and can be connected to metal on the motor or left unconnected.
- Speaker Connections: Connect the four speaker wires from the main unit's output jack to the respective speakers. Ensure correct polarity for each speaker.
- Power Connections:
- Connect the Positive Wire (typically red) to the positive terminal of your vehicle's 12V battery.
- Connect the Negative Wire (typically black) to the negative terminal of your vehicle's 12V battery or a suitable ground point on the chassis.
- Connect the Ignition Wire (typically yellow) to a switched 12V source that turns on and off with your vehicle's ignition.
- Important: For full functionality, including music playback and alarm features, ensure all three power wires (Positive, Negative, and Ignition) are properly connected to the battery circuit. If only red and black are wired, only the alarm function may work, and music playback will not.
- Antenna Connection: The white wire serves as an antenna. It can be connected to a metal part of your vehicle for improved FM reception, or it can be left unconnected if reception is adequate.
Mounting the Main Unit
Use the provided mounting bracket to secure the main unit in a safe and accessible location on your vehicle. Ensure it is protected from direct impact and excessive vibration.
Mounting the Speakers
Choose the appropriate speaker holders based on your vehicle's mounting points (handlebars or 10MM thread). Securely attach the speakers, ensuring they are positioned for optimal sound dispersion and are not obstructed.
The speaker cables are 250cm (2.5 meters) long, allowing for flexible placement.
Operating Instructions
Power On/Off
- Press the POW button on the main unit or the power button on the remote control to turn the system on or off.
Mode Selection
- Press the MODE button on the main unit or remote control to cycle through available modes: Bluetooth, FM Radio, USB, TF Card, AUX IN.
Volume Control
- Use the VOL+ and VOL- buttons on the main unit or the volume controls on the remote to adjust the audio level.
Bluetooth Operation
- Switch the system to Bluetooth Mode using the MODE button. The display will indicate Bluetooth pairing readiness.
- On your mobile device, enable Bluetooth and search for available devices. Select "XYC Audio" (or similar) to pair.
- Once paired, you can stream audio wirelessly from your device.
- Hands-Free Calls: The system has a built-in high-sensitive microphone. When a call comes in, the system will provide a warning bell, and you can answer/end calls using the remote control.
FM Radio Operation
- Switch the system to FM Radio Mode.
- Use the PREV and NEXT buttons to tune to different radio stations.
- The system supports full-band FM channels (87-108MHz). AM band is not available.
USB/TF Card Playback
- Insert a USB drive into the USB slot or a TF (Micro SD) card into the TF slot.
- The system will automatically switch to USB or TF card mode and begin playing MP3 music.
- Use the PREV and NEXT buttons to skip tracks. Use the Play/Pause button on the remote to control playback.
- Note: The equalizer function is only available in TF/USB Mode.
AUX IN
- Connect an external audio device (e.g., MP3 player, smartphone) to the AUX IN port using a 3.5mm audio cable.
- Switch the system to AUX IN Mode. Audio will play from the connected device.
Clock Function
- Press the CLK button to display the time.
- Refer to the remote control instructions for setting the clock.
Remote Control
The system includes a key fob remote and a wired control panel for convenient operation. The key fob remote has a built-in AUX input and background light for dark conditions.
- Key Fob Remote: Features buttons for Play/Pause/Mode, On/Off Alarm, Equalizer, PREV, NEXT, MUTE.
- Wired Control Panel: Features buttons for On/Off Volume +/-, PREV, NEXT, Alarm, MOD, EQ, Play/Pause.
Maintenance
- Cleaning: Use a soft, damp cloth to clean the main unit and speakers. Do not use harsh chemicals or abrasive cleaners.
- Waterproofing: The system is designed to be waterproof. However, avoid submerging the unit or exposing it to high-pressure water jets. Ensure all covers and ports are securely closed.
- Connections: Periodically check all wiring connections to ensure they remain secure and free from corrosion.
Troubleshooting
| Problem | Possible Cause | Solution |
|---|---|---|
| No power / Unit does not turn on. |
|
|
| No sound / Very low sound. |
|
|
| Bluetooth not pairing. |
|
|
| Poor FM reception. |
|
|
| Equalizer not working. |
|
|
Specifications

Image: Technical drawing showing the dimensions of the main unit (approx. 110mm x 83.5mm x 50mm) and the speakers (approx. 89mm diameter x 102mm depth).
| Feature | Detail |
|---|---|
| Model Number | MP-D056 |
| Input Voltage | DC 12V (36V-72V models require an adapter) |
| Power Output | 4 x 25W |
| Speaker Impedance | 4-8Ω |
| Speaker Size | 3 Inches (83.5mm diameter x 102mm depth) |
| Main Unit Size | Approx. 100mm (4") x 60mm (2-3/8") x 44mm (1-3/4") |
| Bluetooth Version | V3.0+EDR (Supports AVRCP1.0, GAVDP1.0, AVDTP1.0, A2DP1.0) |
| Bluetooth Frequency | 2.402GHz - 2.480GHz |
| Effective Transmission Distance | >10 Meters |
| FM Frequency Range | 87-108MHz (AM band not available) |
| Water Resistance Level | Waterproof |
| Supported Media | MP3 from USB or SD/TF card |
| Special Features | Hands-free calling, LCD display with clock, remote control with backlight. |
Warranty and Support
This product comes with a limited warranty. Please retain your proof of purchase for any warranty claims.
For technical support or warranty inquiries, please contact your retailer or the manufacturer directly. Contact information may be available on the product packaging or the manufacturer's official website.
Related Documents - MP-D056
 |
IVAR MULTI•PRESS® User Manual: Hydronic Press Fitting System Comprehensive user manual for the IVAR MULTI•PRESS® system, detailing installation, specifications, compatibility, and technical data for hydronic press fittings used in climate control and sanitary systems. |
 |
NAGAOKA MP Series Stereo Cartridge Operation Manual Comprehensive operation manual for NAGAOKA MP Series stereo cartridges, detailing installation, stylus replacement, specifications, usage precautions, and warranty information for models MP-500, MP-300, MP-200, MP-150, and MP-110. |
 |
TAC MP-5200 Series Electronic Hydraulic Actuator General Instructions and Specifications Comprehensive guide to TAC MP-5200 Series electronic hydraulic actuators, covering applications, features, specifications, installation, wiring, troubleshooting, and replacement parts. Includes detailed technical information for HVAC control systems. |
 |
Hunter MP Rotator™ Design Guide: High-Efficiency, Multi-Stream Nozzles This design guide provides comprehensive information on Hunter MP Rotator™ high-efficiency, multi-stream nozzles. It covers nozzle features, application details, precipitation rates, layout and placement strategies, cost and water savings, filtration recommendations, and performance data for residential and commercial irrigation systems. |
 |
Robot Coupe Immersion Blenders: User Manual and Operating Guide Comprehensive user manual for Robot Coupe immersion blenders, covering operation, safety, maintenance, troubleshooting, and specifications for models like MP 350 Turbo, MP 450 Turbo, MP 600 Turbo, and MP 800 Turbo. Includes detailed instructions for use, cleaning, and assembly. |
 |
Robot Coupe Immersion Blender User Manual: Operation, Safety, and Maintenance Comprehensive user manual for Robot Coupe immersion blenders (MP 350, MP 450, MP 550, MP 600, MP 800 series). Covers operation, safety warnings, cleaning, maintenance, troubleshooting, and warranty information. |
Ask a question about this manual
Ask about setup, troubleshooting, compatibility, parts, safety, or missing instructions. Manuals+ will review the question and use this page’s manual context to help answer it.