1. Introduction
This manual provides essential information for the safe and efficient assembly, operation, and maintenance of your tectake Lean-To Greenhouse. Designed to be attached to an existing wall, this greenhouse offers an optimal environment for cultivating plants, protecting them from adverse weather conditions such as cold, rain, and frost. Please read these instructions thoroughly before beginning assembly or use to ensure proper functionality and longevity of your greenhouse.
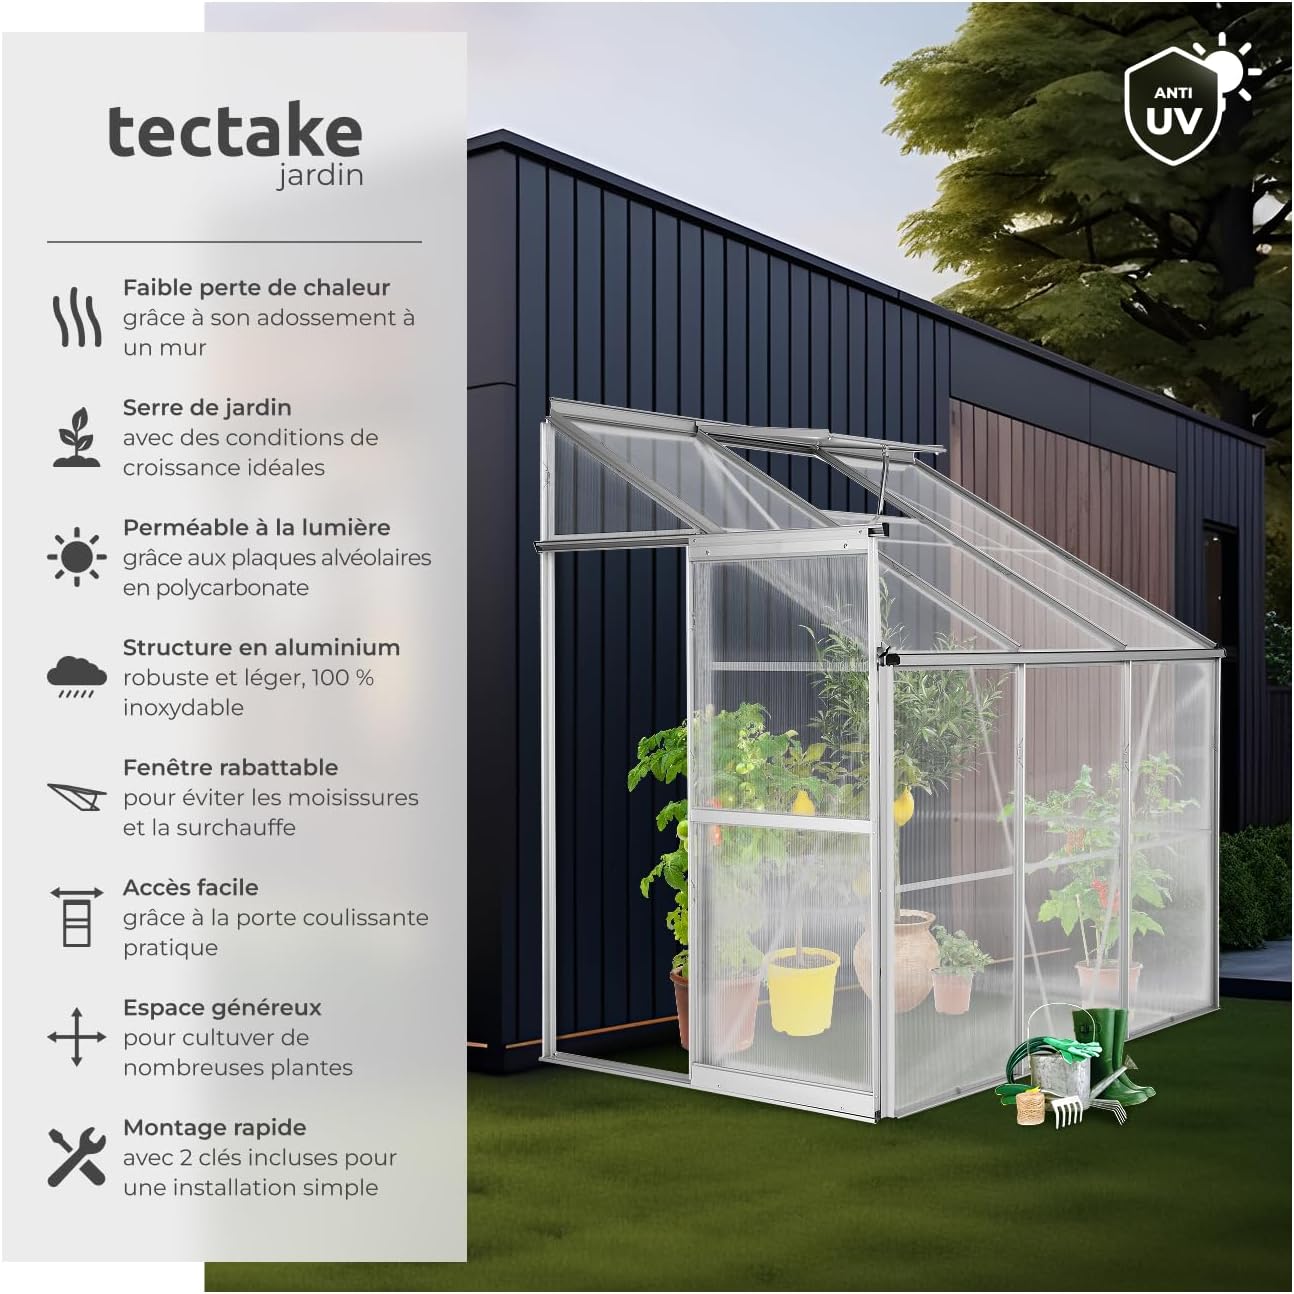
Figure 1: tectake Lean-To Greenhouse in a garden setting, demonstrating its wall-mounted design.
2. Safety Information
Adherence to the following safety guidelines is crucial for preventing injury and damage to the product.
- Assembly and Installation: Always assemble and install the greenhouse strictly according to the provided instructions to ensure its stability. Improper assembly can lead to structural failure, especially in adverse weather conditions.
- Heat Sources: Do not expose the greenhouse to excessive heat sources or open flames. The polycarbonate panels and aluminum frame are not fireproof and can be damaged or pose a fire hazard.
- Children and Pets: Keep children and pets away from the assembly area and the greenhouse during use. Small parts and tools used during assembly can be choking hazards, and the structure itself may present risks if not handled properly.
- Wind Stability: In areas prone to strong winds, additional anchoring or reinforcement may be necessary to prevent the greenhouse from being dislodged or damaged.
- Sharp Edges: Be aware of potentially sharp edges on aluminum profiles during assembly. Wear appropriate protective gloves.
3. Package Contents
Before beginning assembly, verify that all components listed below are present and undamaged. If any parts are missing or damaged, contact customer support immediately.
- 1 x Greenhouse structure (anodized aluminum profiles)
- Polycarbonate hollow-chamber panels (4 mm thick)
- Mounting material (screws, bolts, clips, seals)
- Assembly instructions manual
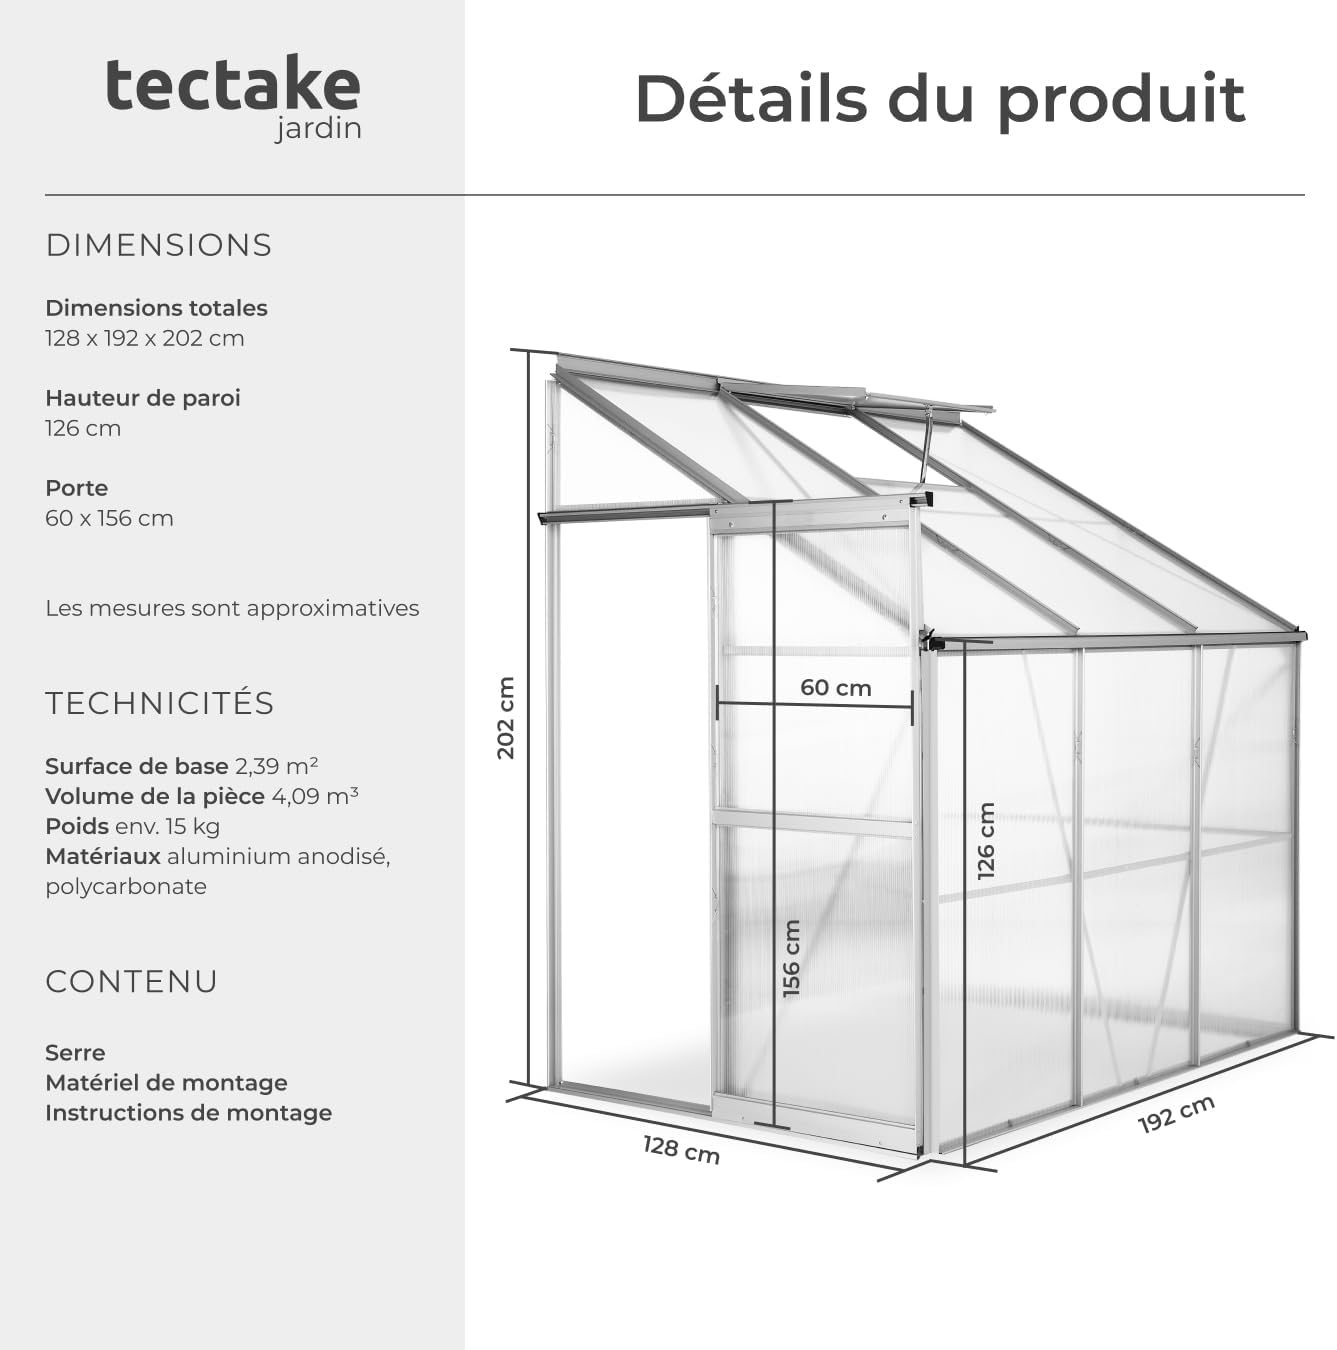
Figure 2: Overview of product dimensions and included components.
4. Setup and Assembly
Assembly of the tectake Lean-To Greenhouse requires careful attention to detail and patience. It is recommended to have at least two people for assembly. Please follow the included detailed assembly instructions step-by-step.
- Site Preparation: Choose a level and stable surface for installation. The greenhouse is designed to be adjoined to a sturdy wall. Ensure the wall can support the structure.
- Unpack Components: Carefully unpack all parts and lay them out. Refer to the parts list in the separate assembly manual to identify each component.
- Frame Assembly: Begin by assembling the aluminum frame according to the diagrams in the assembly manual. Ensure all connections are secure but do not overtighten until the entire frame is aligned.
- Panel Installation: Insert the polycarbonate panels into the designated channels of the aluminum frame. Ensure the UV-protected side of the panels faces outwards (if specified in the separate manual). Secure panels with the provided clips or seals.
- Door and Window Installation: Install the sliding door and roof window as per the instructions. Ensure they operate smoothly.
- Anchoring: Securely anchor the greenhouse to the ground and the adjoining wall. This is critical for stability, especially in windy conditions. Consider using additional anchoring methods if your location experiences strong winds.

Figure 3: Internal frame structure, illustrating the aluminum profiles and panel channels.
5. Operating Instructions
Your tectake Lean-To Greenhouse is designed for ease of use and optimal plant growth.
- Sliding Door: The greenhouse features a practical sliding door for easy access. Gently slide the door along its track to open or close it. Avoid forcing the door to prevent damage to the runners.
- Roof Window: The integrated roof window allows for natural ventilation and temperature regulation. Open the window to release excess heat and humidity, and close it to retain warmth. For optimal air circulation, especially during warmer periods, ensure the window is used regularly.
- Climate Control: Monitor the internal temperature and humidity. The polycarbonate panels provide good insulation and UV protection, but manual adjustment of the roof window may be necessary to maintain ideal growing conditions for your specific plants.
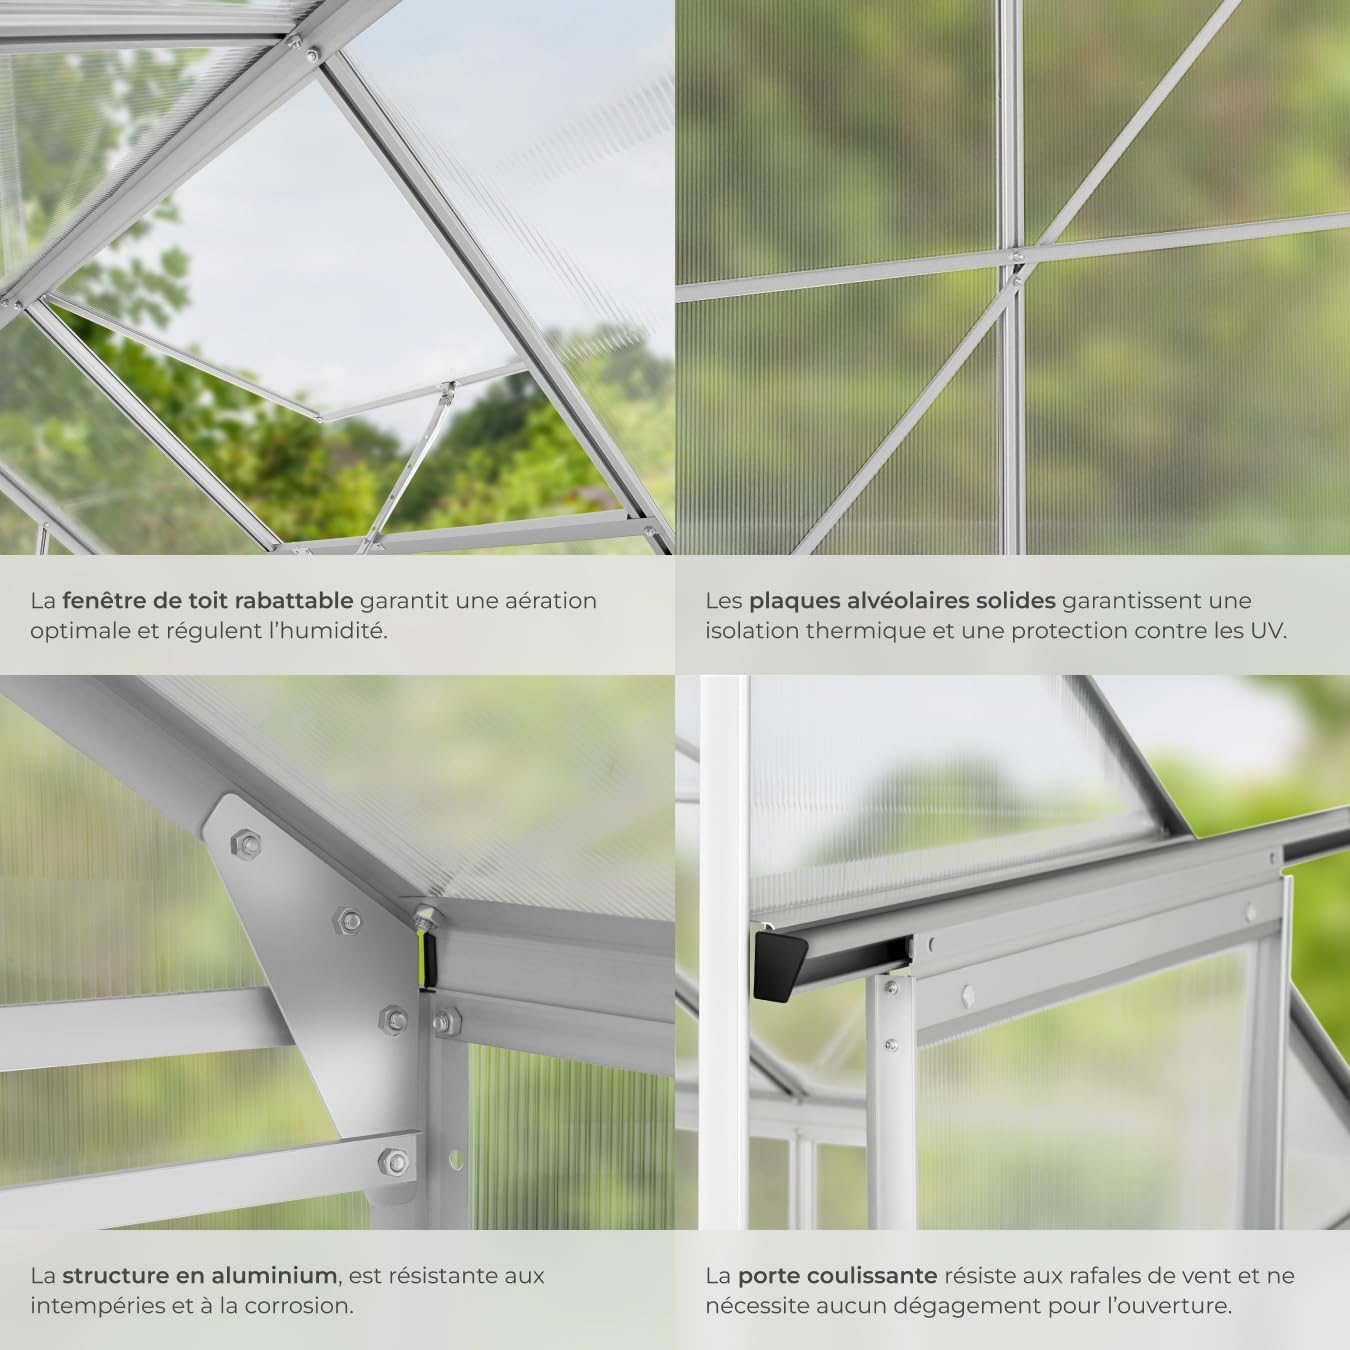
Figure 4: Detail of the roof window for ventilation and the solid polycarbonate panels.
6. Maintenance
Regular maintenance will extend the lifespan of your greenhouse and ensure its continued performance.
- Cleaning: Clean the polycarbonate panels periodically with mild soap and water using a soft cloth or sponge. Avoid abrasive cleaners or brushes that could scratch the panels. Rinse thoroughly with clean water.
- Frame Inspection: Annually inspect the aluminum frame for any signs of corrosion, damage, or loose fasteners. Tighten any loose screws or bolts.
- Panel Security: Check that all polycarbonate panels are securely held in place by their clips or seals. Re-secure any loose panels to prevent them from dislodging in windy conditions.
- Door and Window Tracks: Keep the sliding door and roof window tracks clean and free of debris to ensure smooth operation. Lubricate with a silicone spray if necessary.
- Winter Preparation: While the greenhouse offers protection, in regions with heavy snowfall, it is advisable to gently remove accumulated snow from the roof to prevent excessive weight and potential damage.
7. Troubleshooting
This section addresses common issues you might encounter with your greenhouse.
| Problem | Possible Cause | Solution |
|---|---|---|
| Panels dislodge in wind. | Insufficient anchoring; clips/seals not fully secured; extreme wind conditions. | Ensure the greenhouse is firmly anchored to the ground and wall. Verify all panel clips/seals are correctly installed and secure. Consider additional reinforcement or silicone sealant for panels in very windy areas. |
| Difficulty during assembly. | Instructions unclear; parts misidentified; frame not aligned. | Carefully review the assembly manual diagrams. Ensure all parts are correctly oriented before tightening. Seek assistance from another person. |
| Door or window sticks. | Debris in tracks; misaligned frame; lack of lubrication. | Clean tracks thoroughly. Check frame for squareness and alignment. Apply a silicone-based lubricant to the tracks. |
| Water leakage. | Improperly sealed panels; damaged seals; gaps in frame. | Inspect all panel edges and seals. Apply weather-resistant silicone sealant to any gaps or compromised areas. |

Figure 5: Greenhouse designed to withstand various weather conditions.
8. Specifications
Key technical specifications for the tectake Lean-To Greenhouse, Model 402470-10.
- Model Number: 402470-10
- Total Dimensions (L x W x H): Approximately 192 cm x 128 cm x 202 cm
- Surface Area: Approximately 2.39 m²
- Volume: Approximately 4.09 m³
- Eave Height (front): Approximately 126 cm
- Door Dimensions (W x H): Approximately 60 cm x 156 cm
- Panel Thickness: 4 mm (hollow-chamber polycarbonate)
- Materials: Anodized Aluminum frame, Polycarbonate (PC) panels
- Weight: Approximately 15 kg
- UV Protection: Yes
- Water Resistance: Watertight
- Assembly Required: Yes
9. Warranty and Support
For information regarding the product warranty, please refer to the documentation provided at the time of purchase or contact your retailer. For technical support, missing parts, or any other inquiries, please contact the tectake customer service or your point of purchase. Please have your model number (402470-10) and purchase details ready when contacting support.


