NEEWER 10094884
Neewer 200W LED Video Light User Manual
Model: 10094884 | Brand: NEEWER
Introduction
This manual provides detailed instructions for the safe and effective operation of your Neewer 200W LED Video Light. This professional-grade continuous lighting solution features a stable 5600K color temperature, high CRI 95+, and a powerful 21000LM output, making it suitable for various applications including YouTube video production, studio portraiture, product photography, weddings, and interviews. Please read this manual thoroughly before use and retain it for future reference.

Image: The Neewer 200W LED Video Light, showcasing its main unit, remote control, and power cables.
Package Contents
Verify that all items listed below are included in your package. If any items are missing or damaged, please contact your retailer.
- 1 x Neewer SL-200W Video Light
- 1 x Reflector Cover
- 1 x Power Cord
- 1 x 2.4G Wireless Remote Control (requires 2 AA batteries, not included)

Image: Visual representation of the items included in the Neewer 200W LED Video Light package.
Product Overview and Function Diagram
Familiarize yourself with the various components and controls of the Neewer 200W LED Video Light and its remote control.
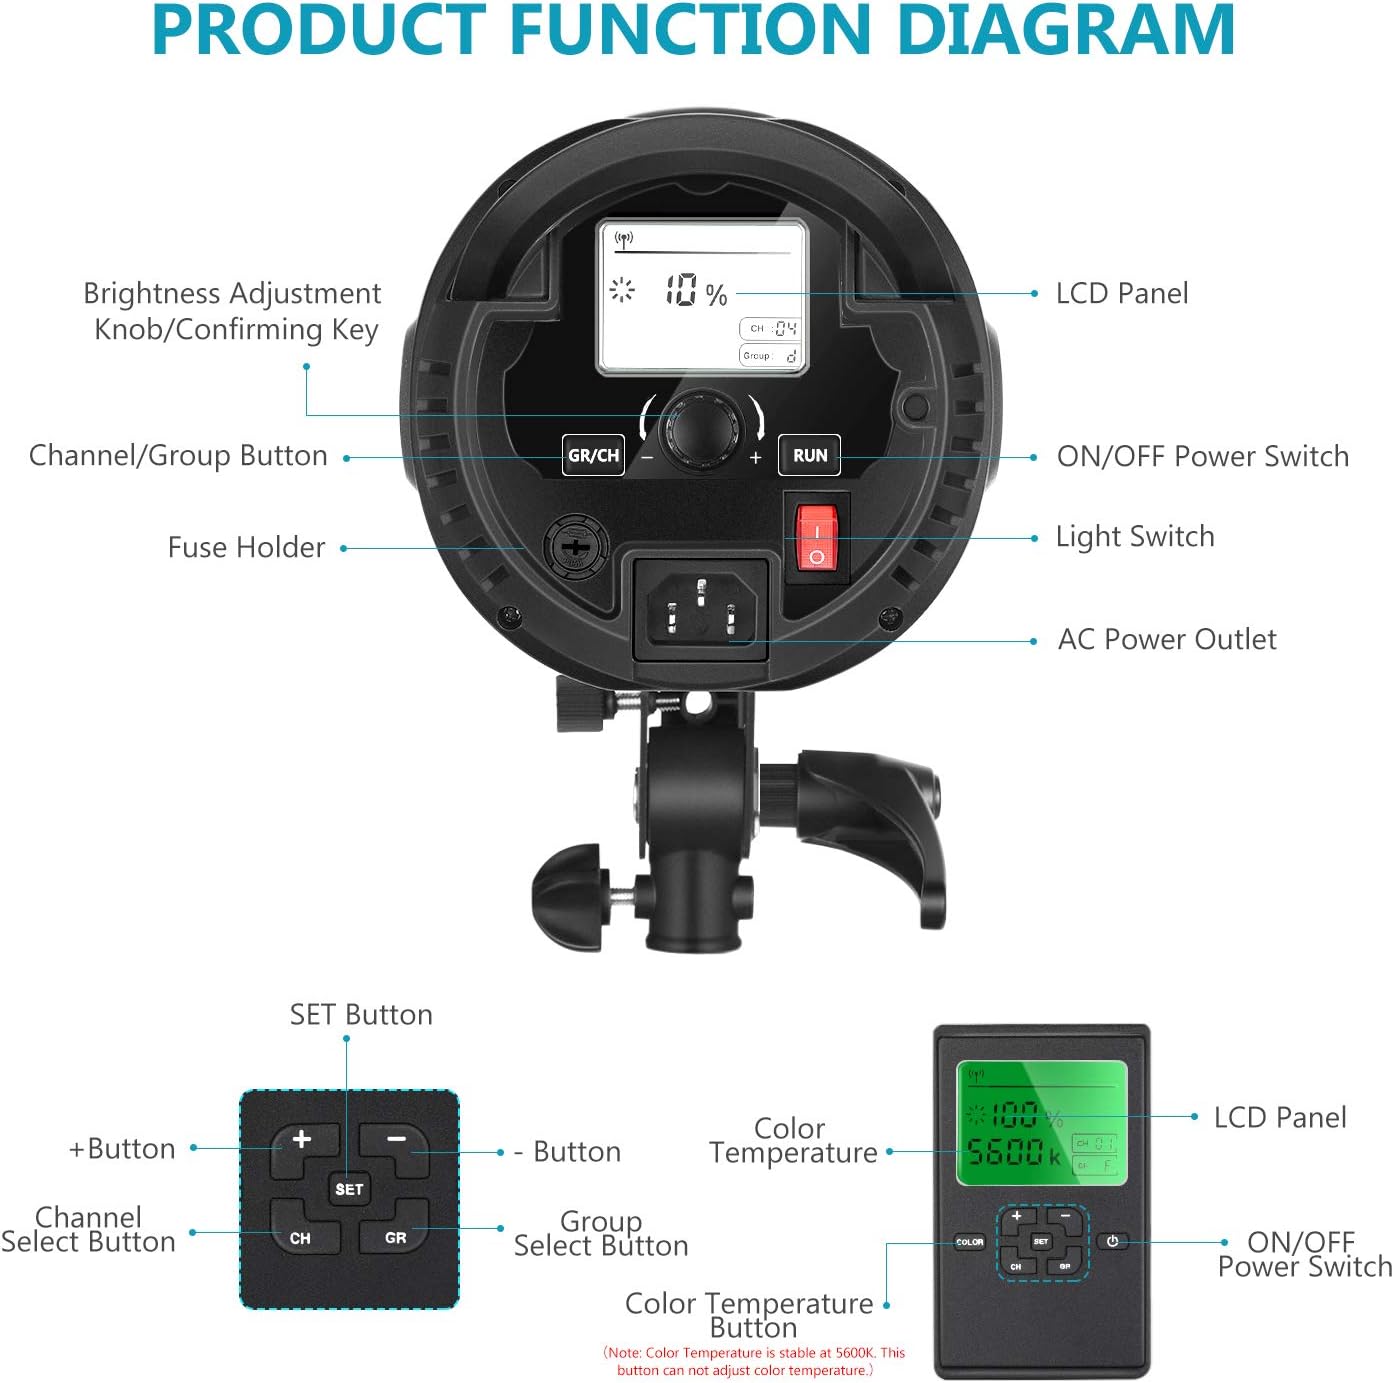
Image: A comprehensive diagram illustrating the functional parts of the Neewer 200W LED Video Light and its remote control.
Main Unit Components:
- Brightness Adjustment Knob/Confirming Key: Used to adjust light intensity and confirm settings.
- LCD Panel: Displays current settings such as brightness percentage, channel, and group.
- Channel/Group Button (GR/CH): Toggles between channel and group selection modes.
- ON/OFF Power Switch: Powers the light unit on or off.
- Fuse Holder: Contains the protective fuse for the unit.
- Light Switch (RUN): Activates or deactivates the light output while keeping the fan operational, which is useful for heat dissipation after extended use.
- AC Power Outlet: Connects the power cord to the main power supply.
Remote Control Components:
- SET Button: Enters setting mode for channel and group.
- + Button: Increases brightness or navigates options.
- - Button: Decreases brightness or navigates options.
- CH (Channel Select Button): Selects the operating channel.
- GR (Group Select Button): Selects the operating group.
- Color Temperature Display: Shows the fixed color temperature (5600K). Note: This button cannot adjust the color temperature of the SL-200W light.
- ON/OFF Power Switch: Powers the remote control on or off.
Setup
1. Mounting the Light
The Neewer 200W LED Video Light features a standard Bowens mount, allowing for compatibility with a wide range of light modifiers such as softboxes, snoots, beauty dishes, and barn doors. Securely attach the light to a sturdy light stand using the integrated mounting bracket.

Image: The Bowens mount interface on the light, demonstrating its versatility with various light shaping tools.
2. Connecting Power
Connect the provided power cord to the AC Power Outlet on the back of the light unit, then plug the other end into a suitable wall outlet. Ensure the power source meets the light's voltage requirements.
3. Remote Control Battery Installation
Open the battery compartment on the back of the 2.4G wireless remote control and insert two (2) AA batteries, observing the correct polarity. Close the compartment securely.
Operating Instructions
1. Powering On/Off
- To power on the light, flip the ON/OFF Power Switch on the main unit to the 'ON' position. The LCD panel will illuminate.
- To turn off the light, flip the ON/OFF Power Switch to the 'OFF' position.
- The Light Switch (RUN) button on the main unit can be used to temporarily turn off the light output while keeping the cooling fan operational, which is useful for heat dissipation after extended use.
2. Adjusting Brightness
Brightness can be adjusted directly on the light unit or via the remote control.
- On the Light Unit: Rotate the Brightness Adjustment Knob to increase or decrease the light intensity. The LCD panel will display the current brightness percentage.
- Using the Remote Control: Ensure the remote is powered on. Use the + and - buttons to adjust the brightness. The remote's display will show the percentage.

Image: Visual representation of the light's adjustable brightness, from low to high intensity.
3. Channel and Group Settings (Remote Control)
The 2.4G wireless remote allows for controlling multiple Neewer lights simultaneously by assigning them to specific channels and groups.
- Setting Channel/Group on Light Unit: Press the GR/CH button to switch between channel (CH) and group (GR) selection. Rotate the Brightness Adjustment Knob to select the desired channel (1-16) or group (A-D). Press the knob to confirm.
- Setting Channel/Group on Remote: Press the SET button. Use the CH button to select the channel and the GR button to select the group. Use the + and - buttons to change the values. Ensure the remote's channel and group match the light unit's settings for proper communication.
4. Color Temperature
The Neewer 200W LED Video Light has a fixed color temperature of 5600K (Daylight Balanced). This setting cannot be adjusted.
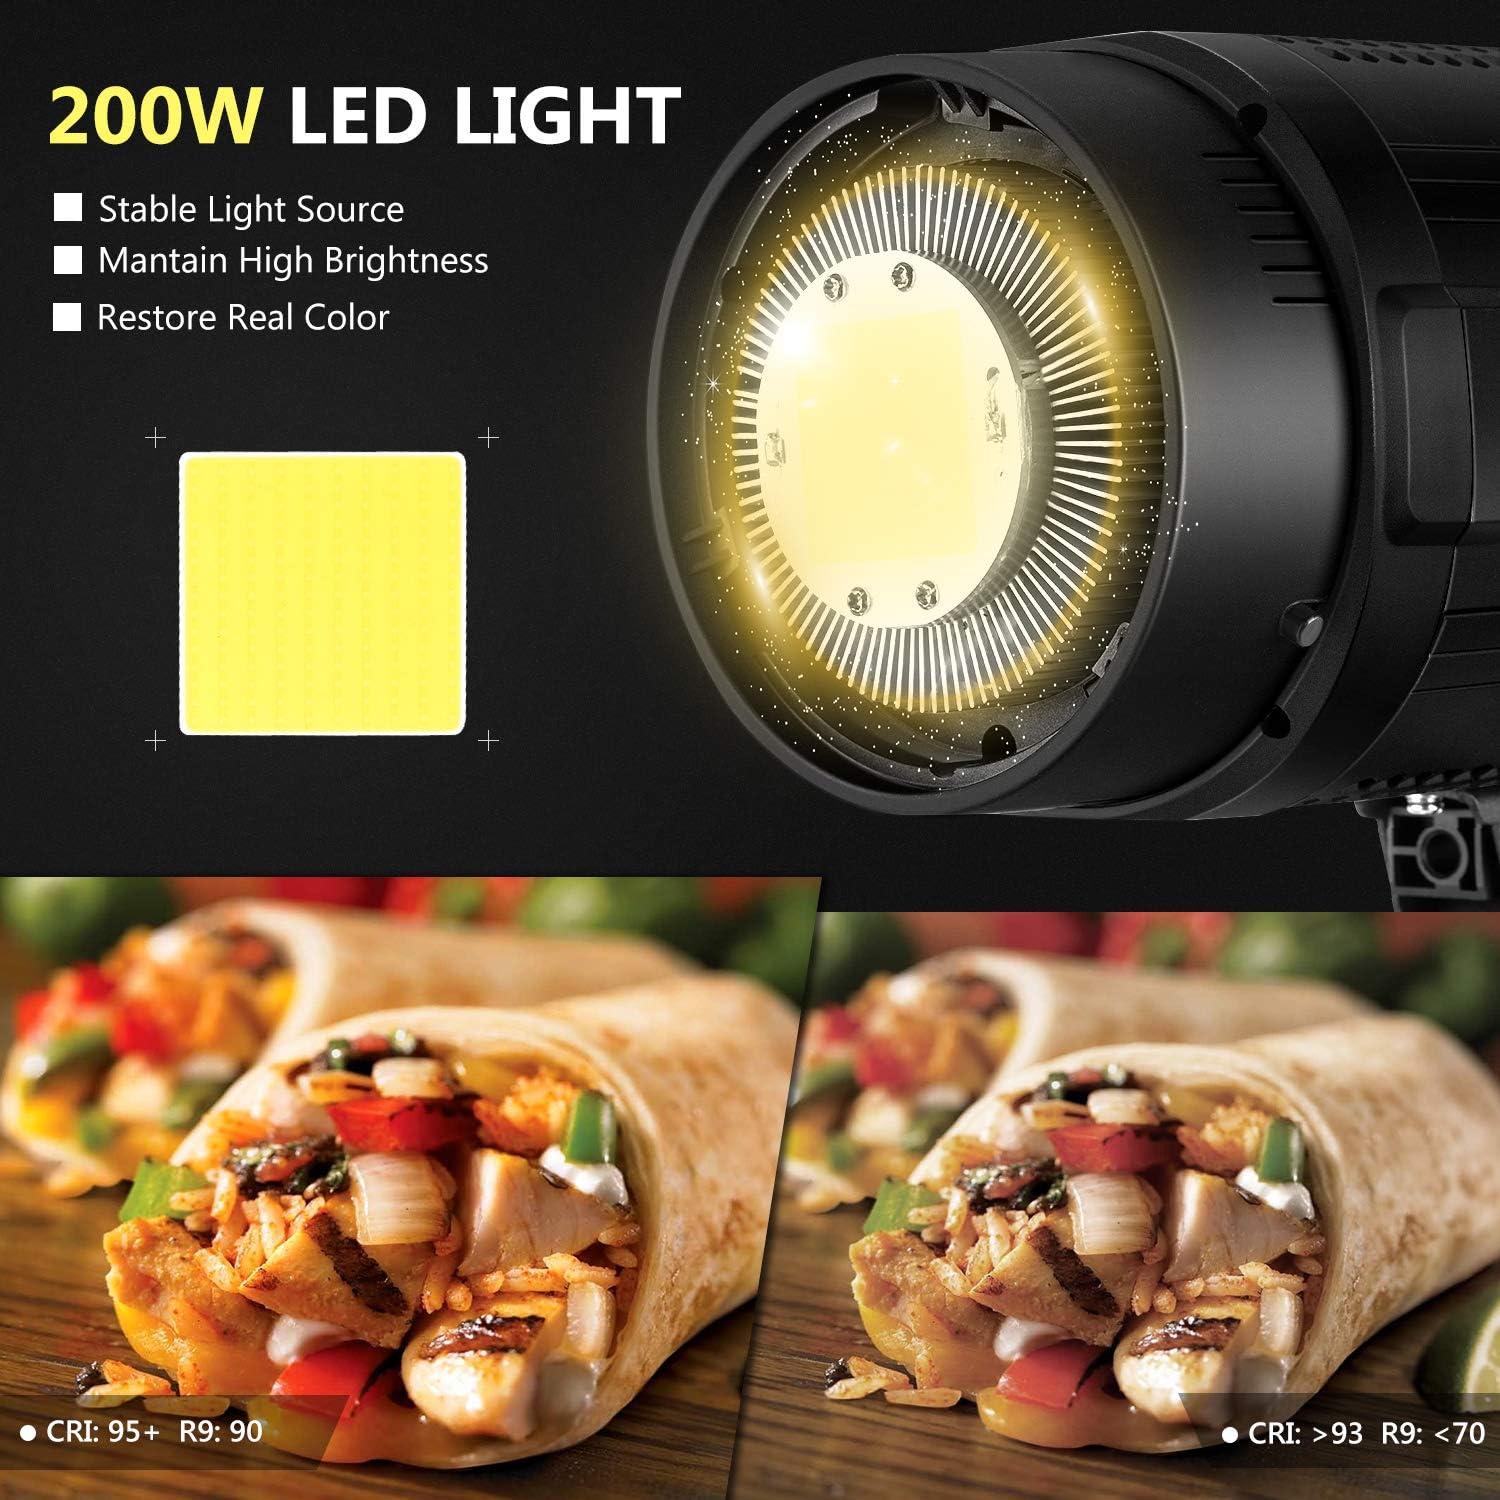
Image: Illustration of the light's stable 200W LED source and its high Color Rendering Index (CRI 95+), ensuring accurate color reproduction.
5. Applications
This light is versatile for various photographic and videographic needs.

Image: Examples of the light's application in portrait and product photography.
Maintenance
- Cleaning: Regularly wipe the exterior of the light with a soft, dry cloth. Do not use abrasive cleaners or solvents. Ensure the light is unplugged before cleaning.
- Ventilation: Keep the ventilation openings clear of dust and obstructions to ensure proper heat dissipation. The integrated cooling fan is essential for stable operation and longevity.
- Storage: When not in use, store the light in a cool, dry place, away from direct sunlight and excessive humidity.
- Fuse Replacement: If the light does not power on, check the fuse in the fuse holder. Replace it with a fuse of the same type and rating if necessary. Always unplug the light before replacing the fuse.
Troubleshooting
| Problem | Possible Cause | Solution |
|---|---|---|
| Light does not power on. | Power cord not connected properly; Power outlet malfunction; Blown fuse. | Ensure power cord is securely connected. Try a different power outlet. Check and replace the fuse if blown. |
| Remote control not working. | Batteries are dead or incorrectly inserted; Remote not paired with light; Interference. | Replace AA batteries in the remote, ensuring correct polarity. Ensure remote and light are set to the same channel and group. Move closer to the light or away from potential interference sources. |
| Light turns off unexpectedly or overheats. | Insufficient ventilation; Prolonged use at high intensity; Internal thermal protection activated. | Ensure ventilation openings are clear. Reduce brightness or allow the unit to cool down. If the light has a 'RUN' button, press it to keep the fan running for cooling. |
| Brightness adjustment is unresponsive. | Remote control issue; Knob malfunction. | Try adjusting brightness directly on the light unit. If using the remote, check batteries and pairing. |
Specifications
- Model: 10094884
- Power Output: 200W
- Color Temperature: 5600K (Fixed)
- Luminous Flux: 21000LM
- Color Rendering Index (CRI): 95+
- Mount Type: Bowens Mount
- Wireless Control: 2.4G Wireless Remote (16 Channels, 16 Groups)
- Remote Control Batteries: 2 x AA (not included)
- Item Weight: 8.32 pounds (approx. 3.77 kg)
- Package Dimensions: 21.02 x 9.92 x 9.45 inches (approx. 53.4 x 25.2 x 24 cm)
- Estimated LED Life: 50,000 Hours
Warranty and Support
For warranty information and technical support, please refer to the documentation provided with your purchase or visit the official NEEWER website. Keep your proof of purchase for any warranty claims.
For further assistance, you may contact NEEWER customer service through their official channels.
Official Product Videos
No official product videos from the seller were found in the provided data for this product.
Ask a question about this manual
Ask about setup, troubleshooting, compatibility, parts, safety, or missing instructions. Manuals+ will review the question and use this page’s manual context to help answer it.