Introduction
The Gvirtue A-TV11 is a user-friendly universal remote control designed with large, easy-to-press buttons, making it ideal for users of all ages, including the elderly and children. This remote is pre-programmed for many popular TV brands and offers additional setup options for broader compatibility.
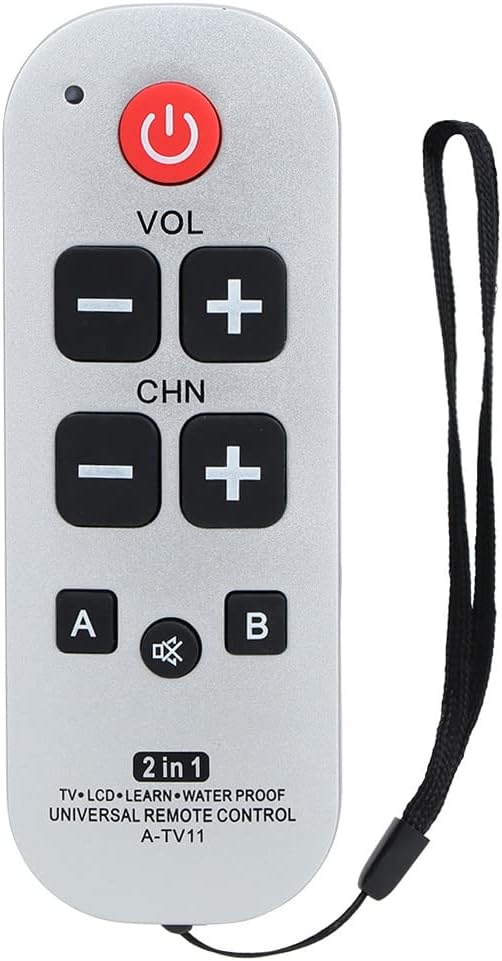
Image: Front view of the Gvirtue A-TV11 Universal Remote Control, highlighting its large buttons and simple layout.
Key Features
- Large, Easy-to-Use Buttons: Designed for simplicity and readability, perfect for basic channel and volume operations.
- Pre-programmed Compatibility: Ready to use with many major TV brands like LG, Vizio, Panasonic, Philips, RCA, Sony, Samsung, Toshiba, JVC/SANYO, MITSUBISHI, SHARP, and NEC/PACK.
- Automatic Search Function: Supports over 1000 types of TVs in the Japanese market for easy setup if pre-programming doesn't work.
- Durable Design: Features a smooth, easy-to-clean surface and is made from soft plastic and ABS material.
- Battery Operated: Requires 2 AAA batteries (not included).
Setup
1. Battery Installation
To begin using your Gvirtue A-TV11 remote, you must first install the batteries. The remote requires 2 AAA batteries.
- Locate the battery compartment on the back of the remote control.
- Carefully remove the waterproof rubber cover from the battery compartment.
- Insert 2 AAA batteries, ensuring the correct polarity (+ and -) as indicated inside the compartment.
- Replace the waterproof rubber cover and securely close the battery compartment.

Image: A visual guide demonstrating the steps for inserting AAA batteries into the remote control, including removing and replacing the waterproof cover.
2. Initial TV Setup (Pre-programmed)
For most major TV brands, the remote is pre-programmed and ready to use simply by inserting the batteries. If your TV does not respond immediately, proceed to the operating instructions for model-specific or automatic search methods.
Operating Instructions
Basic Functions
The Gvirtue A-TV11 remote provides essential controls for your television:
- POWER: Turns the TV on or off.
- VOL +/-: Adjusts the volume up or down.
- CHN +/-: Changes the channel up or down.
- MUTE: Mutes or unmutes the TV sound.
- A / B: These buttons may be used for specific functions depending on the TV model or for learning functions (see Manual Code Input).

Image: Diagram illustrating the functions of each button on the Gvirtue A-TV11 remote, including Power, Volume, Channel, Mute, A/B, and Set keys.
Model-Specific Compatibility (Pre-programmed Codes)
If your TV does not respond after battery installation, try the following pre-programmed code combinations:
- Press [SET] and [1] for Sony brand TVs.
- Press [SET] and [2] for Samsung brand TVs.
- Press [SET] and [3] for Philips brand TVs.
- Press [SET] and [4] for Toshiba brand TVs.
- Press [SET] and [5] for JVC/SANYO brand TVs.
- Press [SET] and [6] for LG/GOLDSTAR brand TVs.
- Press [SET] and [7] for MITSUBISHI brand TVs.
- Press [SET] and [8] for SHARP brand TVs.
- Press [SET] and [9] for PANASONIC brand TVs.
- Press [SET] and [MUTE] for RCA/GE brand TVs.
- Press [SET] and [0] for NEC/PACK brand TVs.

Image: A visual representation showing the Gvirtue A-TV11 remote in the center, surrounded by logos of compatible TV brands such as LG, Vizio, Sony, Sharp, Philips, and Panasonic.
Automatic Search Function
If the pre-programmed codes do not work for your TV, you can use the automatic search function:
- Ensure your TV is turned on.
- Press and hold the [SET] button until the indicator light on the remote illuminates.
- Release the [SET] button.
- Point the remote at your TV and repeatedly press the [POWER] button (or another function button like CHN+ or VOL+) slowly, about once every 2 seconds.
- Stop pressing the button as soon as your TV responds (e.g., turns off, changes channel, or volume adjusts).
- Press the [SET] button once more to save the code. The indicator light will turn off.
Manual Code Input (Learning Function)
For other TV brands or specific functions, you can use the code input (learning) function. This allows the Gvirtue A-TV11 to learn signals from your original TV remote.
- Place the Gvirtue A-TV11 remote and your original TV remote head-to-head, about 3 cm apart.
- On the Gvirtue A-TV11, press and hold the [SET] and [POWER] buttons simultaneously until the indicator light illuminates. Release both buttons.
- Press the button on the Gvirtue A-TV11 that you wish to program (e.g., POWER, VOL+, CHN+). The indicator light will start blinking.
- On your original TV remote, press the corresponding button (e.g., POWER).
- The indicator light on the Gvirtue A-TV11 will blink rapidly and then illuminate steadily, indicating successful learning.
- Repeat steps 3-5 for any other buttons you wish to program (e.g., VOL-, CHN-).
- Once all desired buttons are programmed, press the [SET] button on the Gvirtue A-TV11 to save the settings and exit learning mode. The indicator light will turn off.
Note: If the indicator light does not blink during step 4, adjust the distance between the remotes and try again. Some original remotes may use different infrared frequencies that are not compatible with the learning function.
Maintenance
To ensure the longevity and optimal performance of your Gvirtue A-TV11 remote control, follow these simple maintenance guidelines:
- Cleaning: Wipe the remote with a soft, dry cloth. For stubborn dirt, a slightly damp cloth can be used, but ensure no moisture enters the battery compartment or button crevices.
- Avoid Liquids: While the battery compartment has a waterproof cover, avoid submerging the remote in water or exposing it to excessive moisture.
- Storage: Store the remote in a cool, dry place away from direct sunlight and extreme temperatures.
- Battery Replacement: Replace batteries when the remote's performance diminishes or if the indicator light does not respond as expected. Remove batteries if the remote will not be used for an extended period.
Troubleshooting
If you encounter issues with your Gvirtue A-TV11 remote, consider the following:
- Remote not responding:
- Check if batteries are correctly installed and have sufficient charge. Replace if necessary.
- Ensure there are no obstructions between the remote and the TV's infrared receiver.
- Verify that the remote is pointed directly at the TV.
- Specific buttons not working after setup:
- If using pre-programmed codes, try a different code combination for your TV brand.
- If using the automatic search function, repeat the process to ensure the correct code was saved.
- If using the manual learning function, re-attempt the learning process for the problematic buttons, ensuring proper alignment and distance between remotes.
- Remote stops working intermittently:
- This could indicate low battery power. Replace the batteries.
- Ensure the remote's infrared emitter is clean and unobstructed.
Specifications
| Model Number | A-TV11 |
| Dimensions | 14 x 7 x 3 cm (5.6 x 2.04 x 0.59 inches) |
| Weight | 80 g |
| Color | Silver |
| Material | Plastic (Soft Plastic, ABS) |
| Connectivity Technology | Infrared |
| Power Source | 2 x AAA Batteries (not included) |
| Compatible Devices | TVs (Universal Compatibility) |
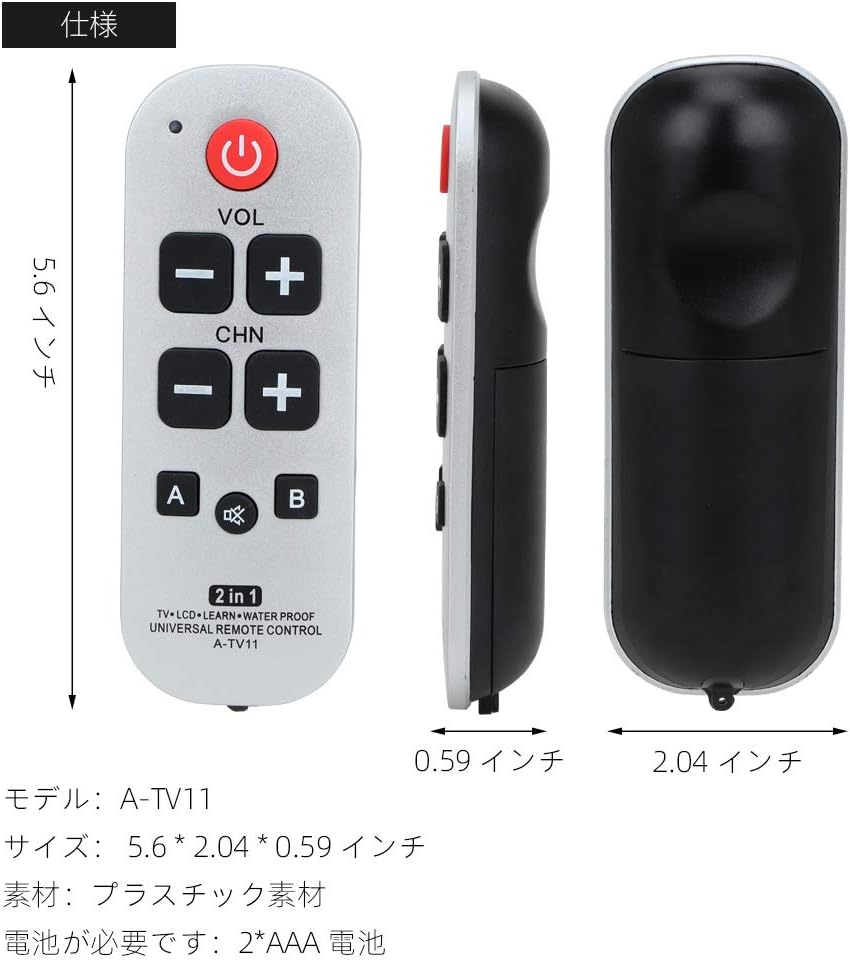
Image: A diagram showing the dimensions of the Gvirtue A-TV11 remote control in inches, along with material and battery requirements.
Package Contents
- 1 x Gvirtue Universal Remote Control (A-TV11)
- Batteries are not included.
Warranty and Support
Gvirtue provides a 1-year manufacturer's warranty and dedicated customer service for Amazon customers.
If you encounter any issues with your product, please contact us through the Amazon message function. We aim to respond and resolve your concerns within 24 hours.


