1. Introduction
Thank you for choosing the Banda Ice X 2001-1 Channel Car Amplifier. This manual provides essential information for the proper installation, operation, and maintenance of your amplifier. Please read this manual thoroughly before attempting installation or use to ensure optimal performance and safety.

Image 1: Top view of the Banda Ice X 2001-1 Channel Car Amplifier, showcasing its sleek design and branding.
2. Safety Information
Always observe the following safety precautions to prevent injury or damage to the amplifier and vehicle:
- Disconnect the vehicle's battery negative terminal before starting any installation.
- Ensure proper grounding to the vehicle chassis.
- Use appropriate wire gauges for power, ground, and speaker connections as specified.
- Avoid installing the amplifier in locations exposed to direct sunlight, excessive heat, moisture, or dust.
- Securely mount the amplifier to prevent movement during vehicle operation.
- Consult a professional installer if you are unsure about any part of the installation process.
3. Product Overview and Features
The Banda Ice X 2001 is a high-performance monoblock Class D amplifier designed for car audio systems. Key features include:
- Amplifier Class: D
- Number of Channels: 1 (Monoblock)
- RMS Power: 2000 Watts at 1 Ohm
- Frequency Response: 10Hz - 24000Hz
- THD (Total Harmonic Distortion): 0.08%
- Signal Noise Ratio: 81.5 dB
- Protection System: Output Short Circuit, Superheating
- Equipped with Subsonic Filter and Low Pass Filter for precise audio control.
- RCA connectors for secure, distortion-free signal transmission.

Image 2: The Banda Ice X 2001-1 Channel Car Amplifier positioned next to a subwoofer, illustrating its intended use in a vehicle audio system.
4. Setup and Installation
Proper installation is crucial for the performance and longevity of your amplifier. Follow these guidelines:
4.1 Mounting
The amplifier is designed for freestanding mounting. Choose a location that is dry, well-ventilated, and away from direct heat sources. Ensure sufficient space around the amplifier for air circulation.

Image 3: A visual representation of the amplifier's dimensions, showing a length of 9.7 inches, width of 8.4 inches, and height of 2.2 inches.
4.2 Wiring Connections
Ensure all connections are secure and properly insulated to prevent short circuits.
- Power Input: Connect the main power cable (positive) to the amplifier's +12V terminal. Use a 4 AWG (21mm²) power wire. Install a 100A fuse within 18 inches of the vehicle's battery.
- Ground Connection: Connect the ground cable (negative) to the amplifier's GND terminal. Use a 4 AWG (21mm²) wire and secure it to a clean, unpainted metal surface on the vehicle chassis.
- Remote Turn-On: Connect the remote turn-on wire from your head unit to the amplifier's REM terminal.
- RCA Input: Connect your head unit's RCA output to the amplifier's RCA input terminals.
- Speaker Output: Connect your subwoofer(s) to the amplifier's speaker output terminals. Ensure the total impedance matches the amplifier's rating (1 Ohm for optimal performance).
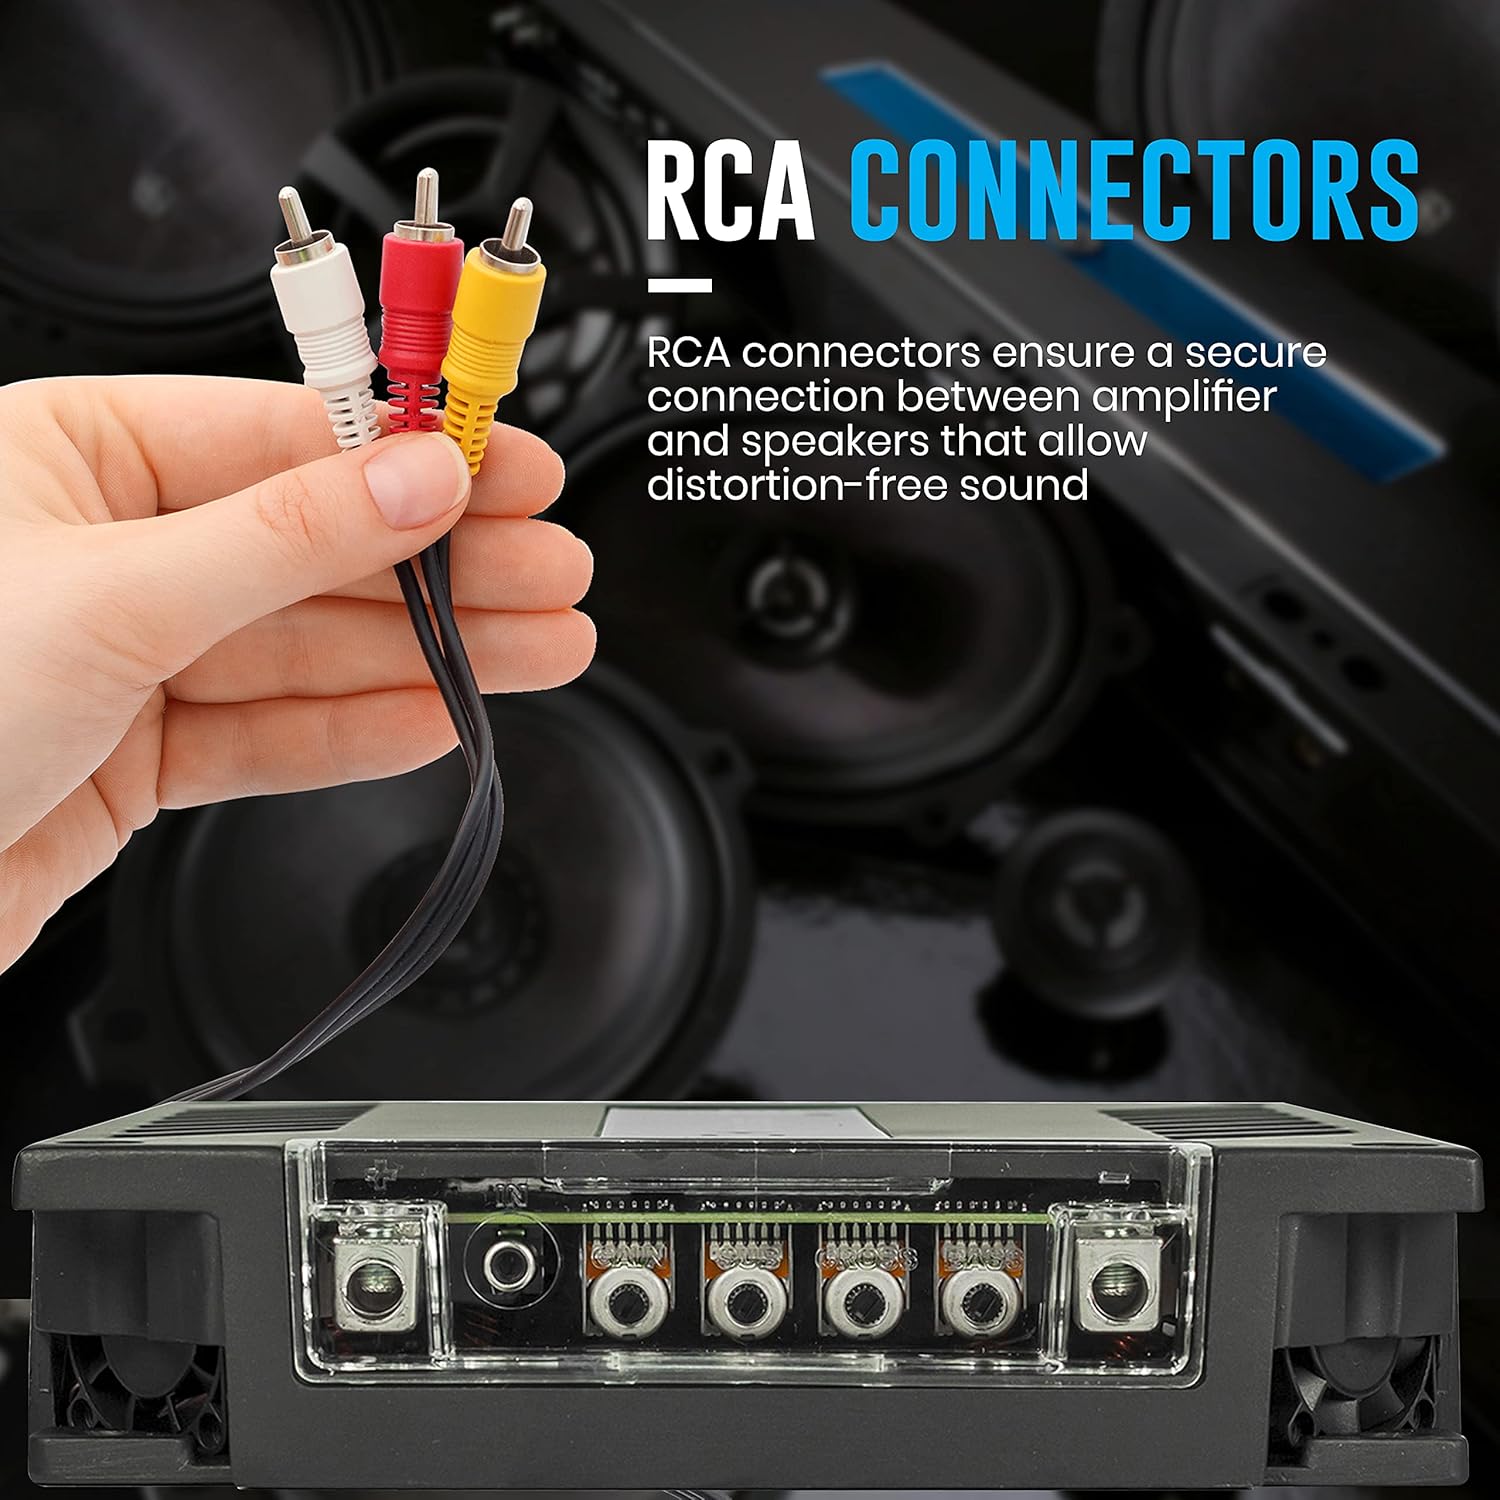
Image 4: A hand holding red, white, and yellow RCA connectors, illustrating the type of cables used for audio input to the amplifier. The amplifier's RCA input ports are visible below.

Image 5: An image showing an amplifier (similar to the Ice X 2001) with recommended wiring specifications: Recommended Fuse: 100A, Average Current Draw (Music): 110A, Current at Rest: 2A, Power Wire Gauge: 21mm/4 AWG.
5. Operating Instructions
Once installed, ensure all connections are secure. Turn on your vehicle's ignition and head unit. The amplifier should power on automatically via the remote turn-on signal. Adjust gain, crossover, and other settings on the amplifier and head unit for desired audio output.
6. Amplifier Indicators
The amplifier features indicator lights to provide status information:
- Blue Light: Indicates the amplifier is powered on and receiving a source signal.
- Red Light: Indicates output distortion. Reduce the input gain or volume to prevent damage.
- Yellow Light (Flashing): Indicates the supply voltage is below the specified minimum. Check your vehicle's battery and charging system.
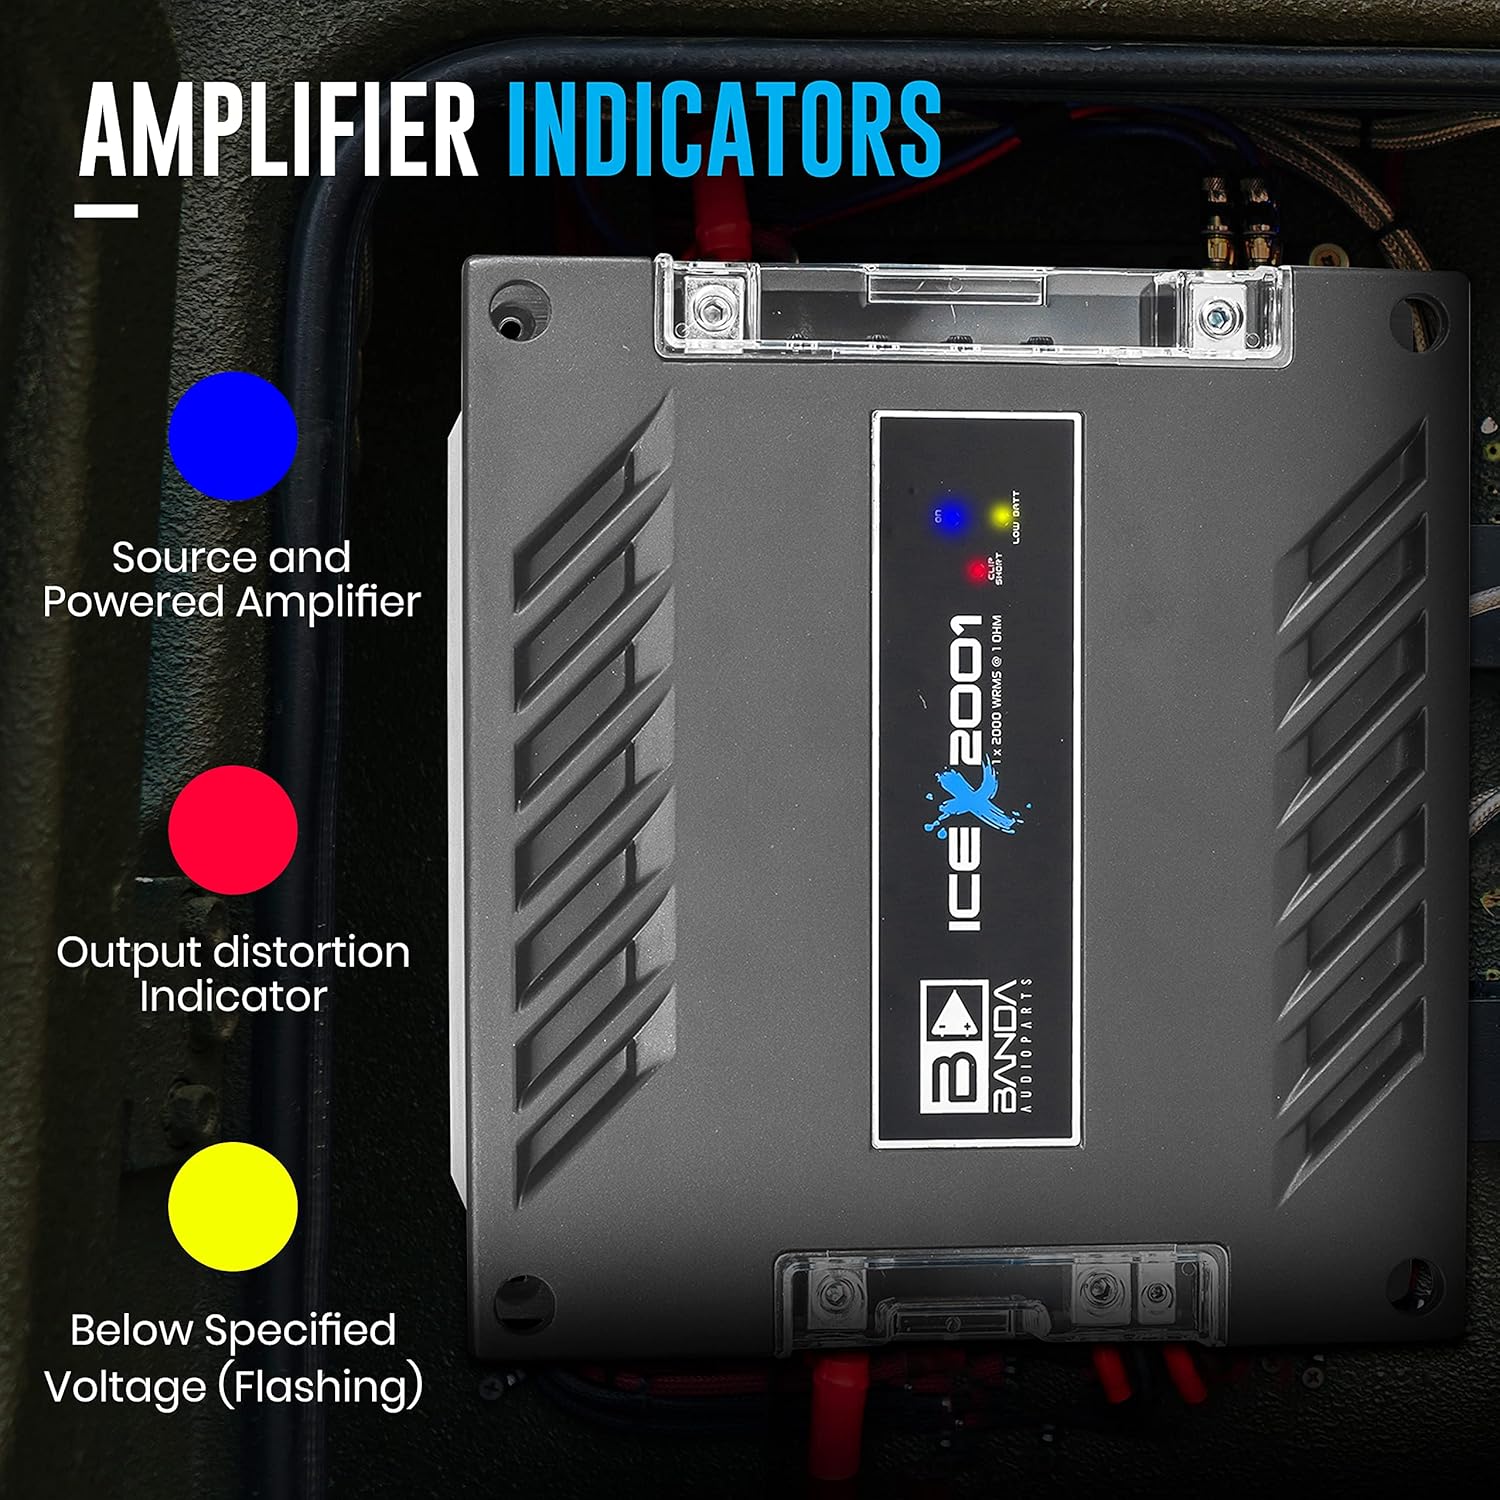
Image 6: Close-up of the amplifier's indicator lights. A blue light signifies a powered amplifier and source, a red light indicates output distortion, and a flashing yellow light signals below specified voltage.
7. Specifications
| Feature | Specification |
|---|---|
| Model Number | Ice X 2001 |
| Amplifier Class | D |
| Number of Channels | 1 (Monoblock) |
| RMS Power (1 Ohm) | 2000 Watts |
| Power with double impedance | 1000 Watts RMS |
| Frequency Response | 10Hz - 24000Hz |
| Minimum Supply Voltage | 9 VDC |
| Maximum Supply Voltage | 16 VDC |
| Idle Consumption | Musical |
| Maximum Consumption (A) | 155 A |
| THD (Total Harmonic Distortion) | 0.08% |
| Signal Noise Ratio | 81.5 dB |
| Protection System | Output Short Circuit, Superheating |
| Recommended Fuse | 100A |
| Power Wire Gauge | 21mm² / 4 AWG |
| Product Dimensions (L x W x H) | 1 x 1 x 1 inches (Note: Product image shows 9.7" x 8.4" x 2.2") |
| Item Weight | 7.13 pounds |
| Mounting Type | Freestanding |
| Specification Met | FCC |
Note: The product dimensions listed in the specifications (1x1x1 inches) appear to be generic. Please refer to Image 3 for more accurate physical dimensions (approx. 9.7" x 8.4" x 2.2").
8. Maintenance
To ensure the longevity and optimal performance of your amplifier:
- Keep the amplifier clean and free from dust. Use a soft, dry cloth for cleaning.
- Ensure proper ventilation. Do not block the cooling fins or vents.
- Regularly check all wiring connections for tightness and corrosion.
- Avoid exposing the amplifier to extreme temperatures or moisture.
9. Troubleshooting
If you encounter issues with your amplifier, refer to the following common problems and solutions:
- No Power: Check the main fuse, ground connection, and remote turn-on wire. Ensure the vehicle battery has sufficient charge.
- No Sound: Verify RCA input connections, speaker wiring, and head unit settings. Check if the amplifier is in protection mode (indicated by a red light).
- Distorted Sound: Reduce the gain setting on the amplifier or the volume on your head unit. Check for proper speaker impedance matching.
- Amplifier Overheating: Ensure adequate ventilation around the amplifier. Check speaker impedance; too low impedance can cause overheating.
- Protection Mode Activated: This usually indicates a short circuit in the speaker wiring, incorrect impedance, or overheating. Disconnect speakers, check wiring, and allow the amplifier to cool down.
If problems persist, consult a qualified car audio technician.
10. Warranty and Support
Specific warranty details are typically provided with your purchase documentation. Please retain your proof of purchase for warranty claims. For technical support or service inquiries, please contact Banda Audioparts customer service or your authorized dealer.
For more information about Banda Audioparts products, you may visit their official website or contact your retailer.