PF-103
PETWANT PF-103 Smart Auto Feeding Pet Feeder User Manual
Model: PF-103
Introduction
This user manual provides detailed instructions for the setup, operation, and maintenance of your PETWANT PF-103 Smart Auto Feeding Pet Feeder. This device is designed to provide automated feeding for your pets, featuring remote control via an application, a built-in camera for monitoring, and a voice recorder function. Please read this manual thoroughly before using the product to ensure proper and safe operation.
Safety Information
- Ensure the feeder is placed on a stable, level surface to prevent tipping.
- Use only the provided AC-DC adapter (DC 5V/2A) to power the device.
- Keep the feeder away from water and excessive moisture. Do not immerse any part of the feeder in water.
- This device is intended for indoor use only.
- Keep out of reach of children and pets when not in use or during assembly.
- Only use dry or semi-wet pet food with a diameter between 0.8cm and 1.5cm. Larger food may cause blockages.
- Unplug the feeder from the power outlet before cleaning.
Package Contents
Verify that all items are present in the package:
- 1 x PETWANT PF-103 Pet Feeder Unit
- 1 x Power Adapter (US Standard Plug)
- 1 x User Manual

Image: The PETWANT PF-103 pet feeder shown alongside its power adapter and the included user manual, illustrating the complete package contents.
Product Overview
Familiarize yourself with the main components of the PETWANT PF-103 Smart Auto Feeding Pet Feeder.

Image: Front view of the PETWANT PF-103 pet feeder, showing the main unit with the food dispenser and integrated camera.

Image: Side view of the PETWANT PF-103 pet feeder, highlighting its slim profile and the attached food bowl.
Key Components:
- Food Storage Container: Located at the top, with a transparent lid for easy viewing of food levels. Capacity: 4.3L.
- Food Dispenser: Internal mechanism that dispenses food into the bowl.
- Feeding Bowl: Detachable tray at the base for pets to eat from.
- HD Camera: 100W pixels, 110-degree ultra-wide angle, located on the front for pet monitoring.
- Control Panel: Buttons and indicator lights (Link, Power, Alarm, Mic, Set) for manual control and status indication.
- Speaker/Microphone: For two-way audio communication and voice recording.
- Power Port: For connecting the AC adapter.
- Battery Compartment: Located at the bottom for optional battery backup (batteries not included).
Setup
1. Unpacking and Assembly
- Carefully remove all components from the packaging.
- Place the main feeder unit on a flat, stable surface.
- Attach the feeding bowl to the base of the feeder by sliding it into place until it clicks securely.

Image: The PETWANT PF-103 pet feeder with its food tray detached, illustrating how the tray connects to the main unit.
2. Power Connection
- Connect the provided AC-DC adapter to the power port on the feeder.
- Plug the adapter into a standard US wall outlet.
- For power backup during outages, open the battery compartment at the bottom of the feeder and insert 3 x D-size batteries (not included).

Image: The underside of the PETWANT PF-103 pet feeder, showing the open battery compartment for D-size batteries and the power switch.
- Flip the power switch located near the battery compartment to the "ON" position. The Power indicator light on the control panel should illuminate.
3. Food Loading
- Open the transparent lid on top of the feeder.

Image: Top view of the PETWANT PF-103 pet feeder with its lid open, revealing the food storage compartment and the internal dispensing mechanism.
- Pour dry or semi-wet pet food into the storage container. Ensure the food kibble size is between 0.8cm and 1.5cm in diameter.
- Do not overfill the container. Close the lid securely to maintain food freshness and prevent moisture.
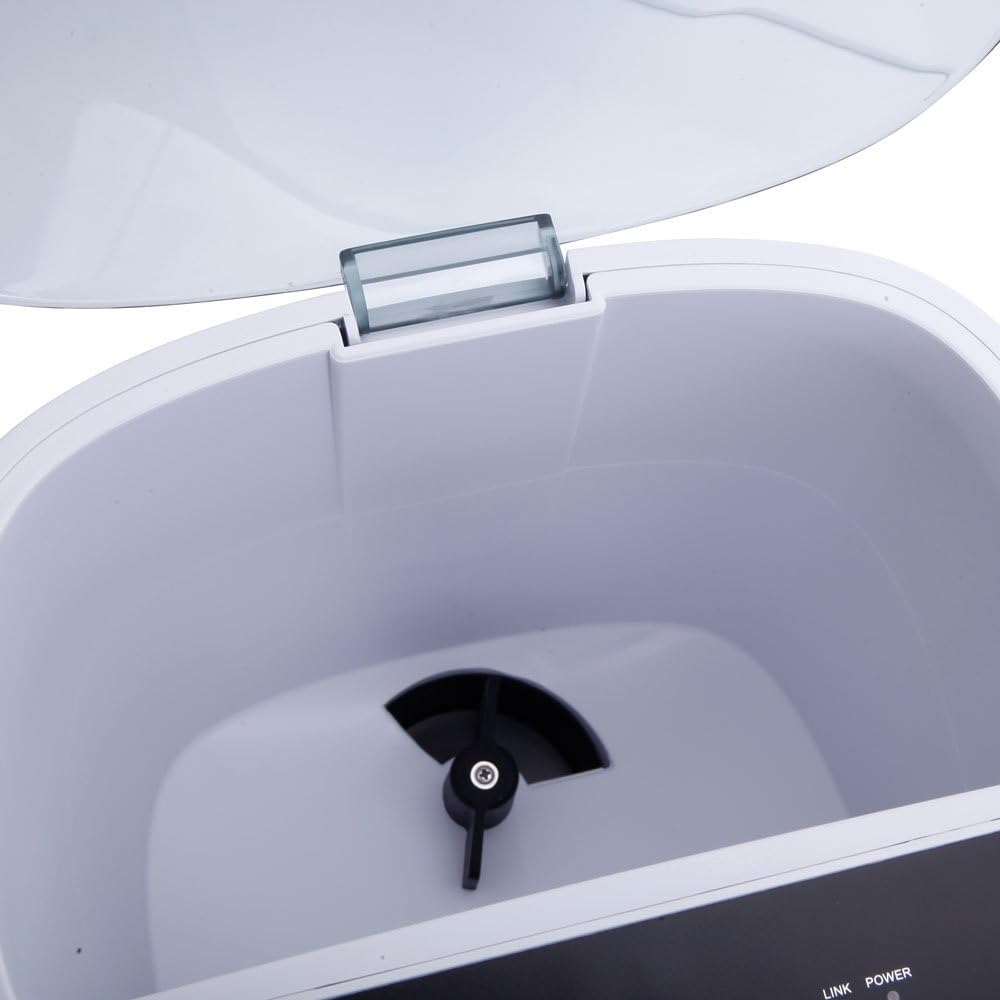
Image: Close-up view of the internal food dispensing mechanism of the PETWANT PF-103 pet feeder, showing the rotating impeller.
4. App Installation and WiFi Connection
The PETWANT PF-103 requires a smartphone application for full functionality, including scheduling and remote monitoring.
- Download the "PETWANT" app from your smartphone's app store (iOS App Store or Google Play Store).
- Register for an account and log in.
- On the feeder's control panel, press and hold the "SET" button for 5 seconds until the Link indicator light starts blinking rapidly. This indicates the feeder is in pairing mode.

Image: Close-up view of the PETWANT PF-103 pet feeder's control panel, showing the 'SET' button and indicator lights for Link, Power, Alarm, and Mic.
- In the PETWANT app, follow the on-screen instructions to add a new device. Select the PF-103 model.
- Enter your Wi-Fi network name (SSID) and password. Ensure your Wi-Fi is 2.4GHz.
- The app will guide you through the connection process. Once connected, the Link indicator light on the feeder will turn solid.
Operating Instructions
1. Manual Feeding
To dispense food manually, press the "SET" button once on the feeder's control panel. One portion (approximately 24mL) of food will be dispensed immediately.
2. Scheduled Feeding (via App)
The primary method for feeding is through scheduled meals using the PETWANT app.
- Open the PETWANT app and select your PF-103 feeder.
- Navigate to the "Feeding Schedule" or "Meal Plan" section.
- Add a new feeding schedule. You can set up to 4 meals per day.
- For each meal, specify the feeding time and the number of portions (each portion is approximately 24mL).
- Save the schedule. The feeder will automatically dispense food at the set times.
3. Voice Recording
You can record a short voice message that will play during scheduled feeding times to call your pet.
- In the PETWANT app, go to the feeder's settings or "Voice Recording" section.
- Press the record button and speak your message (e.g., "Time to eat, [Pet's Name]!").
- Play back the recording to ensure clarity.
- Save the recording. It will automatically play before each scheduled meal.
4. Remote Monitoring (Camera)
The built-in camera allows you to monitor your pet and the feeder remotely.

Image: Close-up view of the integrated camera lens on the front of the PETWANT PF-103 pet feeder, used for remote monitoring.
- Open the PETWANT app and select your feeder.
- The live video feed from the camera will be displayed.
- Use the app's interface to take snapshots, record video, or use the two-way audio function (microphone and speaker).
Maintenance
Cleaning Instructions
Regular cleaning ensures hygiene and proper functioning of the feeder.
- Disconnect Power: Always unplug the feeder from the power outlet before cleaning. If using battery backup, remove the batteries.
- Empty Food: Remove any remaining food from the storage container.
- Detachable Parts: The feeding bowl is detachable and can be washed with mild soap and water. Rinse thoroughly and dry completely before reattaching.
- Main Unit: Wipe the exterior of the feeder with a soft, damp cloth. Do not use abrasive cleaners or immerse the main unit in water.
- Internal Components: Use a dry brush or cloth to clean any food residue from the internal dispensing mechanism. Ensure no moisture enters the electronic components.
- Drying: Ensure all parts are completely dry before reassembling and reconnecting power.
Troubleshooting
| Problem | Possible Cause | Solution |
|---|---|---|
| Feeder not dispensing food. |
|
|
| Cannot connect to Wi-Fi / App. |
|
|
| Camera feed is blurry or dark. |
|
|
| Voice recording not playing. |
|
|
Specifications
| Feature | Detail |
|---|---|
| Model | PF-103 |
| Material | ABS (Acrylonitrile Butadiene Styrene) |
| Dimensions (L x W x H) | (9.45 x 7.48 x 14.96) inches / (24 x 19 x 38) cm |
| Weight | 78.03 oz / 2212 g |
| Color | White |
| Capacity | 4.3 Liters |
| Supported Food Type | Dry & Semi-wet Food |
| Supported Kibble Diameter | 0.8 - 1.5 cm |
| Power Input | AC-DC Adapter DC 5V/2A |
| Plug Type | US Standard |
| Camera Resolution | 100W Pixels (HD) |
| Camera Angle | 110 Degrees (Ultra Wide Angle) |
| Feeding Schedule | Up to 4 meals per day |
| Portion Size | Approx. 24mL per portion |
Warranty and Support
For warranty information, technical support, or service inquiries, please refer to the contact information provided by the retailer or the manufacturer's official website. Keep your purchase receipt as proof of purchase for warranty claims.