OEM Rplm for Miller 72DB0004
Instruction Manual for OEM Upgraded Replacement Miller A-Coil TXV Valve
Model: 72DB0004 | Brand: OEM Rplm for Miller
1. Introduction and Overview
This manual provides essential information for the proper installation, operation, and maintenance of the 72DB0004 OEM Upgraded Replacement for Miller 2.5-5 Ton R-22 A-Coil TXV Valve. This component is a critical part of an HVAC system, designed to precisely control the flow of R-22 refrigerant into the evaporator coil, ensuring optimal system performance and efficiency.
The 72DB0004 valve is a brand new, top-quality OEM replacement part engineered to meet the specifications required for 2.5 to 5-ton R-22 A-Coil systems.
2. Safety Information
WARNING: Installation and servicing of HVAC components should only be performed by qualified, trained, and experienced HVAC technicians. Improper installation, adjustment, alteration, service, or maintenance can cause property damage, personal injury, or death.
- Always disconnect power to the HVAC unit before attempting any installation or maintenance.
- Refrigerants are under pressure and can cause severe frostbite. Always wear appropriate personal protective equipment (PPE), including safety glasses and gloves, when handling refrigerants.
- Ensure proper ventilation when working with refrigerants.
- Follow all local and national codes and regulations regarding HVAC system installation and refrigerant handling.
- Never release refrigerants into the atmosphere. Always recover refrigerants using proper equipment.
3. Product Components
The 72DB0004 TXV Valve consists of a brass valve body, a sensing bulb, and capillary tubes. The sensing bulb is typically attached to the suction line to measure the superheat of the refrigerant leaving the evaporator.
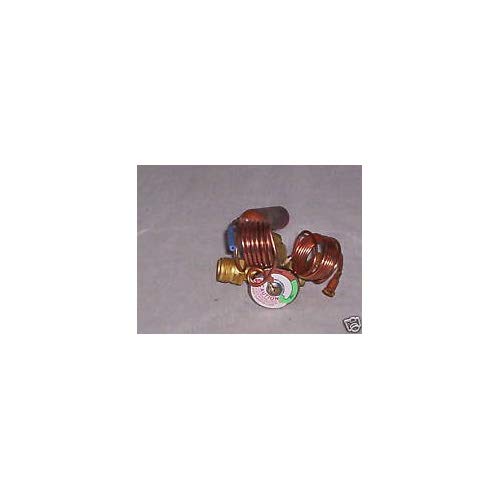
Figure 3.1: 72DB0004 OEM Upgraded Replacement Miller A-Coil TXV Valve. This image displays the 72DB0004 OEM Upgraded Replacement Miller A-Coil TXV Valve, featuring its brass body, copper capillary tubes, and sensing bulb. The valve is designed for precise refrigerant flow control in HVAC systems.
4. Setup and Installation
The installation of a TXV valve requires specialized tools and knowledge. It is strongly recommended that this procedure be carried out by a certified HVAC technician.
- System Preparation: Ensure the HVAC system is de-energized and all refrigerant has been properly recovered from the system.
- Valve Placement: Identify the correct location for the TXV valve, typically at the inlet of the evaporator coil.
- Brazing: Carefully braze the TXV valve into the refrigerant lines. Use a heat sink compound or wet rags to protect the valve body and sensing bulb from excessive heat during brazing.
- Sensing Bulb Installation: Securely attach the sensing bulb to the suction line, typically on a horizontal run, using a copper strap or clamp. Ensure good thermal contact. Insulate the sensing bulb to prevent ambient temperature interference.
- Leak Check: After installation, pressurize the system with nitrogen and perform a thorough leak check using an electronic leak detector or soap bubbles.
- Evacuation: Evacuate the system to a deep vacuum (typically 500 microns or less) to remove all non-condensable gases and moisture.
- Refrigerant Charging: Recharge the system with the correct type and amount of R-22 refrigerant according to the manufacturer's specifications.
- Superheat Adjustment (if applicable): Some TXV valves are adjustable. If so, adjust the superheat according to the system manufacturer's guidelines for optimal performance.
5. Operating Principles
The 72DB0004 TXV valve is a mechanical device that automatically regulates the flow of liquid refrigerant into the evaporator coil based on the superheat of the refrigerant vapor leaving the evaporator. It maintains a constant superheat, ensuring that the evaporator coil is fully utilized without allowing liquid refrigerant to return to the compressor.
- When the superheat increases (meaning the evaporator is running low on refrigerant), the pressure in the sensing bulb increases, opening the valve further to allow more refrigerant flow.
- When the superheat decreases (meaning too much refrigerant is flowing), the pressure in the sensing bulb decreases, closing the valve slightly to reduce refrigerant flow.
This automatic regulation helps protect the compressor from liquid slugging and ensures efficient heat transfer in the evaporator.
6. Maintenance
The TXV valve itself typically requires minimal direct maintenance once installed correctly. However, its proper function relies on the overall health of the HVAC system.
- Regular System Checks: Ensure the entire HVAC system undergoes regular professional maintenance, including checking refrigerant levels, coil cleanliness, and fan operation.
- Leak Detection: Periodically check for refrigerant leaks around the valve connections.
- Sensing Bulb Integrity: Ensure the sensing bulb remains securely attached and insulated on the suction line. Damage or improper insulation can lead to erratic valve operation.
- System Cleanliness: Contaminants in the refrigerant system (e.g., moisture, debris) can cause TXV valve malfunction. Ensure the system is clean and dry.
7. Troubleshooting
Malfunctions of a TXV valve can lead to various HVAC system issues. Always consult a qualified technician for diagnosis and repair.
| Symptom | Possible TXV Related Cause | Potential Solution |
|---|---|---|
| High Superheat / Starved Evaporator | TXV restricted or stuck closed; undersized TXV; loss of charge in sensing bulb. | Check for debris; replace TXV; verify correct TXV sizing; check sensing bulb attachment. |
| Low Superheat / Flooded Evaporator | TXV stuck open; oversized TXV; sensing bulb improperly installed or insulated. | Replace TXV; verify correct TXV sizing; re-install/insulate sensing bulb. |
| Fluctuating Superheat | Contaminants in valve; unstable system conditions; improper sensing bulb contact. | Clean system; address other system issues; re-secure sensing bulb. |
| No Cooling | TXV completely blocked or failed closed. | Replace TXV. |
8. Specifications
- Model: 72DB0004
- Brand: OEM Rplm for Miller
- Application: A-Coil TXV Valve
- Capacity: 2.5-5 Ton Systems
- Refrigerant Type: R-22
- Item Weight: Approximately 32 Ounces
- Manufacturer: Miller (OEM Replacement for)
9. Warranty and Support
For specific warranty information regarding your 72DB0004 OEM Upgraded Replacement Miller A-Coil TXV Valve, please refer to the documentation provided by your seller or contact the point of purchase directly. Warranty terms typically cover manufacturing defects.
For technical support or assistance with installation and troubleshooting, it is highly recommended to contact a certified HVAC professional or the original equipment manufacturer's support channels.
Ask a question about this manual
Ask about setup, troubleshooting, compatibility, parts, safety, or missing instructions. Manuals+ will review the question and use this page’s manual context to help answer it.