Introduction
This manual provides comprehensive instructions for the installation, operation, maintenance, and troubleshooting of your Blackburn Outpost Front and Rear World Touring Bike Rack. Please read these instructions carefully before installation and use to ensure proper function and safety. This rack system is designed for touring and carrying gear on bicycles.
Safety Information
- Always ensure all bolts and fasteners are securely tightened before each ride.
- Do not exceed the maximum load capacity of 20.5 kg (45 lbs). Overloading can compromise stability and safety.
- Distribute weight evenly on the rack to maintain bicycle balance.
- Regularly inspect the rack for any signs of damage, wear, or loose components.
- Be aware that adding a rack and cargo will change your bicycle's handling characteristics. Practice riding with a loaded rack in a safe environment before extended use.
- Ensure that no part of the rack or cargo interferes with the bicycle's moving parts (wheels, brakes, chain) or rider's movement.
Package Contents
Your Blackburn Outpost Front and Rear World Touring Bike Rack package should include the following components. Please verify all parts are present before beginning installation:
- Front Rack Assembly
- Rear Rack Assembly
- Mounting Hardware (various bolts, washers, spacers, and clamps)
- Instruction Sheet
Note: Specific components may vary slightly based on the exact product variant.
Installation
The Blackburn Outpost rack features a universal fit system and adjustable height design to accommodate most road and mountain bike hub and tire widths. Installation typically involves attaching the rack to your bicycle's frame using the provided hardware.
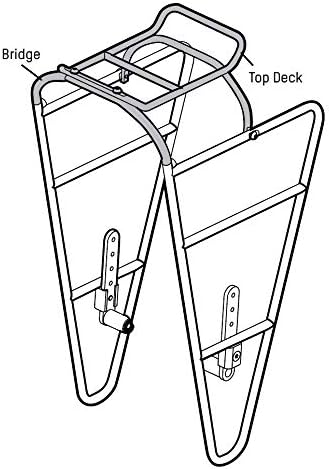
1. Identify Rack Components
Familiarize yourself with the main parts of the rack, including the bridge and top deck, as shown in the diagram below.

2. Check Bicycle Compatibility and Dimensions
Ensure your bicycle has appropriate mounting points (braze-ons) on the frame or fork for rack attachment. The rack's dimensions are provided below for reference.

3. Mounting Procedure
- Attach Lower Mounts: Secure the lower rack arms to your bicycle's frame or fork eyelets using the appropriate bolts and spacers. If your bike lacks lower braze-ons, alternative mounting methods (e.g., using an extended quick release skewer or P-clamps) may be required, which are not always included.
- Attach Upper Mounts: Connect the upper rack stays to the seat stay eyelets (for rear rack) or fork crown eyelets (for front rack). Adjust the length and angle of the stays to ensure the rack is level and clear of the wheel and tires.
- Adjust Height: Utilize the adjustable height feature to position the rack optimally for tire clearance and load stability.
- Tighten All Fasteners: Once the rack is correctly positioned, systematically tighten all bolts and fasteners. Do not overtighten, but ensure they are snug and secure.
Important Note: Some users have reported challenges with hardware fit or the need for specialized skewers for bikes without braze-ons. Ensure all components fit correctly and do not force parts. If you encounter difficulties, consult a professional bike mechanic.
Operation
Once installed, your Blackburn Outpost rack is ready to carry your gear. Proper loading is crucial for stability and safety.
Loading the Rack
- Weight Distribution: Distribute the load as evenly as possible, especially on front racks, to maintain steering control. Place heavier items lower and closer to the bike's center of gravity.
- Maximum Load: Do not exceed the rack's maximum load capacity of 20.5 kg (45 lbs).
- Secure Attachment: Always use appropriate straps, bungee cords, or pannier hooks to securely attach your cargo. Ensure nothing can shift, fall off, or interfere with moving parts during your ride.
- Removable Top Shelf: The top shelf of the rack is removable, offering flexibility for different loading configurations or for a more minimalist setup when not needed.


Maintenance
Regular maintenance will extend the life of your Blackburn Outpost rack and ensure continued safe operation.
- Cleaning: Clean the rack with mild soap and water. Avoid harsh chemicals that could damage the aluminum finish.
- Inspection: Periodically inspect the rack for cracks, bends, or other signs of structural fatigue, especially after heavy use or impacts.
- Fastener Check: Regularly check all mounting bolts and fasteners for tightness. Vibrations from riding can cause them to loosen over time.
- Corrosion: While made of aluminum, prolonged exposure to harsh weather or salt can cause corrosion. Clean and dry the rack thoroughly after riding in such conditions.
Troubleshooting
If you encounter issues with your rack, consider the following common problems and solutions:
- Rack is Loose or Rattles:
Solution: Check all mounting bolts and ensure they are securely tightened. Verify that the rack is not making contact with any other bicycle components. - Difficulty with Installation/Parts Not Fitting:
Solution: Double-check the instruction manual for correct assembly steps. Ensure you have the correct hardware for your specific bicycle frame/fork. If parts appear poorly machined or do not align, contact customer support or a professional bike mechanic. Do not attempt to force components. - Rack Feels Unstable with Load:
Solution: Ensure the load is within the 20.5 kg capacity and distributed evenly. Verify all mounting points are secure and the rack is level. Adjust pannier hooks or straps for a tighter fit. - Screws Breaking:
Solution: This indicates either overtightening or a defect in the screw material. Ensure you are tightening to appropriate torque specifications (if available) and not exceeding them. If screws break during normal use, contact customer support for replacement hardware.
Specifications
- Brand: Blackburn
- Model Number: 7044591
- Material: T6061 Aluminum
- Item Weight: Approximately 0.91 kg (2 Pounds)
- Product Dimensions (L x W x H): 27.89 cm x 21.01 cm x 53.29 cm (10.98"L x 8.27"W x 20.98"H)
- Mount Type: Frame mount, Front dropout Universal mounting options, Rear Seat Mount
- Load Capacity: 20.5 kg (45 lbs)
- Orientation: Front and Rear (system)
- UPC: 768686986246
Warranty Information
The Blackburn Outpost Front and Rear World Touring Bike Rack is subject to a limited lifetime warranty for the lifetime of the original purchaser. This warranty does not apply to damage due to heat, physical damage resulting from abuse, neglect, improper repair, improper fit, improper installation, improper care, accidents, failure to follow directions, alterations, misuse, or use unintended by the manufacturer. Nor does it cover minor cosmetic damages due to normal "wear and tear" of the product.
Customer Support
For further assistance, technical support, or warranty claims, please contact Blackburn customer service through their official website or authorized retailers. When contacting support, please have your product model number (7044591) and proof of purchase available.