1. Introduction
This manual provides detailed instructions for the installation, operation, and maintenance of the Grasslin Q-FRWu Time Delay Switch. This device is designed for precise control of electrical circuits over a 24-hour or 7-day period, offering reliable time-based switching for various applications.
2. Safety Information
WARNING: Risk of electric shock. Installation and servicing should only be performed by qualified personnel.
- Always disconnect power at the main circuit breaker before installing or servicing the switch.
- Ensure all wiring complies with local and national electrical codes.
- Do not exceed the specified electrical ratings of the device.
- Keep the device away from moisture and extreme temperatures.
- Verify all connections are secure before restoring power.
3. Product Components and Features
The Grasslin Q-FRWu Time Delay Switch features a robust design for reliable operation. Key components include:
- Time Dial: A rotating dial marked with 24-hour or 7-day segments for setting the current time and programming.
- Programming Pins: Red and green pins inserted into the dial to define ON and OFF switching times.
- Terminal Block: Screw terminals for electrical connections.
- Manual Override Switch: Allows temporary manual control of the output (if present on your model).

Figure 1: Overall view of the Grasslin Q-FRWu Time Delay Switch. This image shows the compact design with the clear cover, the central time dial, and the red and green programming pins.
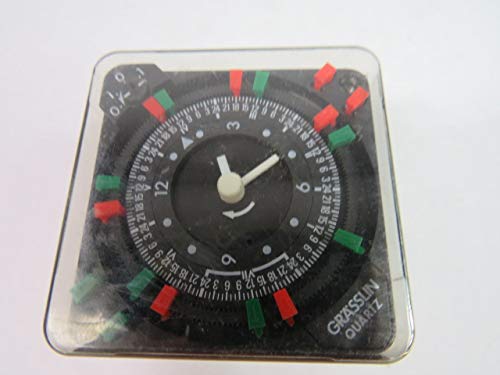
Figure 2: Close-up view of the timer dial. The dial displays 24-hour markings and features slots for inserting the red (ON) and green (OFF) programming pins, allowing for precise scheduling.
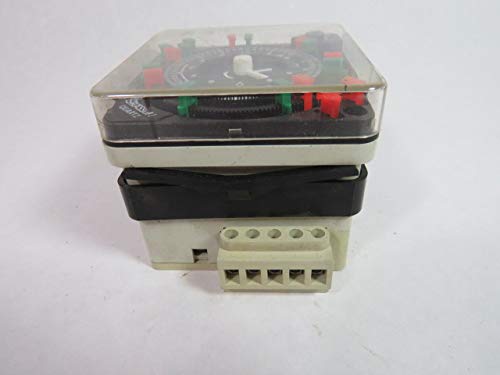
Figure 3: Side view of the timer, highlighting the accessible terminal block. This block provides the connection points for power input and controlled output circuits.

Figure 4: Detailed view of the product label, showing the model number (Typ Q FRWu), electrical ratings (10(2)A 250V~AC, 48-72V~DC, 100-160V~AC, 45-60Hz), and a simplified wiring diagram with numbered terminals (1-5).
4. Setup and Installation
- Power Disconnection: Before beginning installation, ensure that the main power supply to the circuit where the timer will be installed is completely disconnected at the circuit breaker or fuse box.
- Mounting: Mount the Q-FRWu switch securely in a suitable electrical enclosure or panel, ensuring adequate ventilation and protection from environmental factors.
- Wiring: Refer to the wiring diagram on the product label (Figure 4) and follow these general guidelines:
- Connect the incoming power supply to the designated input terminals.
- Connect the load (device to be controlled) to the designated output terminals.
- Ensure all wire connections are tight and secure.
- Observe correct voltage and current ratings as specified on the device.
- Initial Time Setting: Rotate the time dial clockwise until the current time aligns with the time indicator arrow on the timer's face.
- Power Restoration: Once installation and initial time setting are complete, restore power to the circuit.
5. Operating Instructions
- Setting ON/OFF Times:
- Insert the red programming pins into the slots on the time dial corresponding to the desired ON times.
- Insert the green programming pins into the slots on the time dial corresponding to the desired OFF times.
- Each pin typically represents a specific time interval (e.g., 15 minutes). Ensure sufficient pins are used to cover the desired duration.
- Manual Override (if applicable): Some models may include a manual override switch. This allows you to temporarily switch the output ON or OFF, overriding the programmed schedule until the next programmed switching event occurs. Consult your specific model for this feature.
- Monitoring Operation: The time dial will rotate continuously. As the dial rotates, the programming pins will engage the internal switching mechanism, turning the connected load ON or OFF according to your settings.
6. Maintenance
- Cleaning: Periodically clean the exterior of the switch with a dry, soft cloth. Do not use abrasive cleaners or solvents. Ensure power is disconnected before cleaning.
- Inspection: Regularly inspect the wiring connections for tightness and signs of wear or damage. Check the timer's housing for any cracks or damage.
- No User-Serviceable Parts: The internal components of the Q-FRWu switch are not user-serviceable. Do not attempt to open or repair the unit.
7. Troubleshooting
| Problem | Possible Cause | Solution |
|---|---|---|
| Timer not operating / Load not switching. | No power supply; Incorrect wiring; Faulty load; Pins not correctly inserted. | Check circuit breaker/fuse; Verify wiring against diagram; Test the load independently; Ensure pins are firmly in place at desired times. |
| Incorrect switching times. | Current time not set correctly; Pins incorrectly placed. | Adjust the time dial to the current time; Re-position programming pins according to desired schedule. |
| Timer dial not rotating. | No power to the timer motor; Internal fault. | Check power supply to the timer; If power is present and dial still not rotating, the unit may require replacement. |
If problems persist after attempting these solutions, contact a qualified electrician or the manufacturer for assistance.
8. Specifications
| Model | Q-FRWu |
| Brand | Grasslin |
| Voltage Rating | 100-160V AC, 250V AC (10A) |
| DC Voltage Rating | 48-72V DC |
| Current Rating | 10A (resistive load) |
| Frequency | 45-60Hz |
| Switching Period | 24 Hours / 7 Days (depending on configuration) |
| Dimensions (L x W x H) | 15 x 15 x 15 cm (approximately) |
| Weight | 1 kg (approximately) |
9. Warranty and Support
For warranty information and technical support, please refer to the documentation provided at the point of purchase or contact your authorized Grasslin dealer. Keep your purchase receipt as proof of purchase.