1. Introduction
The Bewinner Fixed Wireless Terminal (FWT) is designed to provide voice services using a GSM mobile phone SIM card, eliminating the need for traditional ground wire lines. This device allows you to use standard telephone landline operations with the flexibility of a mobile network. It supports international and domestic, local, fixed/mobile voice services and is suitable for various applications including telephone landlines, alarm systems, and recording boxes.
This manual provides detailed instructions for the proper installation, operation, and maintenance of your Bewinner FWT.
2. Safety Information
- Read all instructions carefully before using the device.
- Do not expose the device to water, moisture, or extreme temperatures.
- Use only the provided power adapter. Using an incorrect adapter may damage the device and void the warranty.
- Keep the device away from direct sunlight and heat sources.
- Do not attempt to open or repair the device yourself. Refer all servicing to qualified personnel.
- Ensure proper ventilation around the device to prevent overheating.
3. Package Contents
Please check the package for the following items:
- Bewinner Fixed Wireless Terminal Main Unit
- Power Adapter (DC 12V)
- GSM Antenna
- Telephone Line Cables (RJ11)

Image 3.1: Contents of the Bewinner Fixed Wireless Terminal package, including the main unit, power adapter, antenna, and telephone cables.
4. Product Overview
4.1 Front Panel Indicators
The front panel of the Bewinner FWT features several LED indicators that display the device's status:
- POWER: Indicates the device is powered on.
- INUSE: Indicates the telephone line is in use.
- TALKING: Indicates an active call.
- MODULE: Indicates the GSM module status.
- SIM: Indicates the SIM card status.
- Signal Strength Indicators: Multiple LEDs to show the strength of the GSM signal.

Image 4.1: Front view of the Bewinner FWT, highlighting the LED indicators for power, usage, call status, module, SIM, and signal strength.
4.2 Rear Panel Ports
The rear panel provides all necessary connection ports:
- DC 12V: Power input port.
- ON/OFF: Power switch.
- PHONE1 / PHONE2: RJ11 ports for connecting standard telephones or alarm systems.
- USB: Micro USB port (for potential data/configuration, typically not user-accessible for basic operation).
- RST: Reset button.
- ANT: SMA connector for the external GSM antenna.
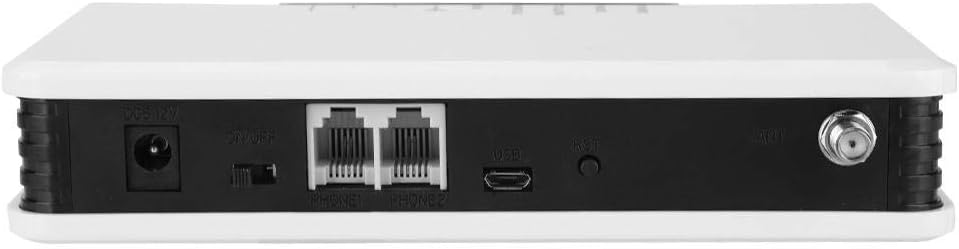
Image 4.2: Rear view of the Bewinner FWT, showing the DC power input, ON/OFF switch, PHONE1/PHONE2 ports, USB port, Reset button, and antenna connector.
5. Setup Instructions
Follow these steps to set up your Bewinner Fixed Wireless Terminal:
5.1 SIM Card Installation
- Ensure the device is powered off using the ON/OFF switch on the rear panel.
- Locate the SIM card slot on the bottom of the device. It is usually covered by a small flap or a swing-up mechanism.
- Carefully insert your activated GSM SIM card into the slot. Ensure the SIM card is correctly oriented according to the diagram near the slot. The SIM card slot typically swings up to allow insertion.
- Close the SIM card slot securely.

Image 5.1: Bottom view of the Bewinner FWT, indicating the location of the SIM card slot. Ensure the SIM card is activated by your mobile carrier before insertion.
5.2 Antenna Connection
- Locate the ANT connector on the rear panel of the device.
- Screw the provided GSM antenna onto the ANT connector clockwise until it is finger-tight.
- Position the antenna vertically for optimal signal reception.
5.3 Power Connection
- Connect the power adapter to the DC 12V input port on the rear panel.
- Plug the power adapter into a standard electrical outlet.
5.4 Connecting a Telephone
- Using a standard RJ11 telephone cable, connect your telephone or alarm system to either the PHONE1 or PHONE2 port on the rear panel of the FWT.
5.5 Powering On
- Flip the ON/OFF switch on the rear panel to the 'ON' position.
- Observe the LED indicators on the front panel. The POWER LED should illuminate. The SIM and MODULE LEDs should also light up, and the signal strength indicators should show the network signal. This process may take a few moments as the device registers with the GSM network.

Image 5.2: The Bewinner FWT in an operational setting, demonstrating its use for making calls via a connected telephone.
6. Operating Instructions
6.1 Making a Call
- Pick up the handset of the connected telephone. You should hear a dial tone.
- Dial the desired phone number.
- The TALKING LED will illuminate during an active call.
6.2 Receiving a Call
- When an incoming call is received, the connected telephone will ring.
- Pick up the handset to answer the call.
6.3 LED Indicator Meanings
| Indicator | Status | Description |
|---|---|---|
| POWER | On | Device is powered on. |
| INUSE | On | Telephone line is active (off-hook). |
| TALKING | On | An active call is in progress. |
| MODULE | On/Flashing | Indicates GSM module status (e.g., searching for network, registered). |
| SIM | On/Flashing | Indicates SIM card status (e.g., detected, error). |
| Signal Strength | Varying LEDs | Indicates the strength of the GSM network signal. More LEDs lit means stronger signal. |
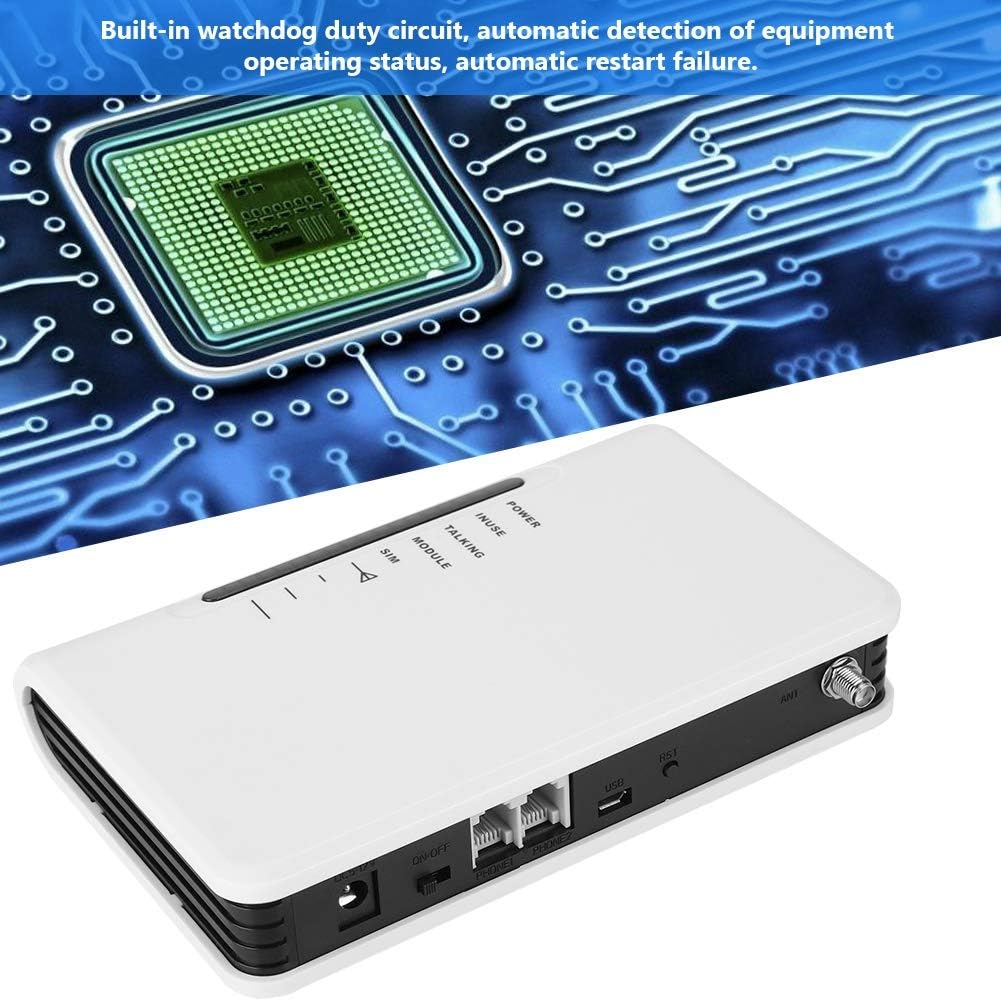
Image 6.1: The Bewinner FWT displaying various LED statuses, including signal, standby, and working status.
7. Maintenance
- Cleaning: Use a soft, dry cloth to clean the exterior of the device. Do not use liquid cleaners or aerosols.
- Storage: If storing the device for an extended period, disconnect it from power and store it in a cool, dry place.
- Watchdog Circuit: The device includes a built-in watchdog duty circuit for automatic detection of operating status and automatic restart in case of failure, minimizing the need for manual intervention.
8. Troubleshooting
| Problem | Possible Cause | Solution |
|---|---|---|
| No Power | Power adapter not connected; Power switch off; Faulty adapter/outlet. | Ensure power adapter is securely connected and plugged into a working outlet. Turn the ON/OFF switch to 'ON'. |
| No Dial Tone | SIM card not inserted or activated; Poor GSM signal; Telephone not connected properly. | Check SIM card insertion and activation status. Ensure antenna is connected and positioned for best signal. Verify telephone cable connection to PHONE1/PHONE2 port. |
| Poor Call Quality / Cannot Hear | Weak GSM signal; Network congestion; Device compatibility issues with specific network bands. | Relocate the FWT to an area with better signal strength (check signal LEDs). Ensure your SIM card's network provider supports the device's GSM bands (850/900/1800/1900Mhz). Note that some networks (e.g., in the US) may no longer support 2G devices. |
| Cannot make/receive calls | SIM card not activated; SIM card balance low; Network issues; Device not registered on network. | Verify SIM card activation and account balance with your mobile carrier. Check signal strength. Restart the device. |
| Device restarts automatically | Normal operation of watchdog circuit; Temporary system error. | This may be the built-in watchdog circuit functioning. If restarts are frequent and disruptive, contact support. |
9. Specifications
| Feature | Detail |
|---|---|
| Brand | Bewinner |
| Model Number | Bewinner42sg1ohuke-01 |
| GSM Frequency Bands | Quad-Band GSM 850/900/1800/1900Mhz |
| Power Source | DC |
| Voltage | 12 Volts, 5 Volts (Input/Output) |
| Wattage | 2 watts |
| Product Dimensions | 10L x 10W x 10H millimetres (approx. 1 x 1 x 1 cm) |
| Item Weight | 399 g |
| Compatible Devices | PC (for potential configuration, not typical user operation), Standard Telephones, Alarm Systems |
| Noise Level | 104 Decibels |
| UPC | 753874206541 |

Image 9.1: Bottom label of the Bewinner FWT, displaying the model number, serial number, and checkboxes for supported network technologies (GSM, CDMA, WCDMA, 4G).
Note: Specifications are subject to change without notice. The "Noise level" specification of 104 Decibels may be a general specification for a component within the device or a misinterpretation; the device itself is not expected to produce such high noise during normal operation.
10. Warranty and Support
For warranty information and technical support, please refer to the documentation provided with your purchase or contact your retailer. Keep your proof of purchase for warranty claims.


