B-Qtech T650
B-Qtech RV Solar Wireless TPMS User Manual
Model: T650
1. Introduction
This user manual provides detailed instructions for the B-Qtech RV Solar Wireless Tire Pressure Monitoring System (TPMS) Model T650. This system is designed to enhance driving safety by providing real-time monitoring of tire pressure and temperature for RVs, trailers, motorhomes, and other vehicles with 4 or 6 tires. Please read this manual thoroughly before installation and operation to ensure proper use and optimal performance.

Figure 1: B-Qtech RV Solar Wireless TPMS Monitor and Sensors.
2. Product Features
- Upgraded High Brightness Display: The monitor screen brightness has been enhanced for clear visibility even in direct sunlight. Brightness is adjustable.
- Dual Charging Options: Features solar panels for continuous power during sunny days and a built-in 1000mAh rechargeable lithium battery with a USB charging cable for use in low light conditions or at night.
- Intelligent Monitoring with Infineon SP40 Chip: Utilizes the Infineon SP40 chip for lower energy consumption, higher measurement accuracy (0.1 bar pressure, ±2 ℃ temperature), and stable tire monitoring. Data updates every 3 seconds with immediate anomaly alerts.
- Five Alarm Modes: Provides comprehensive alerts including fast leak alarm, high/low-pressure alarm, high-temperature alarm, and sensor low power alarm.
- User-Set Alarm Values: Allows customization of high pressure, low pressure, and high temperature alarm values for each axle, accommodating different vehicle types and needs.
- Versatile Vehicle Compatibility: Designed with a 4/6 tire switching option, making it suitable for various models including RVs, trailers, and motorhomes. Separate alarm settings for front and rear axles.
- Easy External Sensor Installation: Equipped with 6 external sensors that can be installed quickly without professional assistance. Sensors are designed to withstand harsh weather and include anti-theft screws.

Figure 2: Solar and USB charging capabilities of the monitor.

Figure 3: Illustration of the five alarm modes and customizable settings.

Figure 4: The Infineon SP40 chip ensures accurate and stable monitoring.
3. Product Components
The B-Qtech RV Solar Wireless TPMS package includes the following items:
- 1 x TPMS Monitor
- 6 x External Sensors
- 1 x USB Power Cord
- 1 x Anti-slip Mat
- 6 x Theftproof Nuts
- 1 x Spanner Tool

Figure 5: All components included in the B-Qtech TPMS package.
4. Setup & Installation
4.1 Initial Setup of the Monitor
- Charge the Monitor: Before first use, fully charge the TPMS monitor using the provided USB power cord. The monitor also charges via its solar panel when exposed to sunlight.
- Power On: Press and hold the 'SET' button to power on the monitor.
- Brightness Adjustment: From the standby interface, press the '–' button to adjust the screen brightness for optimal visibility.
- Vehicle Mode Selection (4 or 6 tires): The system supports both 4-tire and 6-tire configurations. Refer to the detailed instructions in the full user manual (PDF link provided in product documents) for switching between modes.

Figure 6: The monitor supports both 4-wheel and 6-wheel display configurations.
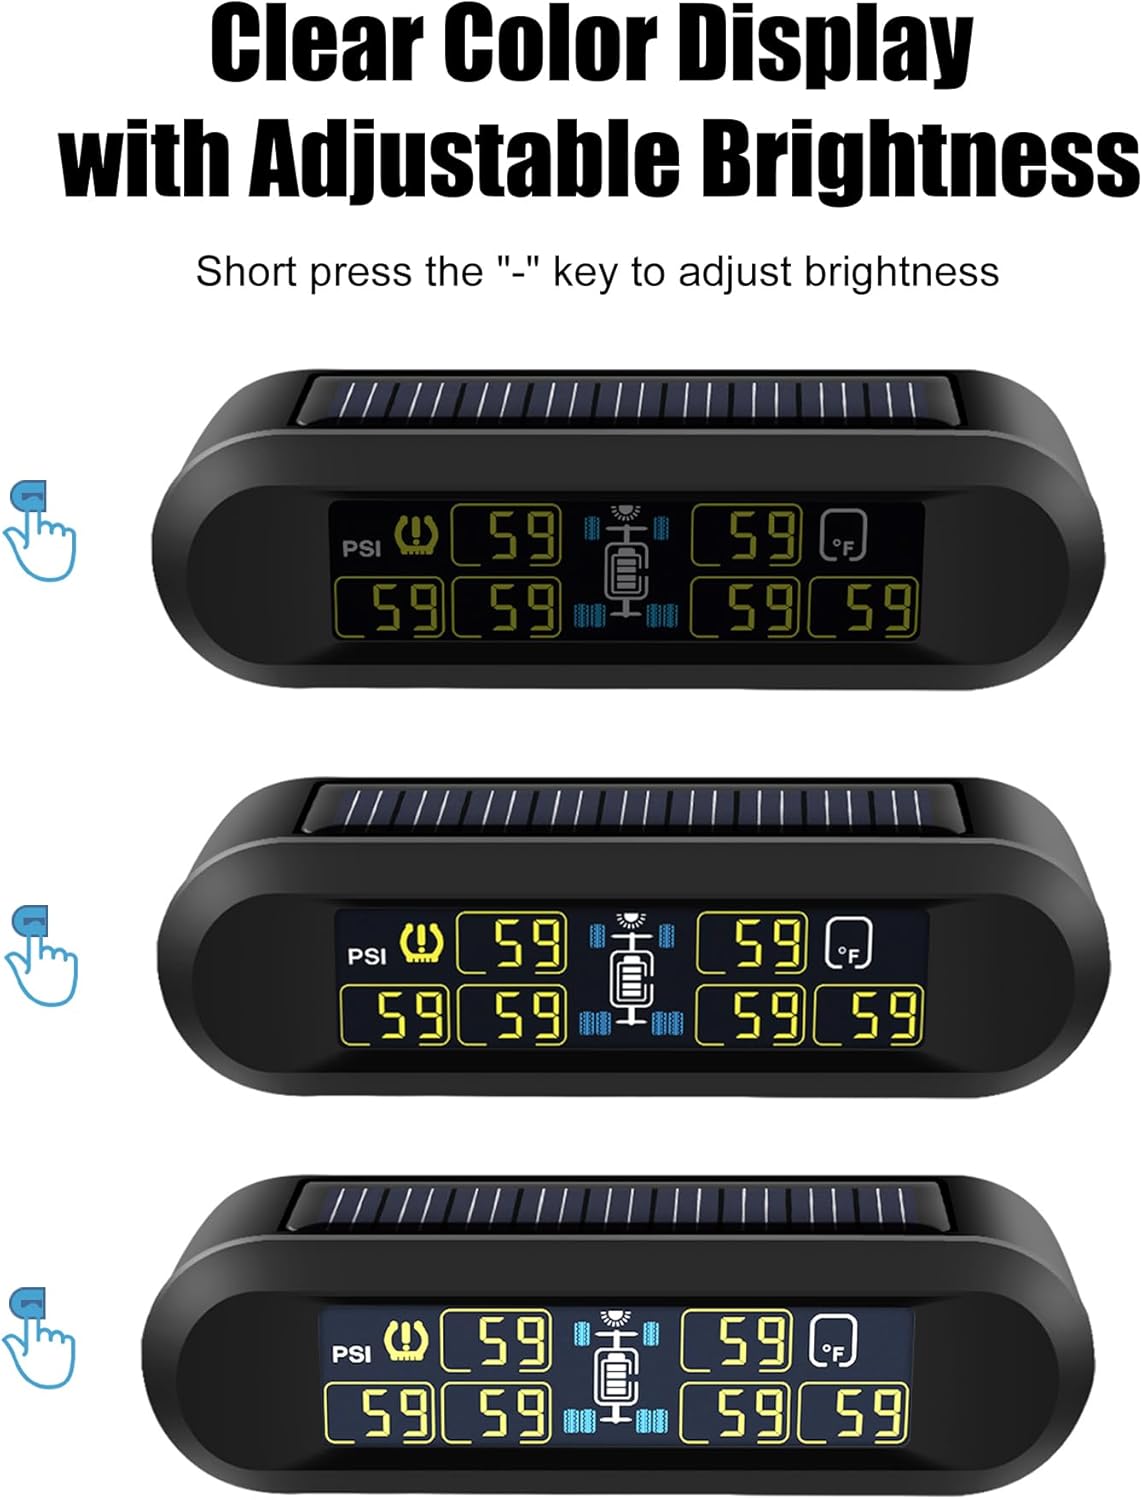
Figure 7: Adjusting the display brightness for optimal viewing.
4.2 Sensor Installation
The external sensors are designed for quick and easy installation on your tire valves.
- Prepare the Valve: Ensure the tire valve stem is clean and dry.
- Screw on Nuts: Screw one of the provided theftproof nuts onto the tire valve stem.
- Install Sensor: Screw the corresponding sensor onto the tire valve stem until it is hand-tight. Ensure the sensor is securely attached.
- Tighten Theftproof Nut: Use the spanner tool to tighten the theftproof nut against the sensor in an anticlockwise direction. This secures the sensor and prevents unauthorized removal.
- Repeat for all Tires: Install sensors on all designated tires. For the system to activate and display readings, the vehicle may need to be driven briefly to register tire pressure changes.

Figure 8: Step-by-step guide for installing the external sensors.
5. Operation
5.1 Real-time Monitoring
Once installed and activated, the monitor will display real-time tire pressure and temperature readings for each tire. The display updates every 3 seconds to provide current information.
5.2 Alarm Modes and Settings
The system features five distinct alarm modes to alert you to potential tire issues:
- Fast Leak Alarm: Alerts when a rapid pressure drop is detected.
- High-Pressure Alarm: Activates if tire pressure exceeds the set high limit.
- Low-Pressure Alarm: Activates if tire pressure falls below the set low limit.
- High-Temperature Alarm: Alerts if tire temperature exceeds the set high limit.
- Sensor Low Power Alarm: Indicates a sensor battery is running low.
Alarm values can be customized for each axle. Refer to the full user manual for detailed instructions on how to access and modify these settings. Factory default settings are: High-pressure alarm: 116psi, Low-pressure alarm: 58psi, High-temperature alarm: 149℉.
5.3 Automatic Wake-up and Sleep
The monitor is designed for convenience:
- It automatically wakes up when you start driving or get into the car.
- It automatically enters sleep mode after 15 minutes of parking to conserve battery.
6. Troubleshooting
This section addresses common issues you might encounter with your B-Qtech TPMS.
6.1 Frequently Asked Questions
- Q: Why didn't the monitor display the tire pressure reading after I installed it?
- A: For the first installation, first turn on the monitor and then install the sensor. The system needs to recognize changes in tire pressure to activate. Driving the vehicle briefly after installation can help activate the sensors.
- Q: Can I set different alarm values for different vehicles?
- A: Yes, the pressure of different vehicle tires is different, and the alarm value range supports user-defined settings. You can customize alarm values for each axle.
- Q: I bought a tire pressure monitoring system with 6 sensors. Can I use it on a 4-wheel vehicle?
- A: Yes, the 6-wheel and 4-wheel modes can be switched. Please refer to the instruction manual for the specific steps to switch modes.
6.2 General Troubleshooting Tips
- No Signal from Sensor: Ensure the sensor is correctly installed and tightened. Check if the sensor battery needs replacement (CR1632). If the vehicle has a long wheelbase, a signal repeater (optional purchase) might be needed.
- Inaccurate Readings: Verify that the sensors are installed on the correct tires as per the display mapping. Compare readings with a reliable manual tire gauge.
- Monitor Not Charging: Ensure the solar panel is clean and exposed to direct sunlight. If using USB, check the cable and power source.
7. Specifications
| Brand | B-Qtech |
| Model Number | T650 |
| Material | Plastic |
| Monitor Dimensions (L x W x H) | 4.72 x 1.97 x 1.18 inches |
| Item Weight | 14.1 ounces (400 Grams) |
| Screen Size | 3.3 Inches |
| Pressure Detection Range | 0-199 PSI / 0-13.7 Bar |
| Temperature Detection Range | -4°F ~ 176°F (-20°C ~ 80°C) |
| Pressure Accuracy | ±0.1 Bar |
| Temperature Accuracy | ±2 ℃ |
| Sensor Battery Type | CR1632 (Replaceable) |
| Monitor Battery | 1000mAh Lithium Polymer (Built-in) |
| Signal Transmission Distance | Up to 98 FT (with optional repeater) |
| UPC | 747130398040 |

Figure 9: Key specifications including pressure, temperature, and signal range.
8. Warranty & Support
B-Qtech is committed to providing high-quality products and customer satisfaction. For warranty information, technical support, or any inquiries regarding your TPMS, please refer to the official B-Qtech brand store or contact customer service through the platform where you purchased the product.
You can visit the official B-Qtech store for more information and support: B-Qtech Store
Ask a question about this manual
Ask about setup, troubleshooting, compatibility, parts, safety, or missing instructions. Manuals+ will review the question and use this page’s manual context to help answer it.