Introduction
This manual provides detailed instructions for the installation, operation, and maintenance of your ACTi B76A 12MP Video Analytics Outdoor Hemispheric Dome Camera. Please read this manual thoroughly before using the product to ensure proper setup and functionality. Keep this manual for future reference.
Product Overview
The ACTi B76A is a high-performance 12-megapixel hemispheric dome camera designed for outdoor surveillance. It features advanced video analytics, superior low light sensitivity, and robust environmental protection.
Camera Components
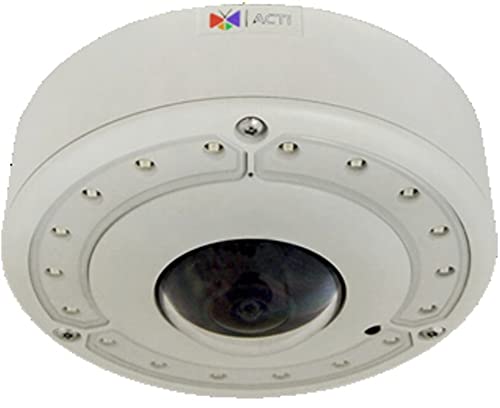
Image: Diagram illustrating the key components and connection points of the ACTi B76A camera.
- Memory Card Slot: For local storage of video footage using MicroSDHC/MicroSDXC cards.
- Audio Input / Output: Connect external audio devices for two-way communication.
- Digital Input/Output: Interface for connecting external sensors or control devices.
- Reset Button: Used to restore the camera to factory default settings.
- Ethernet Port: RJ-45 connector for network connection and Power over Ethernet (PoE).
- DC 12V Power Input: Alternative power connection point.
- Built-in Microphone: For audio capture.
Key Features
- High Resolution: 12MP image sensor for detailed surveillance.
- Superior Low Light Sensitivity (SLLS): Enhanced performance in challenging lighting conditions.
- Adaptive IR LED: Built-in infrared illumination for night vision up to 20 meters.
- Fisheye Lens: f1.65mm/F2.8 lens providing 360°/180° panoramic views.
- Dewarped Streaming: Multiple view modes including fisheye, dewarped, 270° corner, and ePTZ.
- Extreme WDR (130 dB): Wide Dynamic Range for clear images in high-contrast scenes.
- Advanced Video Analytics: Includes Object Based Motion Detection, Tampering Detection, Shock Detection, Digital Auto Tracking, Object Line Crossing Detection, Object Enter Area Detection, Missing Object Detection, Unattended Object Detection, and Object Loitering Detection.
- Image Enhancement: Features like White Balance, Brightness, Contrast, Sharpness, Automatic Gain Control, Flickerless, and Defogging.
- Two-Way Audio: Built-in microphone with audio input/output for interactive communication.
- Local Storage: MicroSDHC/MicroSDXC card slot for on-device recording.
- Power over Ethernet (PoE): Simplifies installation by providing power and data over a single cable.
- Robust Design: IP68 weatherproof and IK10 vandal-proof casing for outdoor durability.
- Wide Operating Temperature: Functions reliably from -40°C to 50°C.
Setup
1. Unpacking and Inspection
Carefully unpack the camera and all accessories. Inspect for any signs of damage. If any components are missing or damaged, contact your vendor immediately.
2. Mounting the Camera
The ACTi B76A is designed for outdoor wall or ceiling mount installations. Ensure the mounting surface is strong enough to support the camera's weight. Use appropriate screws and anchors for secure installation. Refer to the included mounting template for drilling holes.
3. Power Connection
- Power over Ethernet (PoE): Connect an Ethernet cable from a PoE-enabled switch or injector to the camera's Ethernet port. This provides both power and network connectivity.
- DC 12V Power: Alternatively, connect a DC 12V power adapter (not included) to the DC 12V power input port. Ensure the power supply meets the camera's specifications (7W minimum).
4. Network Connection
Connect an Ethernet cable from your network switch or router to the camera's Ethernet port. Ensure your network is configured to assign an IP address to the camera (DHCP recommended for initial setup).
5. Initial Configuration
Once powered and connected to the network, use the ACTi IP Utility software (available on the ACTi website) to discover the camera on your network. Access the camera's web interface using its assigned IP address to perform initial setup, including setting a strong password, configuring network settings, and adjusting basic video parameters.
Operating
1. Accessing Live View
Open a web browser and enter the camera's IP address. Log in with your credentials. The live view interface will display the camera's video feed. You can switch between different view modes (Fisheye, Dewarped, 270° Corner, Multiple, ePTZ) from the interface.
2. Configuring Video Settings
Navigate to the video settings section in the web interface to adjust resolution, frame rate, compression (H.264, MJPEG), and image quality parameters such as brightness, contrast, sharpness, and WDR settings.
3. Utilizing Video Analytics
The camera offers a suite of built-in video analytics. Access the analytics configuration section to enable and customize features like motion detection, line crossing, and object detection. Define detection zones and sensitivity levels as required for your surveillance needs.
4. Audio Functionality
Enable and configure the built-in microphone for audio monitoring. If external speakers are connected to the audio output, two-way audio communication can be established through the web interface or compatible VMS.
5. Recording and Storage
Configure recording schedules and storage destinations. You can record directly to a MicroSDHC/MicroSDXC card inserted into the camera's memory card slot, or to a Network Video Recorder (NVR) or other network storage solutions.
6. Event Management
Set up event triggers based on video analytics, digital inputs, or sound detection. Configure event responses such as email notifications, push notifications to mobile devices, saving video to local storage, or activating external devices via digital outputs.
Maintenance
1. Cleaning the Camera
Regularly clean the camera's dome cover and housing with a soft, damp cloth. Avoid using abrasive cleaners or solvents that could damage the surface or lens. Ensure the camera is powered off before cleaning.
2. Firmware Updates
Periodically check the ACTi website for the latest firmware updates. Keeping your camera's firmware up-to-date ensures optimal performance, security, and access to new features. Follow the provided instructions carefully when performing firmware updates.
3. Environmental Checks
For outdoor installations, periodically inspect the camera's mounting and cabling for any signs of wear, corrosion, or damage. Ensure all seals are intact to maintain the IP68 weatherproof rating.
Troubleshooting
No Power
- Verify that the PoE switch/injector is functioning correctly or that the DC 12V power adapter is properly connected and supplying power.
- Check all cable connections for secure fit.
No Network Connection
- Ensure the Ethernet cable is securely connected to both the camera and the network device.
- Check network settings (IP address, subnet mask, gateway) using the ACTi IP Utility.
- Confirm that the network switch port is active and configured correctly.
Poor Image Quality
- Clean the camera's dome cover and lens.
- Adjust image settings (brightness, contrast, sharpness, WDR) in the web interface.
- Ensure sufficient lighting in the surveillance area, especially at night (check IR LED functionality).
Analytics Not Triggering
- Verify that the analytics features are enabled and correctly configured in the camera's web interface.
- Adjust detection zones and sensitivity levels to match environmental conditions.
- Ensure there are no obstructions blocking the camera's view in the detection areas.
Specifications
| Feature | Specification |
|---|---|
| Model Number | B76A |
| Maximum Resolution | 12MP (4072x3046) |
| Image Sensor | 1/1.7" Progressive Scan CMOS |
| Lens | Fisheye, f1.65mm/F2.8 |
| IR LED | Adaptive IR LED x18 (850nm), 20m working distance |
| Compression | H.264 (Baseline/Main/High profile), MJPEG |
| View Modes | Fisheye View, Dewarped View, 270° Corner View, Multiple View, ePTZ View |
| WDR | Extreme WDR (130 dB) |
| DNR | 2D+3D DNR |
| Audio | 2-way, Built-in Microphone, Mic-in, Line-in, Line-out |
| Power Source | PoE Class 3 (IEEE802.3af), DC 12V |
| Power Consumption | 12.95W (PoE, IR on), 10.77W (PoE, IR off), 7W (DC) |
| Environmental Rating | Weatherproof (IP68), Vandal proof (IK10) |
| Operating Temperature | -40°C ~ 50°C |
| Connectivity Technology | Wired (Ethernet) |
| Local Storage | MicroSDHC/MicroSDXC |
| UPC | 745559467279 |
Warranty and Support
For warranty information, please refer to the warranty card included with your product or visit the official ACTi website. Technical support and additional resources, including software downloads and FAQs, are available on the ACTi support portal. Please have your model number (B76A) and serial number ready when contacting support.