
1. Safety Instructions
Always prioritize safety when operating power tools. Failure to follow these instructions may result in serious injury or damage to the machine.
- Read the Entire Manual: Understand all operating procedures and safety warnings before use.
- Wear Personal Protective Equipment (PPE): Always wear safety glasses, hearing protection, and a dust mask. Avoid loose clothing or jewelry that could get caught in moving parts.
- Ensure Proper Electrical Connection: Connect the planer to a 240V, 15A, single-phase power supply as specified. Ensure the circuit is properly grounded.
- Maintain a Clean Work Area: Keep the work area free of clutter, debris, and other obstructions. Good lighting is essential.
- Secure the Workpiece: Always ensure the material being planed is properly supported and guided.
- Never Reach into the Machine: Keep hands clear of the cutterhead and feed rollers during operation.
- Disconnect Power: Always disconnect the planer from the power source before performing any adjustments, maintenance, or when changing cutter inserts.
- Use Correct Feed Direction: Feed material into the planer in the direction indicated by arrows on the machine.
2. Product Overview
The Shop Fox W1863 is a robust 15-inch planer designed for precision wood surfacing. It features a helical cutterhead for superior finish and reduced noise.
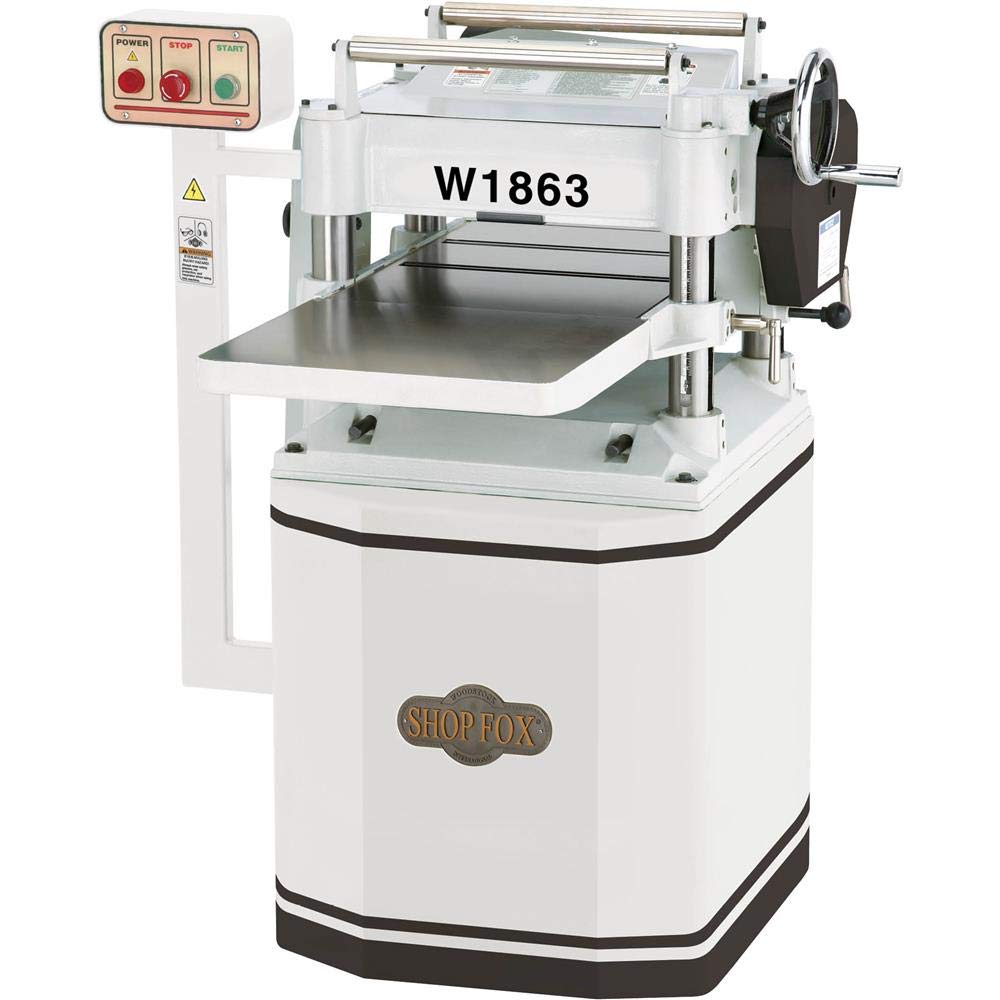
Figure 2.1: Overall view of the Shop Fox W1863 15-inch Planer. This image shows the main body of the planer, including the infeed and outfeed tables, the control panel with power, stop, and start buttons, and the handwheel for depth adjustment.
Key Features:
- Helical Cutterhead: Equipped with a 4-flute helical cutterhead and 52 indexable four-sided carbide inserts for smooth, tear-out-free cuts.
- Two-Speed Gearbox: Allows selection between 16 FPM and 20 FPM feed rates for optimal results on various wood types.
- Precision-Ground Cast-Iron Tables: Durable infeed and outfeed tables provide stable material support.
- Pedestal-Mounted Switch: Conveniently located controls for easy access.
- Large Board Return Rollers: Facilitate efficient material handling.

Figure 2.2: Close-up view of the helical cutterhead. This image highlights the individual carbide inserts arranged in a helical pattern, which are responsible for the planer's smooth cutting action.
3. Setup
3.1 Unpacking and Inspection
- Carefully remove the planer from its packaging.
- Inspect the machine for any shipping damage. Report any damage to the carrier immediately.
- Verify that all components listed in the packing list are present.
3.2 Placement
Place the planer on a stable, level surface capable of supporting its weight (approximately 553 lbs). Ensure adequate space around the machine for safe operation and material handling.
3.3 Electrical Connection
The Shop Fox W1863 requires a 240V, 15A, single-phase power supply. Consult a qualified electrician if you are unsure about your electrical system. Ensure the machine is properly grounded to prevent electrical shock.
4. Operating Instructions
4.1 Pre-Operation Checks
- Ensure all guards are in place and secure.
- Check that the cutterhead inserts are clean and properly seated.
- Verify the depth of cut setting is appropriate for the material.
4.2 Adjusting Depth of Cut
Use the handwheel on the side of the planer to adjust the cutting height. One full rotation typically corresponds to a specific change in height. The maximum depth of cut per pass is 1/8 inch. For best results and to prevent overloading the motor, take shallow passes, especially on wide or hard stock.
4.3 Selecting Feed Rate
The planer offers two feed rates: 16 FPM (Feet Per Minute) and 20 FPM. Select the slower speed (16 FPM) for harder woods or when a finer finish is desired. Use the faster speed (20 FPM) for softer woods or when rough planing.
4.4 Feeding Material
- Turn on the planer using the START button on the control panel. Allow the cutterhead to reach full speed.
- Place the leading edge of the workpiece onto the infeed table.
- Gently push the material until the feed rollers engage and pull it through the machine.
- Support the workpiece as it exits the outfeed table to prevent snipe.
- Never force material through the planer. If the machine struggles, reduce the depth of cut.
5. Maintenance
Regular maintenance ensures the longevity and optimal performance of your planer. Always disconnect power before performing any maintenance.
5.1 Cleaning
- After each use, clear all wood chips and dust from the machine, especially around the cutterhead, feed rollers, and tables.
- Use compressed air or a brush; avoid using water directly on electrical components.
- Clean the cast-iron tables with a non-abrasive cleaner and apply a rust preventative as needed.
5.2 Cutterhead Insert Replacement
The helical cutterhead uses 52 indexable four-sided carbide inserts. When an edge becomes dull, rotate the insert to a fresh edge. When all four edges are dull, replace the insert.
- Disconnect the planer from power.
- Access the cutterhead area.
- Using the appropriate tool, loosen the screw holding the dull insert.
- Rotate the insert to a new, sharp edge or replace it with a new one.
- Securely tighten the screw. Ensure the insert is flush with the cutterhead body.
- Repeat for all necessary inserts.
5.3 Lubrication
Periodically lubricate moving parts such as the height adjustment screws and chains (if applicable) with a suitable machine lubricant. Refer to the detailed lubrication points in the full manual for specific instructions.
6. Troubleshooting
This section addresses common issues you might encounter with your planer.
| Problem | Possible Cause | Solution |
|---|---|---|
| Poor surface finish (e.g., tear-out, chatter marks) | Dull or damaged cutterhead inserts; excessive depth of cut; incorrect feed rate; unstable workpiece. | Rotate or replace cutter inserts; reduce depth of cut; use slower feed rate; ensure workpiece is stable. |
| Material not feeding | Feed rollers are dirty or worn; excessive depth of cut; motor overload. | Clean feed rollers; reduce depth of cut; check for obstructions. |
| Planer does not start | No power; emergency stop engaged; thermal overload tripped. | Check power connection and circuit breaker; disengage emergency stop; allow motor to cool and reset thermal overload. |
| Snipe at ends of board | Improper support of workpiece; infeed/outfeed tables not properly adjusted. | Provide adequate support for the workpiece; ensure infeed/outfeed tables are level with the main bed. |
7. Specifications
The following are the key technical specifications for the Shop Fox W1863 15-inch Planer:
- Motor: 3 HP, 240V, 15A, single-phase
- Max. Cutting Width: 15 inches
- Max. Cutting Height: 6 inches
- Min. Stock Thickness: 1/8 inch
- Min. Stock Length: 6 inches
- Max. Depth of Cut: 1/8 inch
- Feed Rate: 16 FPM & 20 FPM (Feet Per Minute)
- Cutterhead Type: Helical with 4 flutes
- Cutter Inserts: 52 indexable four-sided carbide inserts
- Base Material: Iron
- Item Weight: Approximately 553 pounds
- Product Dimensions: 37 x 48 x 44 inches
- UPC: 754001003989
8. Warranty and Support
8.1 Manufacturer's Warranty
The Shop Fox W1863 15-inch Planer is covered by a 2-year manufacturer's warranty. This warranty typically covers defects in materials and workmanship under normal use. Please retain your proof of purchase for warranty claims.
8.2 Customer Support
For technical assistance, parts, or warranty service, please contact Shop Fox customer support. Refer to the contact information provided with your purchase documentation or visit the official Shop Fox website.