1. Introduction
Thank you for choosing the PUPPY KITTY Automatic Pet Feeder. This device is designed to provide scheduled and portion-controlled meals for your pets, ensuring their health and well-being even when you are away. Please read this manual carefully before use to ensure proper operation and maintenance.

Image 1.1: The PUPPY KITTY Automatic Pet Feeder, highlighting its 6.5L capacity and timer feeding function.
2. Product Components
The package includes the following items:
- Automatic Pet Feeder Main Unit
- Food Storage Container (6.5 Liter capacity)
- Food Tray
- USB Power Cable and Adapter (EU standard)
- Two Dispensing Gears (10g and 5g per portion)
- User Manual
Please ensure all components are present and undamaged upon unpacking.
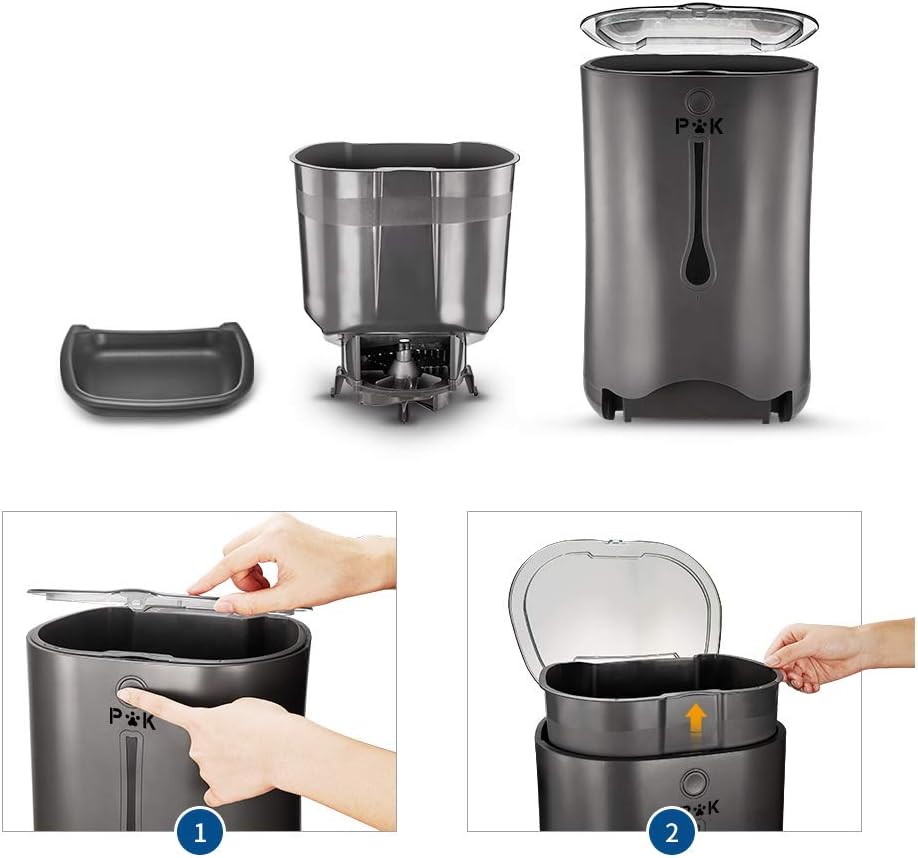
Image 2.1: Overview of the pet feeder's main components, including the food tray, food container, and the main unit.
3. Setup Instructions
- Unpack and Assemble: Carefully remove all components from the packaging. Place the food storage container into the main unit. Ensure it is seated correctly.
- Install Dispensing Gear: Select the appropriate dispensing gear (10g or 5g) based on your pet's food size and desired portion. Install it at the bottom of the food container.
- Attach Food Tray: Slide the food tray into the designated slot at the base of the main unit until it clicks securely into place.
- Power Supply: The feeder can be powered by two methods:
- USB Power: Connect the USB cable to the feeder and the power adapter, then plug it into a wall outlet.
- Battery Power: Open the battery compartment at the bottom of the unit and insert 3 'D' size batteries (not included). This provides backup power in case of an outage.
- Fill Food Container: Open the lid on top of the feeder and pour dry pet food into the container. Close the lid securely.

Image 3.1: Steps for disassembling and assembling the feeder components.

Image 3.2: Power options: USB cable connection and battery compartment for 'D' batteries.
4. Operating Instructions
The feeder features a blue backlit LCD screen and touch control panel for programming.

Image 4.1: The digital control panel for programming the feeder.
4.1. Setting Current Time
- Press the 'Time' button.
- Use the 'Hour' and 'Minute' buttons to adjust the current time.
- Press 'Time' again to confirm.
4.2. Programming Meals
You can program up to 4 meals per day. Each meal can dispense 1 to 39 portions (10g per portion with the standard gear).
- Press the 'Meal' button (e.g., 'Breakfast', 'Lunch', 'Dinner', 'Meal').
- Use the 'On/Off' button to activate or deactivate the meal.
- Use the 'Hour' and 'Minute' buttons to set the feeding time for that meal.
- Use the 'Meal Size' button to set the number of portions (1-39) for that meal.
- Repeat for other meals as needed.
4.3. Voice Recording
Record an 8-second message to call your pet at meal times. The message will play 3 times.
- Press and hold the 'MIC' button.
- Speak your message into the microphone.
- Release the 'MIC' button to save the recording.
- Press the 'Play' button to test your recording.

Image 4.2: The voice recording feature helps call your pet for meals.
4.4. Manual Feeding
To dispense food manually, press the 'Manual Feed' button on the control panel. Each press will dispense one portion.
4.5. Low Food Alarm
The feeder is equipped with an acoustic alarm that will sound when the food level in the container is low, reminding you to refill.
5. Maintenance and Cleaning
Regular cleaning ensures hygiene and proper functioning of the feeder.
- Disassembly: Unplug the feeder from power. Remove the food tray and the food storage container.
- Cleaning: The food tray and food storage container are removable and washable. Wash them with mild soap and water. Rinse thoroughly and dry completely before reassembly. Do not immerse the main unit in water. Wipe the main unit with a damp cloth.
- Reassembly: Once all parts are dry, reassemble the feeder by following the setup instructions in reverse order.

Image 5.1: The feeder's design helps prevent food spillage, making cleaning easier.
6. Troubleshooting
- Feeder not dispensing food:
- Check if the power adapter is securely plugged in or if batteries are correctly installed and charged.
- Ensure the food container is not empty.
- Verify that the dispensing gear is not jammed by food particles. Clean if necessary.
- Check programmed meal times and portion settings.
- Food portions are incorrect:
- Ensure the correct dispensing gear (10g or 5g) is installed for your pet's food size.
- Adjust the 'Meal Size' setting for each programmed meal.
- Voice recording not playing:
- Ensure the recording process was completed correctly (press and hold 'MIC', then release).
- Test by pressing the 'Play' button.
- LCD screen is blank:
- Check power supply (USB or batteries).
- If using batteries, replace them.
7. Specifications
| Feature | Specification |
|---|---|
| Model Number | Doll |
| Capacity | 6.5 Liters |
| Dimensions (L x W x H) | 35 cm x 25 cm x 39 cm |
| Weight | 2250 Grams |
| Material | Acrylonitrile Butadiene Styrene, Rubber |
| Meals per Day | Up to 4 |
| Portions per Meal | 1-39 (approx. 10g per portion) |
| Voice Recording | 8 seconds, plays 3 times |
| Power Supply | USB cable with adapter or 3 'D' batteries (not included) |
| Special Features | Programmable, Voice Recording, Digital Timer, Low Food Alarm |
8. Warranty and Support
The PUPPY KITTY Automatic Pet Feeder comes with a 3-year warranty. This warranty covers manufacturing defects and malfunctions under normal use. Please retain your proof of purchase for warranty claims.
For technical support, troubleshooting assistance, or warranty inquiries, please contact PUPPY KITTY customer service through the retailer where you purchased the product or visit the official PUPPY KITTY website.


