Introduction
This manual provides detailed instructions for the installation, operation, and maintenance of the RideTech 11169576 Steering Kit. This kit is designed to upgrade the steering components in 1968-1969 Camaro and Firebird, and 1968-1974 Nova vehicles equipped with power steering. The kit includes inner tie rod ends, outer tie rod ends, an idler arm, a pitman arm, and billet tie rod adjusters. These components are manufactured to original equipment (OE) specifications to ensure precise fitment and are constructed from high-quality materials for reliable performance and extended durability in demanding automotive applications.
Safety Information
- Always wear appropriate personal protective equipment (PPE) including safety glasses and gloves.
- Ensure the vehicle is securely supported on jack stands before beginning any work. Never work under a vehicle supported only by a jack.
- Disconnect the vehicle's battery before working on any electrical components or if instructed by your vehicle's service manual.
- Refer to your vehicle's service manual for specific torque specifications and procedures relevant to your model year.
- Improper installation can lead to serious injury, loss of vehicle control, or vehicle damage. If you are unsure about any step, consult a qualified automotive technician.
- Dispose of old parts and fluids responsibly according to local regulations.
Package Contents
The RideTech 11169576 Steering Kit includes the following components:
- Inner Tie Rod Ends
- Outer Tie Rod Ends
- Idler Arm
- Pitman Arm
- Billet Tie Rod Adjusters
- Associated hardware (nuts, cotter pins)
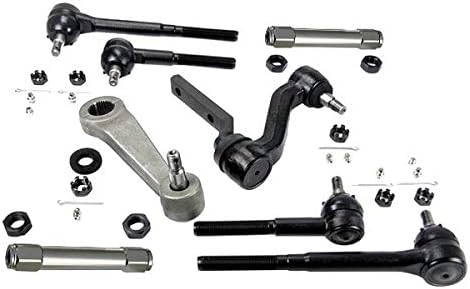
An overhead view displaying all components included in the Ridetech 11169576 Steering Kit. Visible parts include inner and outer tie rod ends, billet tie rod adjusters, an idler arm, a pitman arm, and various nuts and cotter pins required for installation. The components are laid out on a white background, showcasing their individual forms and finishes.
Setup and Installation
Installation of the RideTech 11169576 Steering Kit requires mechanical knowledge and appropriate tools. It is recommended to consult a professional if you are not familiar with automotive steering system work.
- Preparation: Park the vehicle on a level surface, engage the parking brake, and block the rear wheels. Raise the front of the vehicle and support it securely with jack stands. Never rely solely on a jack. Remove the front wheels.
- Disassembly of Old Components: Loosen and remove the castle nuts and cotter pins securing the old tie rod ends, idler arm, and pitman arm. Use a tie rod puller or pickle fork to separate the components from the steering knuckles and center link. Carefully remove all old steering linkage components. Note the orientation of existing components for reference.
- Installation of New Components: Begin by installing the new idler arm and pitman arm onto their respective mounting points, ensuring proper alignment. Torque these components to the specifications found in your vehicle's service manual. Attach the inner tie rod ends to the center link. Thread the billet tie rod adjusters onto the inner tie rod ends, then attach the outer tie rod ends. Ensure the tie rod ends are oriented correctly and that threads are clean and lubricated if specified.
- Initial Adjustment: Adjust the tie rod adjusters to achieve an approximate toe setting. This will allow the vehicle to be driven safely to an alignment shop. Do not overtighten any components before final alignment. Ensure sufficient thread engagement on all tie rod components.
- Final Assembly: Secure all castle nuts with new cotter pins, bending the cotter pin ends to prevent loosening. Reinstall the front wheels and lower the vehicle. Perform a preliminary check of the steering system for any binding, excessive play, or loose components by turning the steering wheel lock-to-lock.
- Professional Alignment: It is critical to have a professional wheel alignment performed immediately after installation to ensure proper steering geometry, tire wear, and vehicle safety. Failure to do so can result in unpredictable handling and premature tire wear.
Operating Guidelines
After installation and professional alignment, operate the vehicle cautiously. Pay attention to steering feel, responsiveness, and any unusual noises. The new steering components should provide improved precision and durability. Avoid aggressive driving immediately after installation to allow components to settle. If any unusual behavior is noted, pull over safely and inspect the steering system or consult a qualified technician.
Maintenance
Regular inspection and maintenance are crucial for the longevity and performance of your steering kit.
- Periodic Inspection: Annually or every 12,000 miles, inspect all steering components for wear, damage, or looseness. Check tie rod ends, idler arm, and pitman arm for excessive play by attempting to move them by hand while the vehicle is raised.
- Lubrication: If components are equipped with grease fittings, lubricate them periodically with appropriate chassis grease (e.g., lithium-based grease) as recommended by the vehicle manufacturer or component supplier. Over-greasing should be avoided.
- Alignment Check: Have your vehicle's wheel alignment checked periodically, especially after encountering significant road hazards, replacing tires, or if uneven tire wear or steering pull is observed.
- Cleaning: Keep steering components free from excessive dirt, salt, and debris, which can accelerate wear and corrosion. A mild soap and water solution can be used for cleaning.
Troubleshooting
| Problem | Possible Cause | Solution |
|---|---|---|
| Loose or sloppy steering | Improper installation; Worn components; Loose fasteners; Incorrect alignment. | Re-check all fasteners for proper torque. Inspect components for wear. Have a professional alignment performed. |
| Uneven tire wear | Incorrect wheel alignment; Worn suspension components. | Immediately seek professional wheel alignment. Inspect other suspension components for wear. |
| Steering wheel off-center | Incorrect wheel alignment. | Have a professional wheel alignment performed to center the steering wheel and adjust toe. |
| Unusual noises (clunking, squeaking) | Loose components; Lack of lubrication; Damaged components. | Inspect all connections for tightness. Lubricate grease fittings if applicable. Inspect for damaged parts and replace as necessary. |
Specifications
- Model Number: 11169576
- Brand: RideTech
- Compatibility: 1968-1969 Chevrolet Camaro, 1968-1969 Pontiac Firebird, 1968-1974 Chevrolet Nova (Power Steering applications)
- Item Weight: Approximately 14 pounds
- Product Dimensions: Approximately 12.2 x 8.4 x 7 inches (packaging)
- Components: Inner Tie Rod Ends, Outer Tie Rod Ends, Idler Arm, Pitman Arm, Billet Tie Rod Adjusters
- Construction: Built to OE sizes, premium quality standards
Warranty and Support
For warranty information and technical support regarding your RideTech 11169576 Steering Kit, please refer to the official RideTech website or contact their customer service department directly. Keep your purchase receipt as proof of purchase for any warranty claims. RideTech is committed to providing high-quality products and support.
Visit the official RideTech store for more products and information: RideTech Store on Amazon


