1. Introduction
This manual provides essential information for the safe and effective use of your Force USA G6 Full Body Exercise Multi Machine. The Force USA Monster G6 is an all-in-one comprehensive training solution designed for strength training, bodybuilding, muscular endurance, and rehabilitation goals. It integrates a functional trainer, counterbalanced Smith machine, and squat rack, along with a wide range of attachments.
Please read this manual thoroughly before assembly, operation, or maintenance to ensure proper usage and to prevent injury.

Figure 1: Front view of the Force USA G6 Multi Machine. This image displays the complete assembly of the functional trainer, including the dual weight stacks, Smith machine bar, and squat rack uprights. Various attachment points and the integrated exercise chart are visible.
2. Safety Information
WARNING: Serious injury or death can occur if safety precautions are not followed. Always consult with a healthcare professional before starting any new exercise program.
- Ensure all bolts, nuts, and connections are securely tightened before each use.
- Always use the safety spotter arms when performing exercises with free weights or the Smith machine, especially when lifting heavy loads.
- Maintain a clear area of at least 2 meters (6.5 feet) around the machine during operation.
- Do not allow children or pets near the equipment during use.
- Inspect the machine for worn or damaged parts (cables, pulleys, pins) before each workout. Do not use if any damage is found.
- Use proper lifting techniques and avoid overexertion.
- The maximum user weight and load capacities must not be exceeded. Refer to the Specifications section.
- This equipment is designed for home gym use.
3. Package Contents
The Force USA G6 Multi Machine comes with a comprehensive set of components and attachments. Please verify that all items listed below are present upon delivery.
- Main Frame Assembly (Functional Trainer, Smith Machine, Squat Rack)
- Dual 99.5kg (221lb) Weight Stacks (total 199kg / 442lb)
- Counterbalanced Commercial Smith Machine Bar
- Leg Press Attachment
- Core Trainer (Landmine Attachment)
- Knee Support for Lat Pulldown
- Lat Pulldown Bar
- T-Bar Row Handle
- Olympic Lock Collars
- Multi-Grip Dip Handles
- Barbell J-hooks (Pair)
- Safety Spotting Arms (Pair)
- 6x Olympic Sized Weight Plate Holders
- Olympic & Standard Barbell Holders
- Storage Hooks for Attachments
- Exercise Chart (integrated)
- Various cable attachments (e.g., D-handles, tricep rope, ankle strap)
- Assembly Hardware and Tools (Allen keys, spanner)
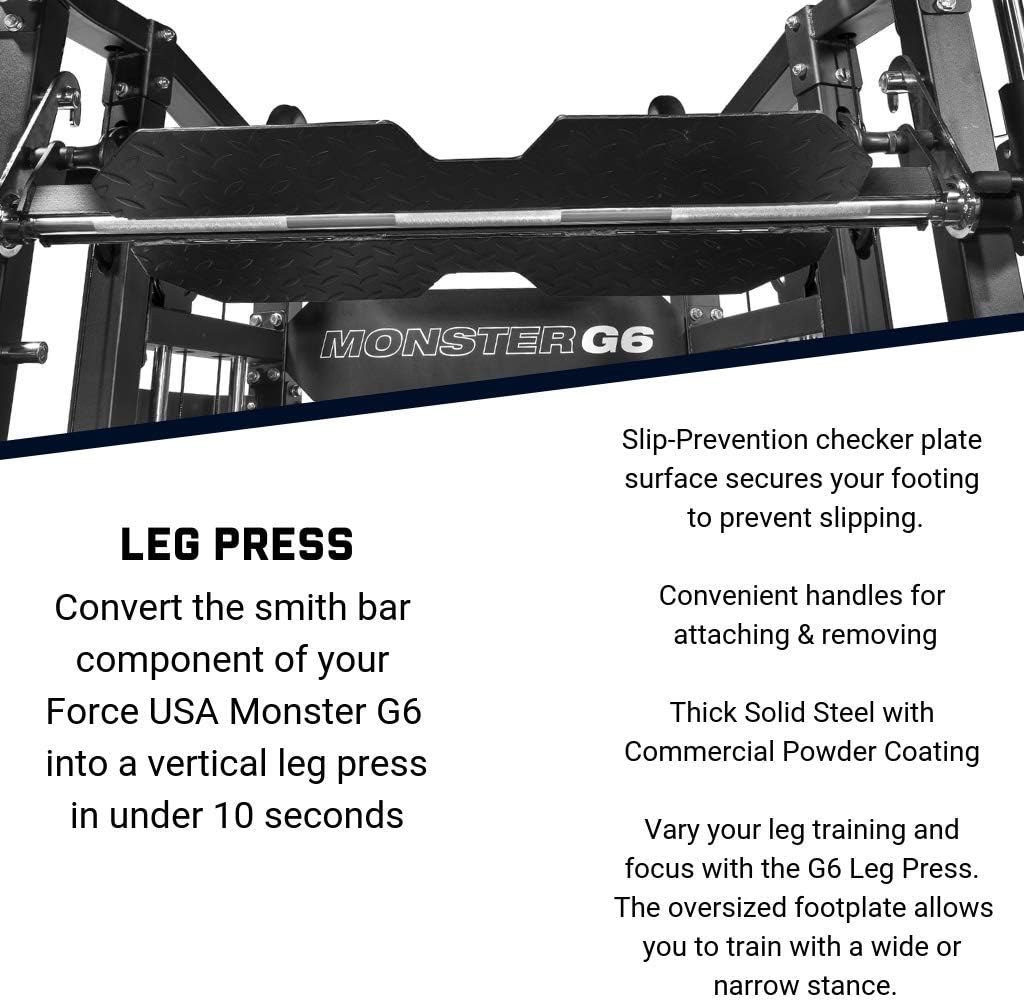
Figure 2: Included Attachments and Accessories. This image displays a wide array of accessories that come with the Force USA G6, such as various handles, ropes, chains, a lat pulldown bar, dip handles, and safety components.
4. Setup and Assembly
The Force USA G6 Multi Machine requires significant assembly. Due to its size and complexity, professional assembly is highly recommended. If assembling yourself, ensure you have at least two adults available to assist.
- Unpacking: Carefully unpack all components and lay them out in an organized manner. Compare against the package contents list to ensure nothing is missing.
- Location: Choose a flat, stable surface for assembly and operation. Ensure adequate clearance around the machine (refer to safety information).
- Frame Assembly: Begin by assembling the main frame components according to the detailed assembly instructions provided in the separate assembly manual (not included in this document).
- Cable and Pulley System: Install the cable and pulley system, ensuring all cables are routed correctly and move freely without obstruction.
- Weight Stacks: Install the weight stacks, ensuring the selector pins operate smoothly.
- Attachments: Securely attach the Smith machine bar, J-hooks, safety spotter arms, and other accessories as needed.
- Final Inspection: Before first use, perform a thorough inspection. Check all bolts, nuts, and connections for tightness. Verify that all moving parts operate smoothly and safely.

Figure 3: Side view of the Force USA G6 Multi Machine. This perspective highlights the depth of the unit and the intricate cable and pulley system, essential for its functional trainer capabilities.
5. Operating Instructions
The Force USA G6 offers a versatile range of exercises. Familiarize yourself with each function before use.
5.1 Functional Trainer (Cable System)
The dual 99.5kg (221lb) weight stacks provide independent resistance for a wide variety of cable exercises. The pulleys are adjustable to various heights.
- Adjusting Pulley Height: Pull the pop-pin on the pulley carriage and slide it to the desired height. Ensure the pin fully engages before use.
- Attaching Accessories: Use the carabiner clips to attach various cable accessories (e.g., D-handles, tricep rope, ankle strap) to the cable ends.
- Selecting Weight: Insert the selector pin into the desired weight plate. Ensure the pin is fully inserted.

Figure 4: Detail of the Pulley System. This close-up shows the smooth operation of the pulley mechanism and how various cable attachments can be connected for functional training.
5.2 Counterbalanced Smith Machine
The Smith machine provides a guided barbell path for safe and controlled movements, ideal for heavy lifts without a spotter.
- Unracking the Bar: Rotate the Smith bar handles to unlock it from the safety catches.
- Reracking the Bar: After completing your set, rotate the bar handles to engage the safety catches at any point along the uprights.
- Safety Stops: Adjust the safety stops to prevent the bar from descending below a safe height. Always set these before beginning an exercise.
5.3 Squat Rack
The integrated squat rack allows for free weight exercises with a standard Olympic barbell (not included).
- J-Hooks: Position the J-hooks at the appropriate height for unracking and reracking your barbell.
- Safety Spotting Arms: Always install the safety spotting arms below your lowest squat or bench press point to catch the barbell in case of failure.
5.4 Leg Press Attachment
Convert the Smith machine into a vertical leg press in under 10 seconds.
- Installation: Attach the leg press plate to the Smith machine bar. Ensure it is securely fastened.
- Foot Placement: Utilize the slip-prevention checker plate surface for secure footing. Vary foot placement for different muscle emphasis.

Figure 5: Leg Press Attachment. This image highlights the robust design of the leg press plate, its slip-prevention surface, and convenient handles for attachment and removal.
5.5 Multi-Grip Chin-Up / Pull-Up Station
The ergonomically designed chin-up station supports various grip positions for upper body exercises.
- Grip Options: Utilize wide-grip, close-grip, underhand, and overhand positions to target different muscle groups.
- Weight Rating: The station has a massive 350kg weight rating.
5.6 Integrated Exercise Chart
The Monster G6 includes a built-in exercise chart to guide your workout routine and demonstrate correct movement patterns for over 35 exercises.

Figure 6: Rear View with Exercise Chart and Storage. This image provides a view of the back of the machine, clearly showing the integrated exercise chart and the organized storage solutions for various attachments.
6. Maintenance
Regular maintenance ensures the longevity and safe operation of your Force USA G6 Multi Machine.
- Daily: Wipe down the machine with a damp cloth after each use to remove sweat and dust.
- Weekly: Inspect all cables, pulleys, and moving parts for signs of wear, fraying, or damage. Ensure all pins and locking mechanisms engage properly.
- Monthly: Check all nuts and bolts for tightness. Retighten as necessary. Lubricate guide rods for the Smith machine and weight stacks with a silicone-based lubricant to ensure smooth operation.
- Cleaning: Use mild soap and water for cleaning. Avoid abrasive cleaners or solvents that could damage the finish.
- Storage: Keep the machine in a dry, climate-controlled environment to prevent rust and corrosion. Utilize the built-in storage for attachments to keep the area tidy.
7. Troubleshooting
If you encounter issues with your Force USA G6, refer to the following common troubleshooting steps:
| Problem | Possible Cause | Solution |
|---|---|---|
| Cables feel rough or sticky | Lack of lubrication, dirt/debris in pulleys, worn cable. | Clean pulleys and guide rods. Apply silicone lubricant to guide rods. Inspect cables for fraying; replace if damaged. |
| Smith machine bar not moving smoothly | Guide rods are dirty or dry, misalignment. | Clean and lubricate guide rods. Check for any obstructions or loose bolts causing misalignment. |
| Weight stack selector pin not engaging | Pin bent, hole obstructed, or misalignment. | Ensure pin is straight. Clear any debris from weight plate holes. Check for proper alignment of the weight stack. |
| Unusual noises during operation | Loose bolts, worn bearings, lack of lubrication. | Inspect and tighten all bolts. Lubricate moving parts. If noise persists, contact customer support. |
If the problem persists after attempting these solutions, please contact Force USA customer support or your retailer.
8. Specifications
Detailed specifications for the Force USA G6 Full Body Exercise Multi Machine:
| Model Number | G6 |
| Brand | Force USA |
| Material Type | Alloy Steel |
| Color | Black |
| Product Dimensions (L x W x H) | 130 x 193 x 220 cm (51.2 x 76 x 86.6 inches) |
| Item Weight | 400 Kilograms (881.8 lbs) |
| Weight Stacks | 2 x 99.5 kg (221 lb) = 199 kg (442 lb) total |
| Chin-Up Station Weight Rating | 350 kg (771.6 lbs) |
| GTIN | 09343204032653 |

Figure 7: Product Dimensions and Key Features. This diagram provides a visual representation of the machine's dimensions and summarizes its primary functions and components.
9. Warranty and Support
For warranty information, technical support, or to order replacement parts, please contact Force USA directly or your authorized retailer (Alqudra Sports).
- Manufacturer: Force USA
- Retailer: Alqudra Sports
- Refer to your purchase documentation for specific warranty terms and conditions.
For further assistance, visit the official Force USA website or contact their customer service department.