1. Product Overview
The Samshow Digital Dual Kitchen Timer (PS-382) is a versatile timing device designed for various applications, including cooking, sports, and study. It features three independent timer channels, allowing for simultaneous countdown or count-up operations. Key features include a large display, adjustable alarm volume, a memory function, and multiple placement options (magnetic back, stand, hanging hole).

Image 1.1: Front view of the Samshow Digital Dual Kitchen Timer (PS-382) alongside two AAA batteries, highlighting its compact design and clear display.
2. Setup
2.1 Battery Installation
The timer requires two AAAA batteries for operation. To install or replace batteries:
- Locate the battery compartment on the back of the timer.
- Slide open the battery door.
- Insert two AAAA batteries, ensuring correct polarity (+/-). Batteries may be inserted backward for transit protection; ensure they are correctly oriented for use.
- Close the battery door securely.
2.2 Power On/Off
To power on the timer, press and hold the ON/OFF button for approximately 3 seconds. To power off the timer, press and hold the ON/OFF button for approximately 3 seconds again.
2.3 Placement Options
The timer offers multiple placement options:
- Magnetic Back: Two small magnets on the back allow the timer to be attached to metallic surfaces, such as a refrigerator door.
- Retractable Stand: A retractable stand on the back allows the timer to be placed upright on a countertop or desk.
- Hanging Hole: A small hole at the top of the back panel allows the timer to be hung on a hook.
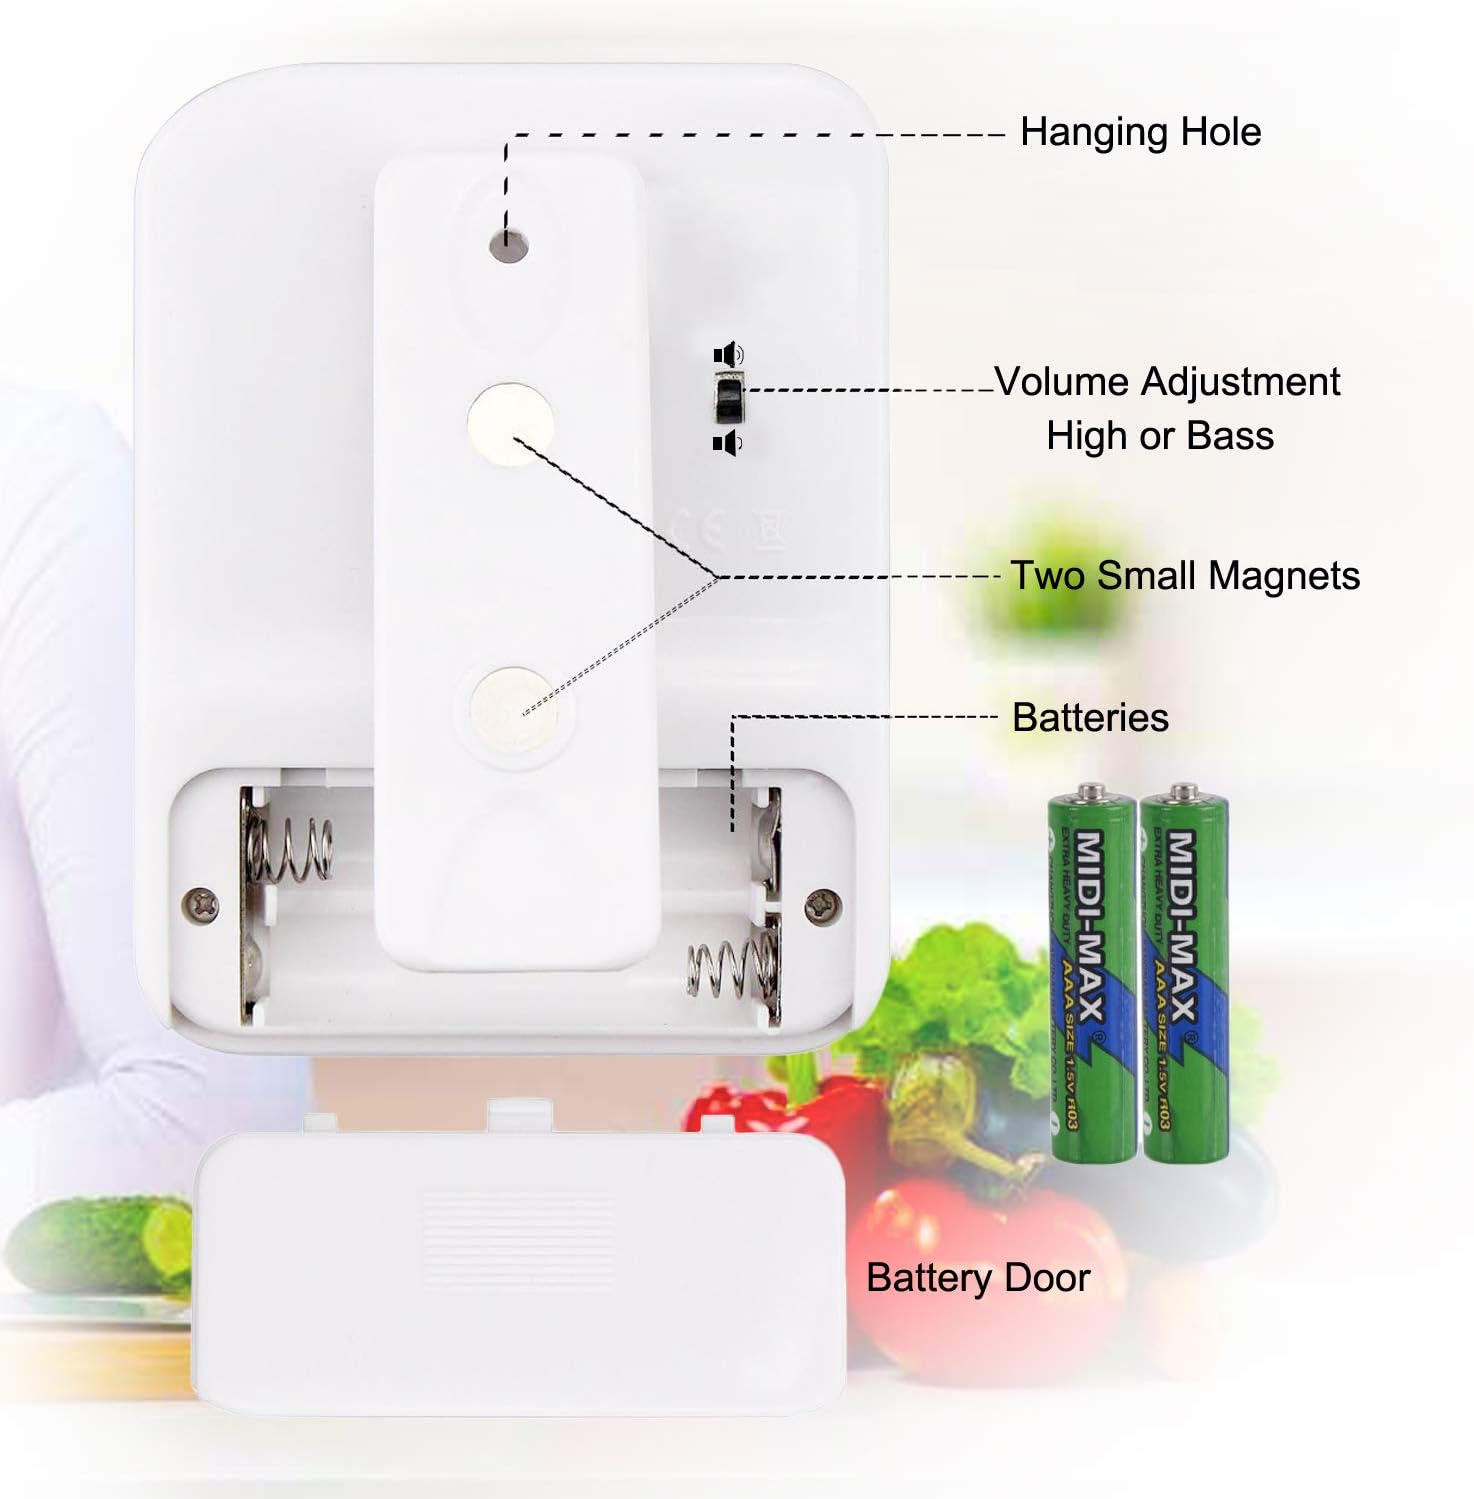
Image 2.1: Rear view of the timer, illustrating the battery compartment, two small magnets for mounting, the volume adjustment switch, and the hanging hole.
3. Operating Instructions
The Samshow Digital Dual Kitchen Timer features three independent timer channels (TIMER 1, TIMER 2, TIMER 3) that can operate simultaneously.

Image 3.1: Diagram of the timer's front panel, indicating the function of each button for setting hours, minutes, seconds, and controlling the timers.
3.1 Setting a Countdown Timer
Each of the three timers can be set for a countdown from 00:00:00 up to 99 hours, 59 minutes, and 59 seconds.
- Press the desired timer button (TIMER 1, TIMER 2, or TIMER 3) to select it. The display for the selected timer will become active.
- Press the HR button to set the hours.
- Press the MIN button to set the minutes.
- Press the SEC button to set the seconds.
- To clear a timer's setting to zero, press the CLEAR button while that timer is selected.
- Once the desired time is set, press the START/STOP button to begin the countdown.
- When the countdown reaches zero, the alarm will sound, and the timer will automatically begin counting up (stopwatch mode) to indicate elapsed time since the alarm.
- Press any button to stop the alarm.
3.2 Using the Count-Up (Stopwatch) Function
Each timer can also function as a stopwatch.
- Press the desired timer button (TIMER 1, TIMER 2, or TIMER 3) to select it.
- Ensure the selected timer is set to 00:00:00. If not, press the CLEAR button.
- Press the START/STOP button to begin counting up.
- Press the START/STOP button again to pause the count-up. Press it once more to resume.
- To reset the count-up timer to zero, press the CLEAR button while the timer is paused or running.
3.3 Adjustable Alarm Volume
The timer features an adjustable alarm volume. On the back of the unit, locate the slide switch. Move the switch to adjust the alarm volume between high and low settings.
3.4 Memory Function
Each timer channel retains its last set countdown time. After a countdown is completed or stopped, pressing the corresponding TIMER button will recall the last set time, allowing for quick reuse without re-entering the values.
4. Maintenance
4.1 Cleaning
To clean the timer, wipe it with a soft, damp cloth. Do not use abrasive cleaners or immerse the unit in water.
4.2 Battery Replacement
Replace the batteries when the display becomes dim or the timer functions erratically. Refer to Section 2.1 for battery installation instructions. Always dispose of used batteries responsibly.
5. Troubleshooting
- Timer does not turn on:
Ensure batteries are correctly installed with the proper polarity. Check if the batteries are fresh. If the unit still does not turn on, try replacing the batteries with new ones. - Display is dim or flickering:
This usually indicates low battery power. Replace the batteries. - Alarm is too quiet or too loud:
Adjust the volume switch located on the back of the timer (refer to Section 3.3). - Timer does not start countdown/count-up:
Ensure a time has been set for countdown, or that the timer is cleared to 00:00:00 for count-up. Press the START/STOP button firmly.
6. Specifications
| Brand | Samshow |
| Model | PS-382 |
| Material | Plastic |
| Display Size | 2 Inches |
| Input Type | Buttons |
| Battery Type | 2 x AAAA (not included, but required) |
| Product Dimensions | 12.7 x 5.08 x 10.16 cm (5 x 2 x 4 inches) |
| Product Weight | 100 grams (3.53 ounces) |
7. Warranty and Support
For warranty information or technical support, please refer to the product packaging or contact Samshow customer service directly through their official website or the retailer where the product was purchased. Please have your model number (PS-382) and purchase details available when contacting support.