
1. Introduction
This manual provides essential information for the installation, operation, and maintenance of your Partman CH620 Carburetor. This carburetor is a replacement component designed for specific Kohler engine models. Please read this manual thoroughly before attempting any installation or maintenance procedures to ensure proper function and safety.
2. Safety Information
WARNING: Failure to follow these safety instructions could result in serious injury or property damage.
- Always disconnect the battery and ensure the engine is cool before performing any work on the carburetor or engine.
- Work in a well-ventilated area. Fuel vapors are flammable and hazardous.
- Wear appropriate personal protective equipment, including safety glasses and gloves.
- Handle fuel with extreme care. Do not smoke or use open flames near fuel.
- If you are unsure about any step, consult a qualified mechanic.
3. Package Contents
Verify that all items listed below are present in your package:
- 1 x Carburetor unit
- 2 x Gaskets
- 1 x Fuel filter (may be included)
- 1 x Fuel pump (may be included)

Figure 1: The complete Partman CH620 Carburetor kit, including the main carburetor unit, a fuel filter, a fuel pump, and two gaskets. These components are essential for a full replacement or repair.
4. Compatibility
This Partman CH620 Carburetor is compatible with the following Kohler engine models and replaces the specified part numbers:
- Compatible Kohler Engine Models: CH18, CH20, CH22, CH620, CH640, CH670, CH680, CH730
- Replaces Kohler Part Numbers: 24 853 50-S, 24 053 58-S, 24 853 32-S, 24 853 59-S, 24 853 43-S, 24 853 255-S
5. Installation Guide
Follow these general steps for carburetor replacement. Specific engine configurations may vary. Refer to your engine's service manual for detailed instructions.
- Preparation: Ensure the engine is off and cool. Disconnect the spark plug wire(s) and the battery. Turn off the fuel supply.
- Drain Fuel: If necessary, drain the fuel from the fuel tank and carburetor bowl into an approved container.
- Remove Air Filter Assembly: Carefully remove the air filter housing and any associated ducting to access the carburetor.
- Disconnect Linkages and Hoses: Disconnect the throttle linkage, choke linkage, fuel line, and any vacuum lines or electrical connections attached to the old carburetor. Note their positions for reassembly.
- Remove Old Carburetor: Unbolt the old carburetor from the engine intake manifold. Be mindful of any gaskets between the carburetor and the engine.
- Clean Mounting Surfaces: Thoroughly clean the mounting surfaces on the engine and air filter housing to ensure a proper seal with the new gaskets.
- Install New Gaskets: Place the new gaskets in their correct positions. These are crucial for preventing air leaks.
- Mount New Carburetor: Carefully position the new Partman CH620 Carburetor and secure it with the mounting bolts. Do not overtighten.
- Reconnect Linkages and Hoses: Reattach the throttle linkage, choke linkage, fuel line, vacuum lines, and electrical connections to their correct positions on the new carburetor. Ensure all connections are secure.
- Install Fuel Filter and Fuel Pump (if applicable): If your kit includes a new fuel filter or fuel pump, install them in line with the fuel system as per your engine's specifications.
- Reinstall Air Filter Assembly: Reattach the air filter housing and any ducting.
- Reconnect Battery and Spark Plug: Reconnect the battery and the spark plug wire(s).
- Refill Fuel: Add fresh, clean fuel to the tank.
- Initial Start-up: Start the engine and check for fuel leaks or unusual operation. Adjust idle speed if necessary.

Figure 2: A side view of the Partman CH620 Carburetor, highlighting its main body and the two accompanying gaskets. This view shows the intake and mounting points, crucial for correct installation.
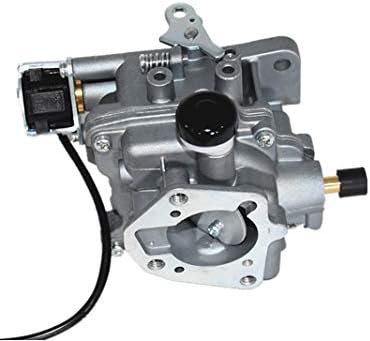
Figure 3: A rear-side view of the Partman CH620 Carburetor, detailing the choke mechanism and electrical connections. Proper connection of these components is vital for engine function.
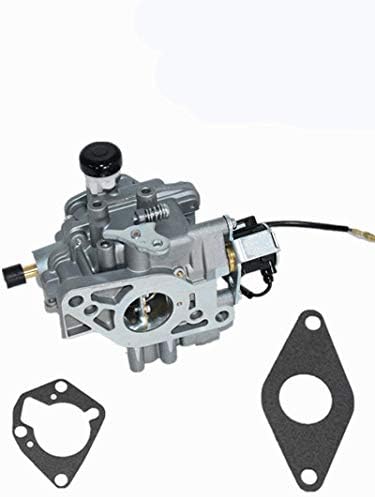
Figure 4: This image presents a top-down view of the Partman CH620 Carburetor, showcasing the air intake opening and the two gaskets. Ensure gaskets are correctly aligned during installation.
6. Operating Considerations
After installing the new carburetor, observe the engine's performance. The carburetor is designed to deliver the correct fuel-air mixture. If the engine runs rough or idles improperly, minor adjustments may be needed. Consult your engine's service manual for specific adjustment procedures, typically involving idle speed and mixture screws.
7. Maintenance
Regular maintenance helps ensure the longevity and optimal performance of your carburetor:
- Fuel Quality: Always use fresh, clean fuel. Stale or contaminated fuel is a common cause of carburetor issues. Consider using a fuel stabilizer if the engine will be stored for extended periods.
- Fuel Filter: Regularly inspect and replace the fuel filter as recommended by your engine manufacturer. A clogged fuel filter can restrict fuel flow to the carburetor.
- Air Filter: Keep the air filter clean to ensure proper airflow to the carburetor. A dirty air filter can cause a rich fuel mixture and poor engine performance.
- Cleaning: If performance issues arise, the carburetor may require cleaning. This typically involves disassembling the carburetor and cleaning jets and passages with carburetor cleaner. This procedure should only be performed by individuals with appropriate mechanical knowledge.
8. Troubleshooting
If you encounter issues after carburetor installation, consider the following common problems and solutions:
- Engine Not Starting:
- Check fuel supply: Ensure there is fuel in the tank and the fuel line is not kinked or blocked.
- Spark: Verify spark plug is connected and producing spark.
- Air leaks: Recheck all mounting bolts and gasket seals for air leaks.
- Rough Idle or Poor Performance:
- Idle adjustment: Adjust the idle speed screw if the engine idles too high or too low.
- Fuel mixture: If adjustable, fine-tune the fuel mixture screw according to engine specifications.
- Air filter: Ensure the air filter is clean and not obstructed.
- Fuel Leaks:
- Check fuel line connections: Ensure all fuel lines are securely clamped and free of cracks.
- Gaskets: Verify that gaskets are properly seated and not damaged.
- Float bowl: Inspect the carburetor float bowl for proper sealing.
If troubleshooting steps do not resolve the issue, it is recommended to seek assistance from a qualified engine technician.
9. Specifications
| Specification | Detail |
|---|---|
| Brand | Partman |
| Item Model Number | 24 853 43-S |
| Manufacturer Part Number | 204 |
| Item Weight | 1.3 pounds |
| Package Dimensions | 6.22 x 4.49 x 3.5 inches |
| Flange Type | Bolt On |
| Recommended Uses For Product | Tractor |
| UPC | 681385397109 |
10. Warranty and Support
For information regarding warranty coverage or technical support, please refer to the product packaging or contact Partman customer service through their official channels. Keep your purchase receipt as proof of purchase.