Spohn Performance D94-99-CAM-980-981
Spohn D94-99-CAM-980-981 Complete Front Control Arms Cam Bolts & Hardware Kit
User Manual for 1994-1999 Dodge Ram 1500, 2500, 3500
1. Introduction
This manual provides detailed instructions for the installation, maintenance, and troubleshooting of the Spohn D94-99-CAM-980-981 Complete Front Control Arms Cam Bolts & Hardware Kit. This kit is designed to replace all necessary mounting hardware for the front upper and lower control arms on 1994-1999 Dodge Ram 1500, 2500, and 3500 trucks. It includes specialized cam bolts for alignment adjustments and standard bolts for secure fastening.
2. Safety Information
- Always wear appropriate personal protective equipment (PPE), including safety glasses and gloves, when working on your vehicle.
- Ensure the vehicle is securely supported on jack stands or a lift before beginning any work. Never rely solely on a jack.
- Disconnect the vehicle's battery before working on any electrical components, though this kit does not involve electrical systems.
- Use proper tools and follow all torque specifications. Overtightening or undertightening fasteners can lead to component failure.
- Be aware that factory cam bolts on older vehicles may be seized due to rust and may require cutting for removal. Exercise caution.
- If you are unsure about any step of the installation process, consult a qualified automotive technician.
3. Package Contents
The Spohn D94-99-CAM-980-981 kit includes the following components:
- (2) Grade 12.9 14mm Cam Bolts: With black e-coating for corrosion protection.
- (2) Eccentric Cam Washers: Designed for alignment adjustments.
- (2) Flanged Lock Nuts: For use with the cam bolts.
- (2) Grade 10.9 14mm Bolts: With silver zinc plating for corrosion protection.
- (2) Flat Washers: For use with the 14mm Grade 10.9 bolts.
- (2) Flanged Lock Nuts: For use with the 14mm Grade 10.9 bolts.
- (4) Grade 10.9 12mm Bolts: With silver zinc plating for corrosion protection.
- (4) Flat Washers: For use with the 12mm Grade 10.9 bolts.
- (4) Flanged Lock Nuts: For use with the 12mm Grade 10.9 bolts.
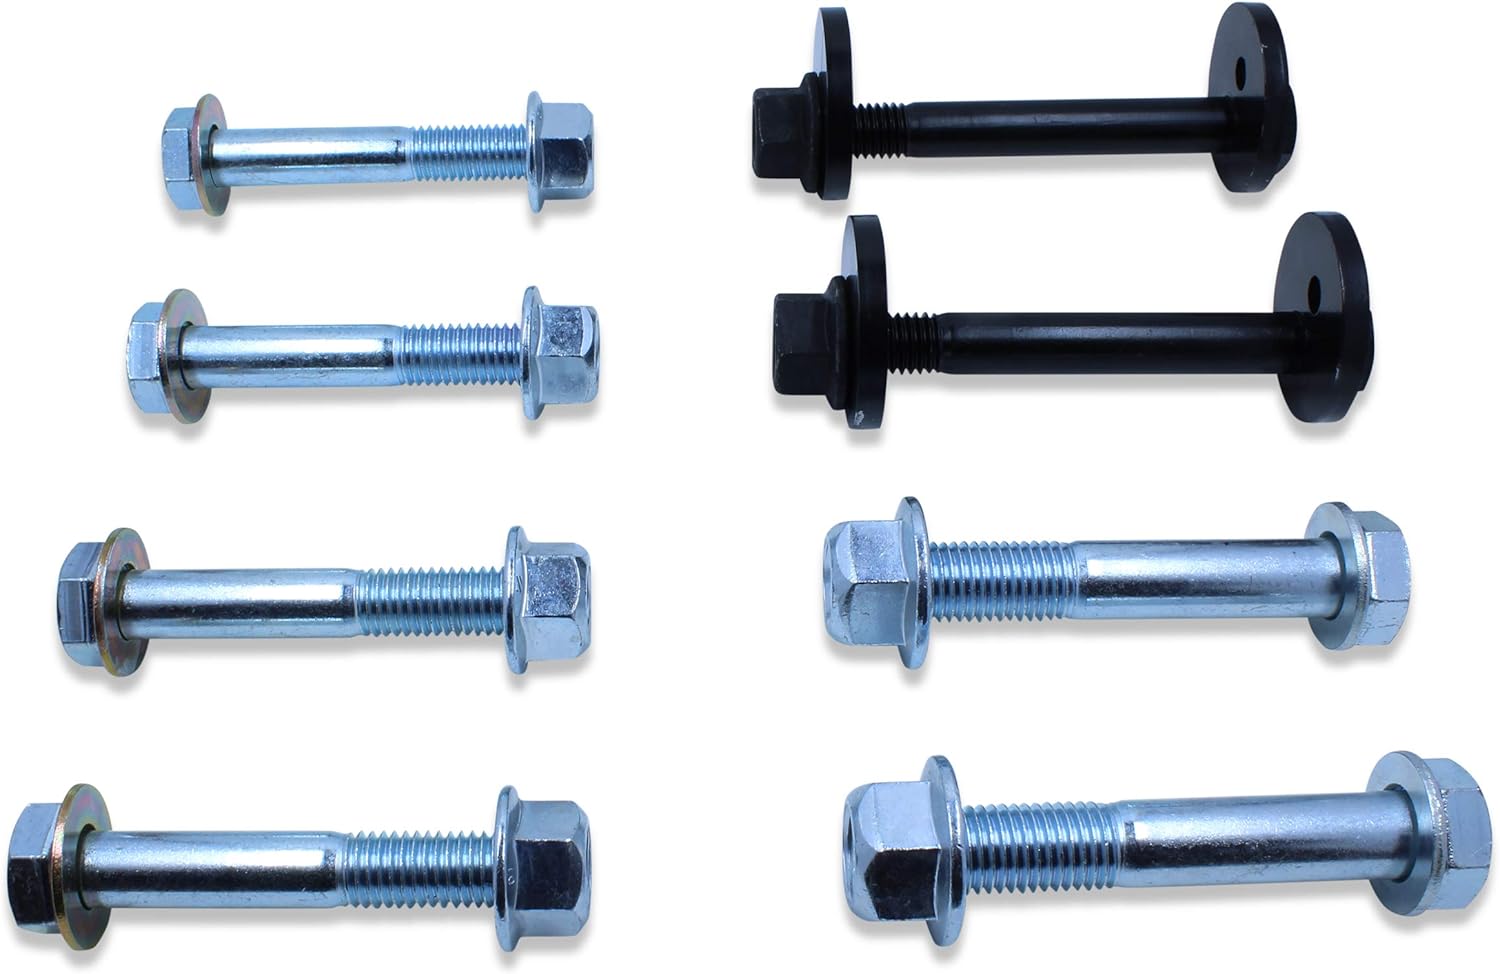
Figure 3.1: Overview of all components included in the Spohn D94-99-CAM-980-981 hardware kit.
4. Installation Instructions
This kit is designed for the replacement of existing control arm mounting hardware. It is highly recommended to perform a wheel alignment after installation.
4.1. Preparation
- Park the vehicle on a level surface.
- Engage the parking brake.
- Loosen the lug nuts on the front wheels.
- Safely lift the front of the vehicle using a hydraulic jack and support it securely with jack stands under the frame rails. Ensure the suspension is unloaded.
- Remove the front wheels.
4.2. Removal of Existing Hardware
The factory cam bolts, especially on the front lower control arms, are prone to seizing due to rust. Be prepared to cut these bolts if they cannot be removed conventionally.
- Identify the front lower control arm cam bolts. These are located at the front mounting points of the lower control arms.
- Attempt to loosen and remove the nuts and bolts. If seized, use appropriate cutting tools (e.g., reciprocating saw, angle grinder) with caution.
- Remove the bolts and nuts from the rearward ends of the front lower control arms.
- Remove the bolts and nuts from both ends of the front upper control arms.
- Carefully remove the old control arms if they are also being replaced. If only hardware is being replaced, ensure the control arms are free to move for new hardware installation.
4.3. Installation of New Hardware
Install the new Spohn hardware according to the following guidelines:
4.3.1. Front Lower Control Arm - Front Mount (Cam Bolts)
- Insert the (2) Grade 12.9 14mm Cam Bolts (black e-coated) through the front mounting points of the front lower control arms.
- Ensure the (2) Eccentric Cam Washers are correctly oriented to allow for alignment adjustments.
- Secure with the (2) Flanged Lock Nuts. Do not fully tighten at this stage; allow for adjustment.

Figure 4.1: Grade 12.9 14mm Cam Bolts with eccentric washers.
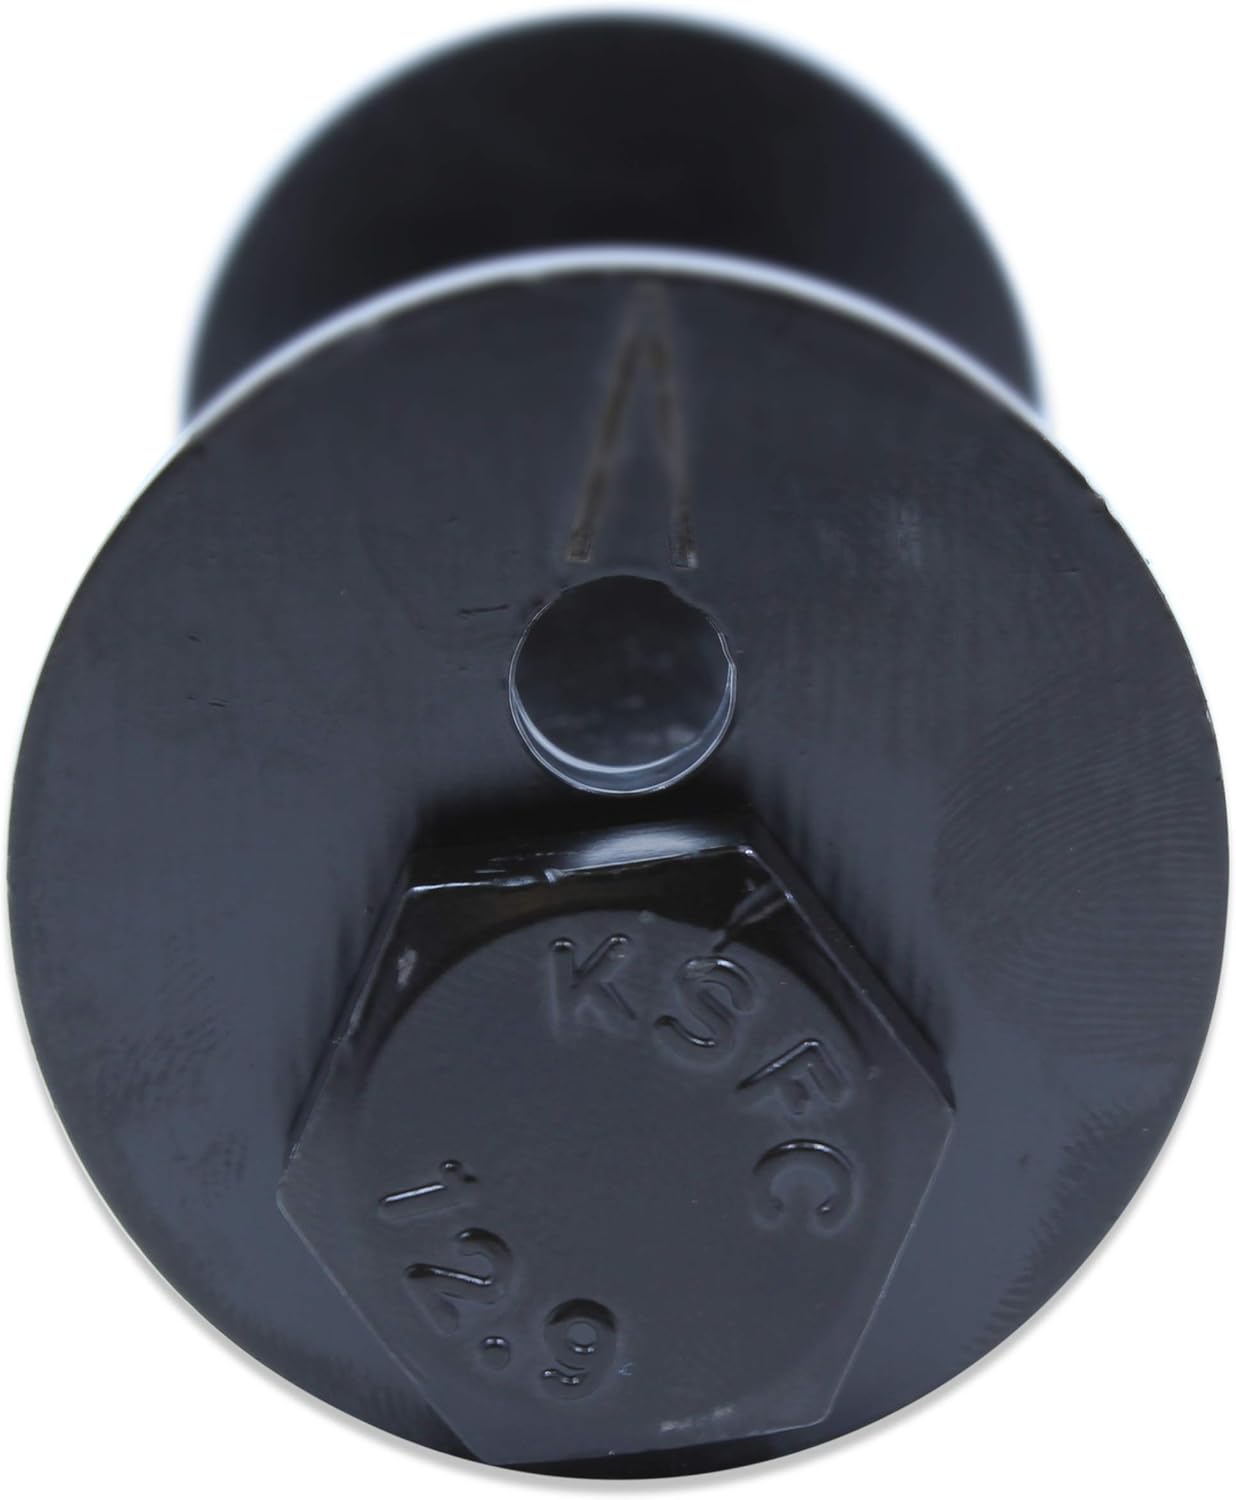
Figure 4.2: Detail of the Grade 12.9 cam bolt head.
4.3.2. Front Lower Control Arm - Rear Mount
- Insert the (2) Grade 10.9 14mm Bolts (silver zinc plated) through the rearward mounting points of the front lower control arms.
- Place a (2) Flat Washer on each bolt.
- Secure with the (2) Flanged Lock Nuts. Do not fully tighten yet.
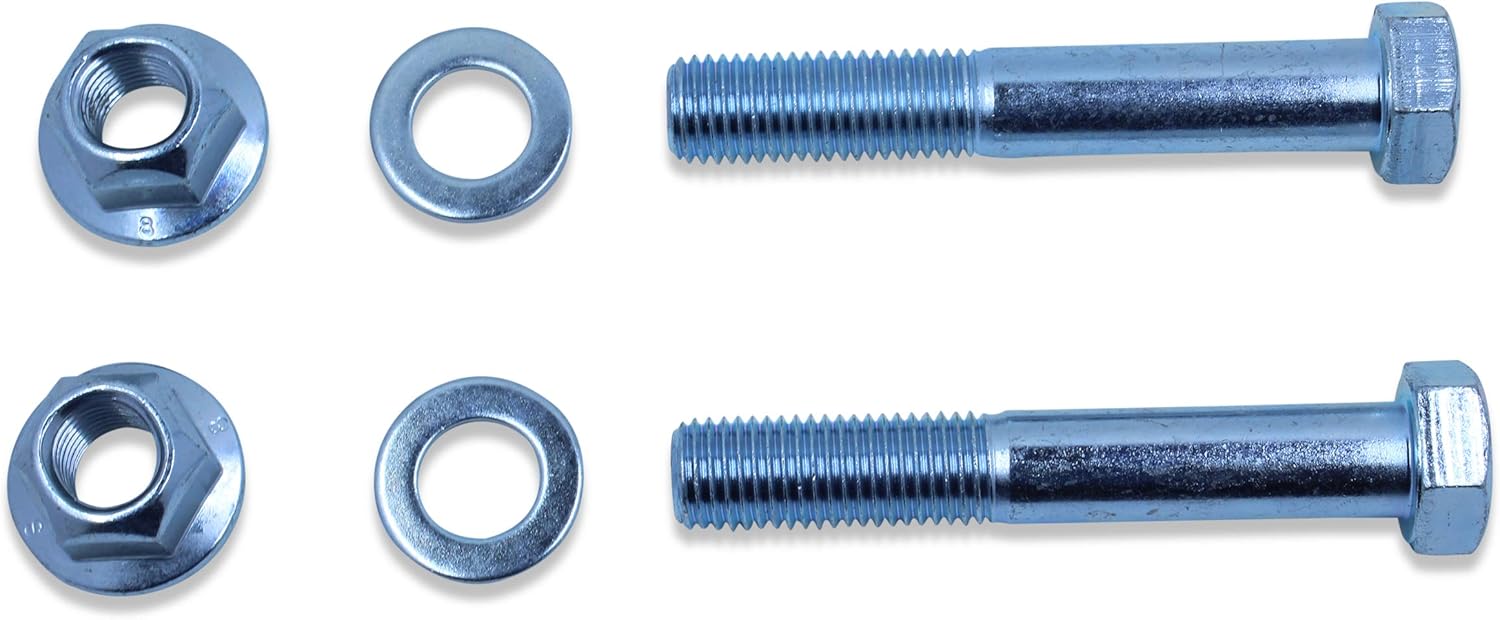
Figure 4.3: Grade 10.9 14mm bolts, washers, and nuts for rear lower control arm mounts.
4.3.3. Front Upper Control Arms - Both Ends
- Insert the (4) Grade 10.9 12mm Bolts (silver zinc plated) through both mounting points of the front upper control arms (two per arm).
- Place a (4) Flat Washer on each bolt.
- Secure with the (4) Flanged Lock Nuts. Do not fully tighten yet.

Figure 4.4: Grade 10.9 12mm bolts, washers, and nuts for upper control arm mounts.
4.4. Final Tightening and Post-Installation
- Once all bolts are in place, lower the vehicle so that the suspension is under normal load (vehicle weight on wheels). This is crucial for proper bushing alignment and to prevent premature wear.
- Tighten all nuts to the manufacturer's specified torque values for your vehicle's control arm mounting bolts. Refer to your vehicle's service manual for exact specifications.
- Reinstall the front wheels and tighten lug nuts to factory specifications.
- Lower the vehicle completely.
- It is highly recommended to have a professional wheel alignment performed immediately after installation to ensure proper vehicle handling and tire wear. The cam bolts allow for this adjustment.
5. Functionality and Post-Installation Check
Once installed, the Spohn hardware kit provides secure mounting for your vehicle's front control arms. The Grade 12.9 cam bolts facilitate precise alignment adjustments, while the Grade 10.9 bolts ensure robust fastening for the remaining points.
After installation and before driving, perform the following checks:
- Visually inspect all installed bolts and nuts to ensure they are properly seated and tightened.
- Check for any obstructions or interference with other suspension components.
- Gently bounce the front of the vehicle to settle the suspension.
- Listen for any unusual noises (clunks, squeaks) during initial low-speed driving.
6. Maintenance
While the Spohn hardware kit is designed for durability and corrosion resistance, periodic inspection is recommended to ensure long-term performance:
- Annual Inspection: During routine vehicle maintenance, visually inspect all control arm bolts and nuts for signs of corrosion, damage, or loosening.
- Torque Check: Periodically re-check the torque of all control arm mounting bolts, especially after off-road driving or heavy use. Refer to your vehicle's service manual for specific torque values.
- Cleaning: If driving in harsh conditions (e.g., salted roads, muddy environments), rinse the undercarriage to remove corrosive elements that could affect the hardware over time.
7. Troubleshooting
7.1. Difficulty Removing Old Bolts
As noted, factory cam bolts are highly susceptible to rust and seizing. If conventional methods fail, cutting the bolts may be necessary. Use appropriate safety gear and tools. Consider applying penetrating oil beforehand.
7.2. Stripped Threads During Installation
Ensure bolts are started by hand to prevent cross-threading. Do not use power tools to start threads. If a thread becomes stripped, the affected component (bolt or nut) must be replaced immediately. Do not attempt to force a stripped bolt.
7.3. Vehicle Alignment Issues After Installation
A professional wheel alignment is mandatory after replacing control arm hardware. The cam bolts are specifically designed to allow for precise alignment adjustments. If alignment issues persist after a professional alignment, inspect all components for proper installation and ensure no other suspension components are worn or damaged.
7.4. Unusual Noises (Clunking, Squeaking)
If you hear unusual noises after installation, re-check all fasteners for proper torque. Ensure no components are rubbing or interfering with each other. Worn control arm bushings (if not replaced) or other suspension components can also be a source of noise.
8. Specifications
| Specification | Value |
|---|---|
| Part Number | D94-99-CAM-980-981 |
| Material | Alloy Steel |
| Thread Size | M14x1.5, M12x1.25 |
| Exterior Finish | Zinc, Black E-Coating |
| Manufacturer Grade | Grade 10.9, Grade 12.9 |
| Head Style | Flat |
| Fastener Type | Flange Bolt |
| Thread Style | Right Hand |
| Item Hardness | Grade 10.9, Grade 12.9 |
| Metal Type | Alloy Steel, Zinc |
| Compatible Groove Diameter | 14 Millimeters |
| Thread Class | 3A |
| Item Weight | 3.64 pounds |
| Product Dimensions | 8 x 8 x 3 inches |
9. Warranty and Support
For specific warranty information regarding your Spohn Performance product, please refer to the documentation provided with your purchase or visit the official Spohn Performance website. For technical support or inquiries, please contact Spohn Performance directly through their customer service channels.
It is recommended to retain your proof of purchase for any warranty claims.