1. Introduction
Thank you for choosing the BAKAJI 3-Seater Garden Swing. This manual provides essential information for the safe assembly, operation, and maintenance of your new garden swing. Please read these instructions carefully before assembly and retain them for future reference.
This garden swing is designed for outdoor relaxation, featuring a sturdy metal frame, comfortable padded seating for three individuals, an adjustable sun canopy, and convenient foldable side trays with cup holders.

Image 1.1: Front view of the assembled BAKAJI 3-Seater Garden Swing.
2. Safety Instructions
- Read All Instructions: Ensure you understand all assembly and safety instructions before using the product.
- Adult Assembly Required: Assembly should be performed by at least two adults. Keep children away during assembly.
- Weight Limit: Do not exceed the maximum recommended weight of 300 kg (approximately 660 lbs). This swing is designed for three adults.
- Stable Surface: Place the swing on a flat, level, and stable surface to prevent tipping.
- Weather Protection: Protect the swing from extreme weather conditions. Store cushions indoors during rain or strong winds. Consider covering the entire swing during prolonged periods of non-use or harsh weather.
- Regular Inspection: Periodically check all bolts, nuts, and connections to ensure they are tight and secure.
- Avoid Standing: Do not stand on the swing seat. Use it only for sitting.
- Keep Clear: Ensure the area around the swing is clear of obstructions to allow for safe swinging motion.
3. Package Contents
Before beginning assembly, verify that all parts listed below are present and undamaged. If any parts are missing or damaged, do not proceed with assembly. Contact customer support for assistance.
- Main Frame Components (legs, crossbars, top bar)
- Swing Seat Frame
- 3 Seat Cushions (8cm thick polyester wadding)
- 3 Round Back Cushions
- Adjustable Sun Canopy Fabric
- Canopy Frame Components
- 2 Foldable Side Trays with Cup Holders
- Suspension Springs and Chains
- Hardware Pack (bolts, nuts, washers, wrenches)
Refer to the assembly diagram (not included in this manual) for visual identification of each component.
4. Setup and Assembly
Assembly requires two adults. Ensure you have sufficient space and all tools (provided in the hardware pack) before starting.
- Unpack and Identify Parts: Carefully remove all components from the packaging. Lay them out on a clean, soft surface to prevent scratches. Identify each part using the provided parts list.
- Assemble the Main Frame: Connect the leg sections and crossbars to form the A-frames. Secure with the appropriate bolts, washers, and nuts. Do not fully tighten bolts until all sections are loosely assembled.
- Attach the Top Bar: Connect the two A-frames using the main top bar. Ensure the frame is stable and upright.
- Assemble the Swing Seat: Construct the swing seat frame. Attach the backrest and seat base components.
- Hang the Swing Seat: Using the suspension chains and springs, carefully hang the assembled swing seat from the main top bar. Ensure the springs are securely attached to both the seat frame and the top bar hooks.
- Install the Sun Canopy: Assemble the canopy frame and attach the canopy fabric. Secure the canopy frame to the main top bar, ensuring it can be adjusted.
- Attach Side Trays: Mount the foldable side trays to the designated points on the main frame.
- Place Cushions: Position the seat and back cushions onto the swing seat.
- Final Tightening: Once all components are in place and aligned, gradually tighten all bolts and nuts. Do not overtighten.
- Stability Check: Gently rock the swing to ensure it is stable and all connections are secure before first use.

Image 4.1: Detail of the suspension spring for the swing seat.
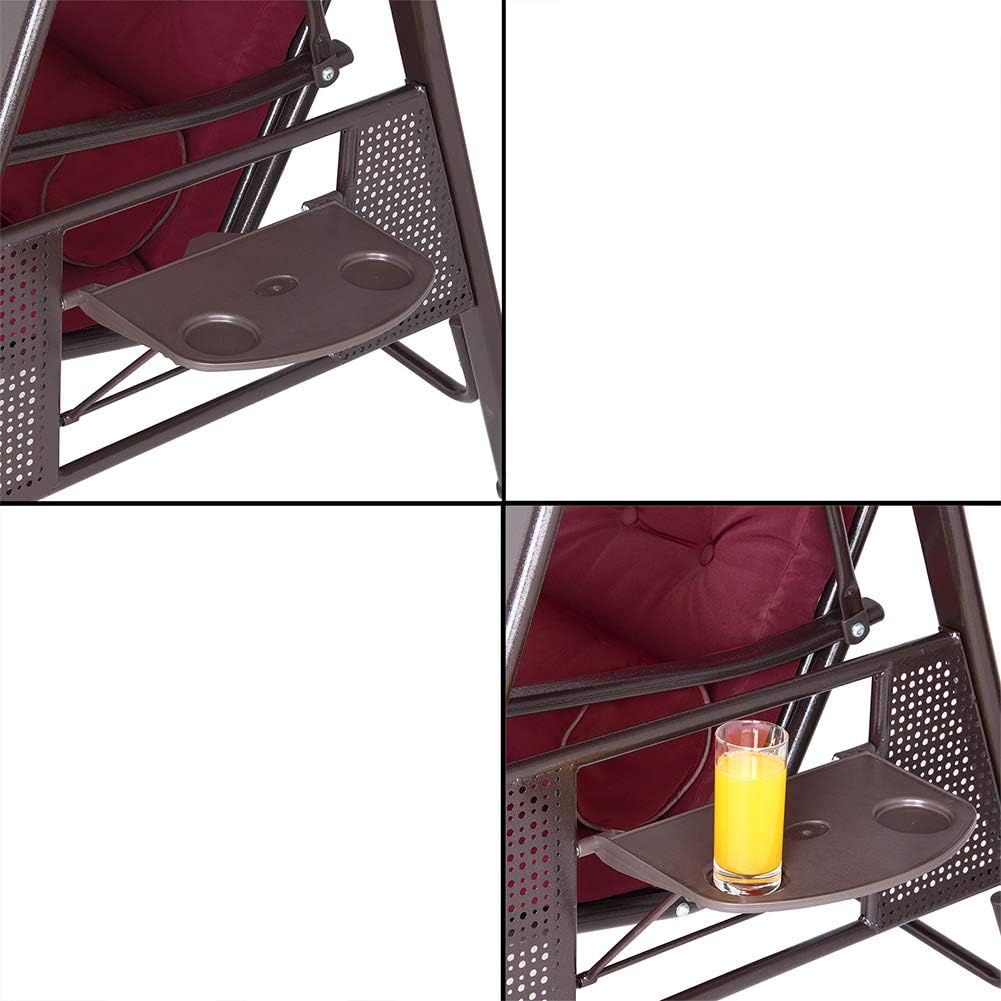
Image 4.2: Detail of the foldable side tray with integrated cup holders.
5. Operating Instructions
- Using the Swing: Sit gently on the swing seat. Avoid sudden movements or excessive force when swinging. The swing is designed for a gentle, relaxing motion.
- Adjusting the Sun Canopy: The sun canopy can be tilted to provide optimal shade. Loosen the adjustment knobs on either side of the canopy frame, position the canopy to your desired angle, and then tighten the knobs to secure it.
- Using Foldable Side Trays: The side trays can be folded up for use or down for storage. Gently lift or lower the trays as needed. The integrated cup holders are suitable for standard beverage containers.
6. Maintenance
- Cleaning the Frame: Wipe the metal frame with a damp cloth and mild soap. Rinse thoroughly and dry completely to prevent rust. Avoid abrasive cleaners.
- Cleaning Cushions and Canopy: The polyester fabric cushions and canopy can be spot cleaned with a mild detergent and water. Allow them to air dry completely. Do not machine wash or tumble dry.
- Seasonal Storage: During winter months or extended periods of non-use, it is recommended to store the cushions indoors. The entire swing should be covered with a protective cover or disassembled and stored in a dry place to prolong its lifespan.
- Lubrication: Periodically apply a silicone-based lubricant to the suspension springs and any moving joints to ensure smooth operation and prevent squeaking.
- Fastener Check: Regularly inspect all bolts, nuts, and screws for tightness. Tighten any loose fasteners to maintain structural integrity.
7. Troubleshooting
- Swing is Squeaking: Apply a silicone-based lubricant to the suspension springs and any pivot points on the swing mechanism. Ensure all bolts are tightened.
- Swing Feels Unstable: Check that the swing is placed on a completely flat and level surface. Verify that all assembly bolts are securely tightened.
- Canopy Does Not Stay in Position: Ensure the adjustment knobs on the canopy frame are fully tightened after positioning the canopy.
- Difficulty with Assembly: Review the assembly instructions carefully. Ensure all parts are correctly oriented. It is often helpful to have a second person assist with assembly. Do not force parts together.
8. Specifications
| Feature | Detail |
|---|---|
| Model Number | 49510 |
| Brand | BAKAJI |
| Dimensions (L x D x H) | 197 cm x 118 cm x 173 cm |
| Seat Depth | 51 cm |
| Weight | 38 kg |
| Material (Frame) | Powder-coated Metal (60 x 30 mm tubular) |
| Material (Covering) | 900gr Polyester Fabric |
| Material (Padding) | 8 cm Polyester Wadding |
| Maximum Recommended Weight | 300 kg |
| Seating Capacity | 3 persons |
| Assembly Required | Yes |
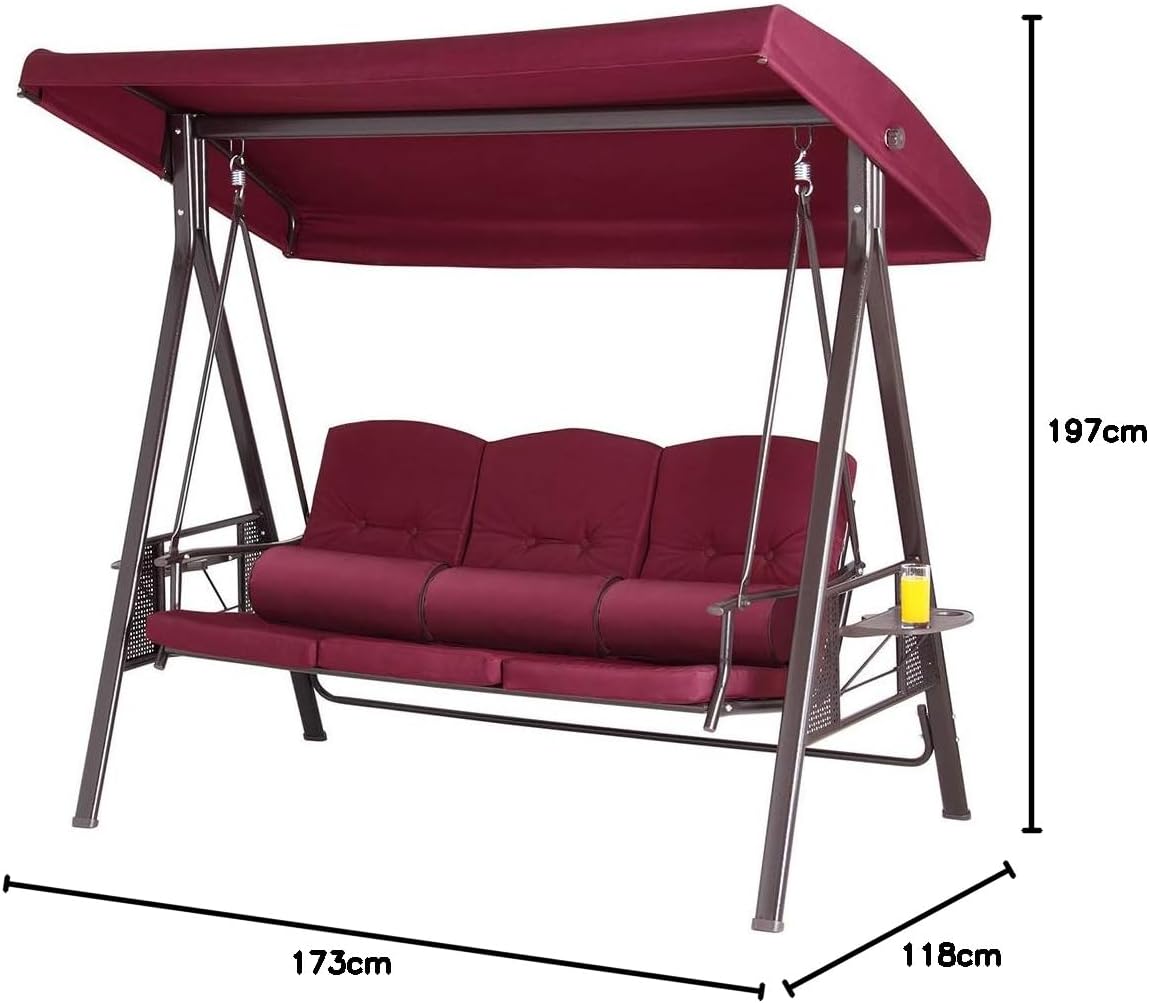
Image 8.1: Dimensions of the BAKAJI 3-Seater Garden Swing.
9. Warranty and Support
For warranty information or technical support, please refer to the purchase documentation or contact your retailer. Keep your proof of purchase for any warranty claims.