1. Introduction
The Y&H RBL-30A-DE Solar Charge Controller is an intelligent, multi-purpose solar charge and discharge controller designed for photovoltaic systems. It is suitable for home solar power systems, including household lighting systems, and can automatically manage 12V and 24V lead-acid batteries (sealed, gel, and flooded types).
This controller utilizes Pulse Width Modulation (PWM) charging to optimize battery life and performance. It features an integrated industrial microcontroller and an LCD display for dynamic monitoring of operating data and parameters.

Figure 1: The Y&H RBL-30A-DE Solar Charge Controller is versatile for various applications such as farm solar power systems, street lights, patio lights, billboards, outdoor camping, and marine solar systems.
2. Safety Instructions
Please read all instructions carefully before installation and operation. Failure to follow these instructions may result in damage to the controller, battery, or other components, and may cause personal injury.
- Ensure the battery voltage is sufficient for the controller to recognize the battery type before the first installation.
- Critical Connection Order: Always connect the battery to the charge controller first, then connect the solar panel, and finally connect the load. Reversing this order during installation or uninstallation can damage the controller.
- The charge controller is suitable only for regulating solar panels. Do not connect other charging sources to the charge controller.
- Install the controller indoors, away from direct sunlight, high temperatures, and moisture.
- Ensure good ventilation around the controller to prevent overheating.
- Use appropriate cables for connections to minimize voltage drop and ensure safety.
- Keep children away from the solar power system components.
3. Product Features
- Integrated industrial microcontroller for reliable operation.
- Large LCD display for dynamic display of operating data and parameters.
- PWM (Pulse Width Modulation) charge management to extend battery life.
- Dual USB output ports (5V/2A total) for charging mobile devices.
- Adjustable charge/discharge parameters and load operating modes.
- Comprehensive protection functions:
- Built-in short-circuit protection.
- Open-circuit protection.
- Reverse polarity protection.
- Overload protection.
- Dual MOSFET reverse current protection.
- Automatic identification of 12V/24V battery voltage.
- Suitable for various lead-acid batteries: Sealed (B01), Gel (B02), and Flooded (B03).
4. Product Overview
Familiarize yourself with the components and interface of the Y&H RBL-30A-DE Solar Charge Controller.

Figure 2: Front panel of the controller showing the LCD display, control buttons, and connection terminals. Key elements include the LCD display, Menu button, Page Up/Manual button, Page Down button, USB ports, Solar Panel terminals, Load terminals, and Battery terminals.
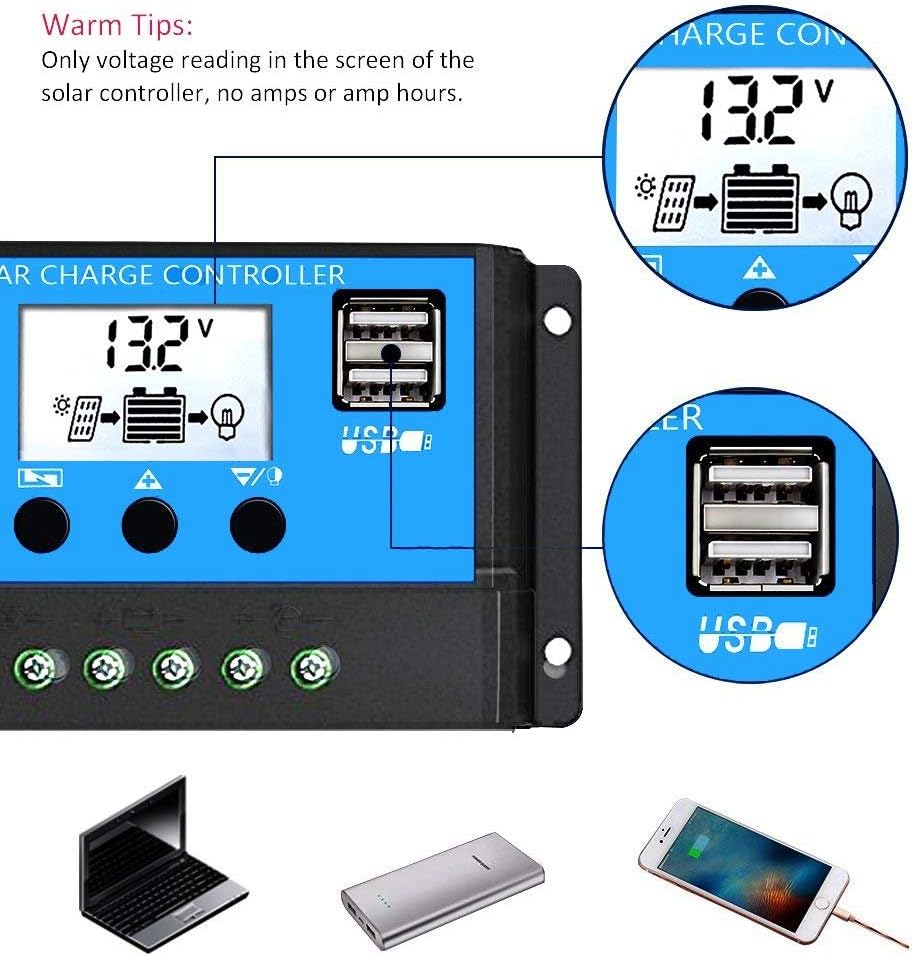
Figure 3: Detail of the dual 5V/2A USB output ports, suitable for charging various portable electronic devices.
5. Setup and Wiring
Follow these steps carefully to connect your solar charge controller to the battery, solar panel, and load. Incorrect wiring sequence can damage the controller.
5.1 Wiring Diagram

Figure 4: System connection diagram showing the solar panels, battery (12Vdc or 24Vdc), DC loads (Max 120W), and an optional inverter for AC loads (110Vac or 220Vac).
5.2 Connection Steps
- Connect the Battery: Connect the battery to the charge controller's positive and negative terminals. The controller will automatically detect 12V or 24V battery voltage. Ensure the battery is charged enough for the controller to recognize it.
- Connect the Solar Panel: Connect the photovoltaic module (solar panel) to the charge controller's positive and negative terminals.
- Connect the Load: Connect the load (e.g., DC lights, fans) to the charge controller's positive and negative terminals.
Important: When disconnecting the system, follow the reverse order: first disconnect the load, then the solar panel, and finally the battery. Incorrect disconnection sequence can damage the controller.
Recommended wire gauge for RBL-30A-DE is 12 AWG.
6. Operating Instructions
The controller features an LCD display and three buttons for navigation and parameter settings.
- MENU Button: Short press to switch between different display interfaces. Long press to enter or exit parameter setting mode.
- UP Button (▲): Press to increase a value or browse upwards in menus.
- DOWN Button (▼): Press to decrease a value or browse downwards in menus.
6.1 Display Interfaces and Parameter Settings
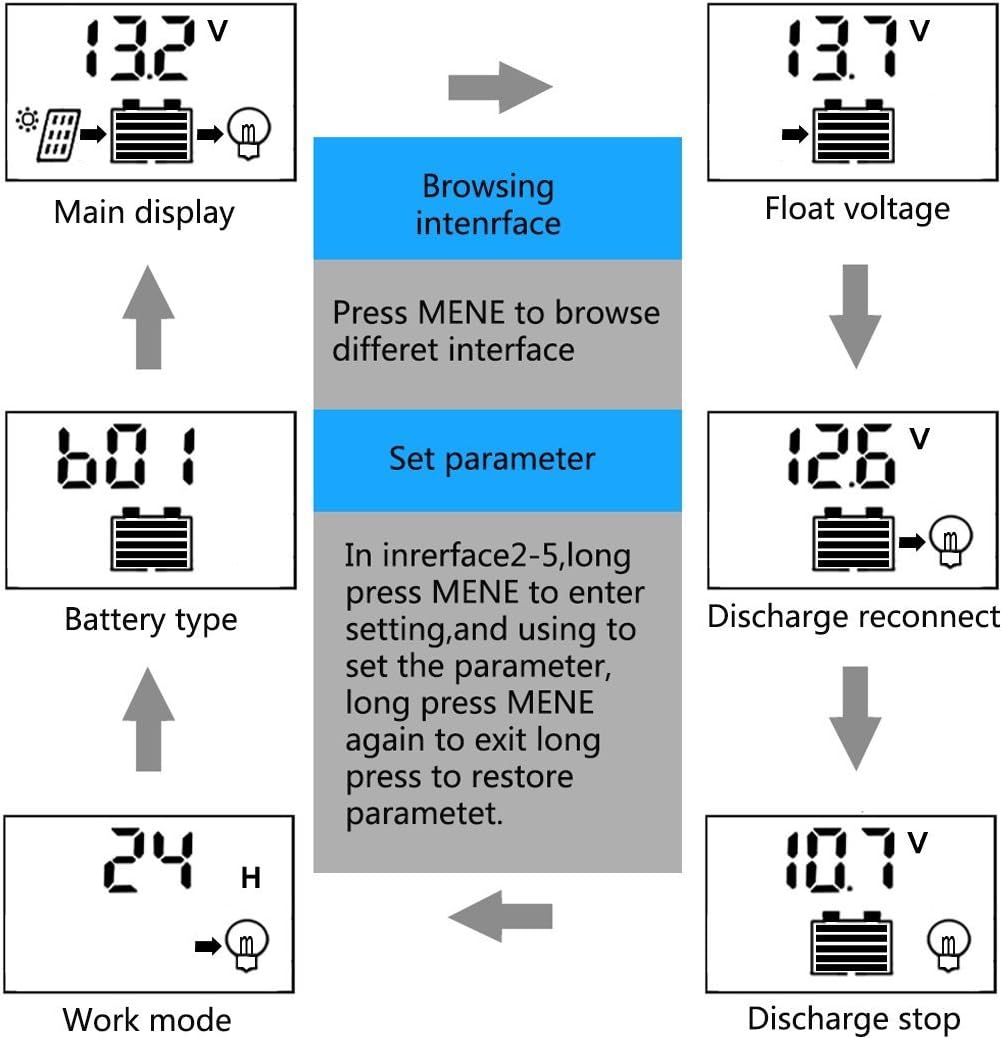
Figure 5: This diagram illustrates the navigation through the controller's LCD interfaces. From the main display, you can browse different interfaces by pressing the MENU button. To set parameters (interfaces 2-5), long press MENU to enter setting mode, use UP/DOWN to adjust values, and long press MENU again to save and exit. Long pressing MENU without changing values will restore default parameters.
The LCD will cycle through various displays including main display (battery voltage), float voltage, discharge reconnect voltage, discharge stop voltage, battery type, and work mode.
6.2 Adjustable Parameters
In setting mode (long press MENU), you can adjust the following parameters:
- Float Charge Voltage (HVD): Default 13.7V (adjustable). This is the voltage at which the battery is maintained after being fully charged.
- Discharge Reconnect Voltage (LVD): Default 12.6V (adjustable). The voltage at which the load will be reconnected after being disconnected due to low battery.
- Discharge Stop Voltage (RVD): Default 10.7V (adjustable). The voltage at which the load will be disconnected to protect the battery from over-discharge.
- Battery Type: Select from B01 (Sealed), B02 (Gel), B03 (Flooded).
- B01 Sealed: Equalization 14.4V
- B02 Gel: Equalization 14.2V
- B03 Flooded: Equalization 14.6V
- Load Work Mode: Set the load output timer (e.g., 24 hours, 1-23 hours, 0 hours for manual control).
Caution: Adjusting parameters incorrectly can affect battery performance and lifespan. Refer to your battery manufacturer's specifications for optimal settings.
7. Maintenance
Regular maintenance ensures the longevity and optimal performance of your solar charge controller and system.
- Check Connections: Periodically inspect all wiring connections for tightness and corrosion. Loose connections can cause voltage drops and overheating.
- Clean the Controller: Keep the controller clean and free from dust and debris. Use a dry cloth to wipe the surface. Do not use liquids or solvents.
- Inspect for Damage: Check for any physical damage to the controller, cables, or terminals.
- Monitor Performance: Regularly check the LCD display for normal operation and battery voltage readings.
- Battery Inspection: For flooded lead-acid batteries, check electrolyte levels and top up with distilled water as needed. Keep battery terminals clean.
8. Troubleshooting
If you encounter issues with your Y&H RBL-30A-DE Solar Charge Controller, refer to the following common problems and solutions:
| Problem | Possible Cause | Solution |
|---|---|---|
| No display on LCD | Battery not connected or low voltage; reverse polarity. | Check battery connections and voltage. Ensure correct polarity. |
| Battery not charging | Solar panel not connected; solar panel output too low; reverse polarity of solar panel. | Check solar panel connections and ensure sufficient sunlight. Verify correct polarity. |
| Load not working | Load not connected; battery voltage too low (LVD activated); overload protection activated. | Check load connections. Charge battery. Reduce load or check for short circuits. |
| Incorrect voltage readings | Loose connections; faulty wiring. | Tighten all connections. Inspect wiring for damage. |
If the problem persists after attempting these solutions, please contact customer support.
9. Specifications
Detailed technical specifications for the Y&H RBL-30A-DE Solar Charge Controller.

Figure 6: This table provides a comprehensive overview of the technical specifications for the RBL series, including the RBL-30A-DE model. It details installation wire gauge, charge/discharge currents, battery voltage, float voltage, dimensions, discharge stop/reconnect voltages, self-consumption, USB output, operating temperature, max solar input, and equalization voltages for different battery types.
| Parameter | Value (RBL-30A-DE) |
|---|---|
| Model | RBL-30A-DE |
| Battery Voltage | 12V/24V Auto Adapt |
| Charge Current | 30A |
| Discharge Current | 30A |
| Max Solar Input | <50V |
| USB Output | 5V/2A (Max) |
| Self-Consume | <10mA |
| Operating Temperature | -35°C to +60°C |
| Float Charge | 13.7V (Adjustable) |
| Discharge Stop | 10.7V (Adjustable) |
| Discharge Reconnect | 12.6V (Adjustable) |
| Equalization (Sealed B01) | 14.4V |
| Equalization (Gel B02) | 14.2V |
| Equalization (Flooded B03) | 14.6V |
| Dimensions (L x W x H) | 15 x 7.8 x 3.5 cm (5.91 x 3.07 x 1.38 inches) |
| Material | Plastic |
| Display Type | LCD |
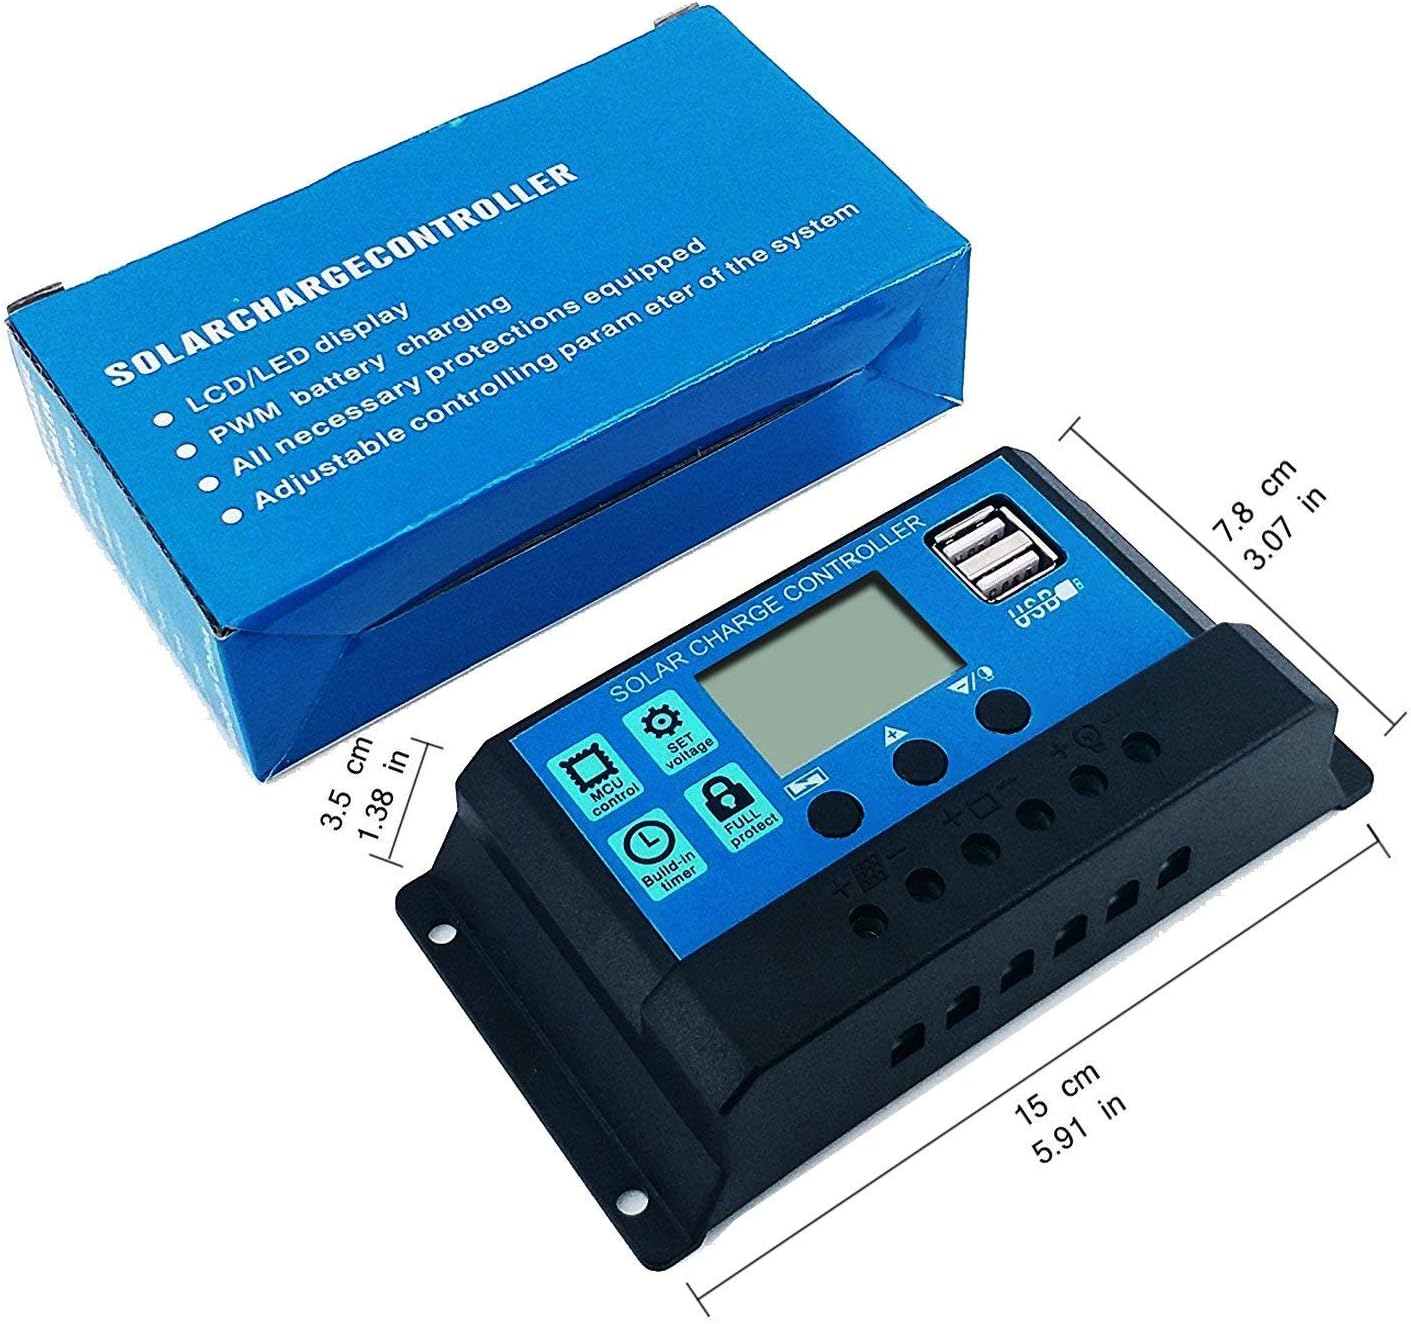
Figure 7: Physical dimensions of the controller: 15 cm (5.91 in) length, 7.8 cm (3.07 in) width, and 3.5 cm (1.38 in) height.
10. Warranty and Support
For warranty information and technical support, please refer to the documentation provided with your purchase or contact the seller directly. Keep your purchase receipt as proof of purchase.
Manufacturer: Y&H
Model: RBL-30A-DE