1. Product Overview
The Sebury NN99 is a standalone RFID fingerprint access control system designed for secure entry management. It combines biometric fingerprint recognition with RFID card technology, offering a reliable solution for various access control needs. This device supports up to 1000 users and features a waterproof fingerprint collector for enhanced durability.
Key Features:
- High-quality ABS fireproof material construction.
- Fully sealed waterproof HD fingerprint collector with indicator light.
- Fast and accurate identification in less than 0.1 seconds.
- Supports 1000 fingerprints and 1000 user cards (RFID).
- Equipped with administrator cards (Add Card, Delete Card) for easy programming.
- SD card support for data upload/download (SD card not included).
- Advanced programming system with anti-demolition and anti-theft alarm switch configuration.
2. Package Contents
Verify that all items listed below are included in your package:
- 1x RFID Fingerprint Access Control Keypad
- 5x RFID Keyfobs
- 5x RFID Cards
- Mounting Screws and Wall Plugs
- Connection Wires
- Administrator Cards (Add Card, Delete Card)

Figure 2.1: Package Contents. This image displays the main access control unit, five RFID keyfobs, five RFID cards, connection wires, mounting screws, and the administrator cards.
3. Product Components
Familiarize yourself with the different parts of your access control device:

Figure 3.1: External Components. This diagram points out the SD card jack on the side, the doorbell key at the top, the fingerprint collector in the middle, the swipe area along the side, and the red/blue indicator activator at the bottom.
- Doorbell Key: Activates the doorbell function.
- Fingerprint Collector: Area for fingerprint scanning.
- Swipe Area: For presenting RFID cards.
- Red/Blue Indicator Activator: Provides visual feedback on device status.
- SD Card Jack: Slot for inserting an SD card for data management.
4. Installation
4.1 Wiring Diagram
Proper wiring is crucial for the correct functioning of the access control system. Refer to the diagram below for connections to power supply, electric locks, and exit button.

Figure 4.1: Access Control Power Supply Wiring Diagram. This diagram illustrates how to connect the access controller to a 12V DC power supply, an exit button, and different types of electric locks (Electric Drop Lock, Cathode Locks, Magnetic Lock, Electric Mortise Lock). Note: The power transformer requires access to 220V AC, and a 5A power supply is recommended for long-term stable operation.
- Power Supply: Connect DC12V to the appropriate terminals. Ensure a stable 5A power supply for optimal performance.
- Electric Locks: The system supports various lock types. Connect the lock according to its specific wiring requirements (NO/NC/COM).
- Exit Button: Connect an external exit button to the PUSH and GND terminals for convenient egress.
- Doorbell: Connect an external doorbell to the BELL terminals.
- Wiegand26 Interface: For connecting to external Wiegand readers or controllers (D0, D1).
4.2 Mounting
Mount the device securely on a wall or door frame using the provided screws and wall plugs. Ensure the device is installed in a location protected from direct weather exposure, as it is designed for indoor or sheltered outdoor use.
5. Initial Setup and User Management
5.1 Programming Administrator Cards
The system uses special administrator cards (Add Card and Delete Card) for easy programming. These cards are essential for managing users.
- Add Card: To enter programming mode and add new users.
- Delete Card: To enter programming mode and delete existing users.
5.2 Adding Users (Fingerprints and RFID Cards)
To add a new user, follow these steps:
- Present the Add Card to the device. The indicator light will change, signaling entry into programming mode.
- For a fingerprint user: Place the user's finger on the fingerprint collector three times, lifting it slightly between each scan.
- For an RFID card user: Present the user's RFID card or keyfob to the swipe area.
- Repeat for additional users.
- To exit programming mode, present the Add Card again or wait for the system to time out.
5.3 Deleting Users
To delete a user, follow these steps:
- Present the Delete Card to the device. The indicator light will change, signaling entry into programming mode.
- For a fingerprint user: Place the user's registered finger on the fingerprint collector.
- For an RFID card user: Present the user's registered RFID card or keyfob to the swipe area.
- Repeat for additional users to delete.
- To exit programming mode, present the Delete Card again or wait for the system to time out.
6. Operation
Once users are enrolled, they can gain access using their registered credentials.
6.1 Unlocking with Fingerprint
Place a registered finger firmly on the fingerprint collector. Upon successful identification, the indicator light will turn green, and the door will unlock for a preset duration.
6.2 Unlocking with RFID Card
Present a registered RFID card or keyfob to the swipe area. Upon successful identification, the indicator light will turn green, and the door will unlock for a preset duration.

Figure 6.1: Unlocking with Fingerprint or RFID Card. This image demonstrates both methods of unlocking the device: by placing a finger on the sensor and by presenting an RFID keyfob.
7. Data Management (SD Card)
The device supports SD card functionality for uploading and downloading user data. This feature allows for easy backup and transfer of user information. An SD card is not included and must be purchased separately.
7.1 Uploading Data
Insert a formatted SD card into the SD card jack. Follow the specific menu options (refer to the full manual if available) to upload user data from the device to the SD card.
7.2 Downloading Data
Insert an SD card containing user data into the SD card jack. Follow the specific menu options to download user data from the SD card to the device.
8. Specifications
| Feature | Specification |
|---|---|
| Operating Voltage | DC12V |
| Quiescent Current | <100mA |
| Operating Temperature | -30°C to 60°C |
| User Capacity | 1000 Fingerprints, 1000 Cards |
| Wiegand Interface | Wiegand26 |
| Card Type | EM (125 KHz) |
| Resolution | 450 DPI |
| Fingerprint Entry Time | <1S |
| Identification Time | <2S |
| FAR (False Acceptance Rate) | <0.0001% |
| FRR (False Rejection Rate) | <0.01% |
| Identification Method | Fingerprint, RFID Key Card |
| Material | ABS Plastic |
| Dimensions | 155mm (H) x 66mm (W) x 28mm (D) |
| Weight | 340g |
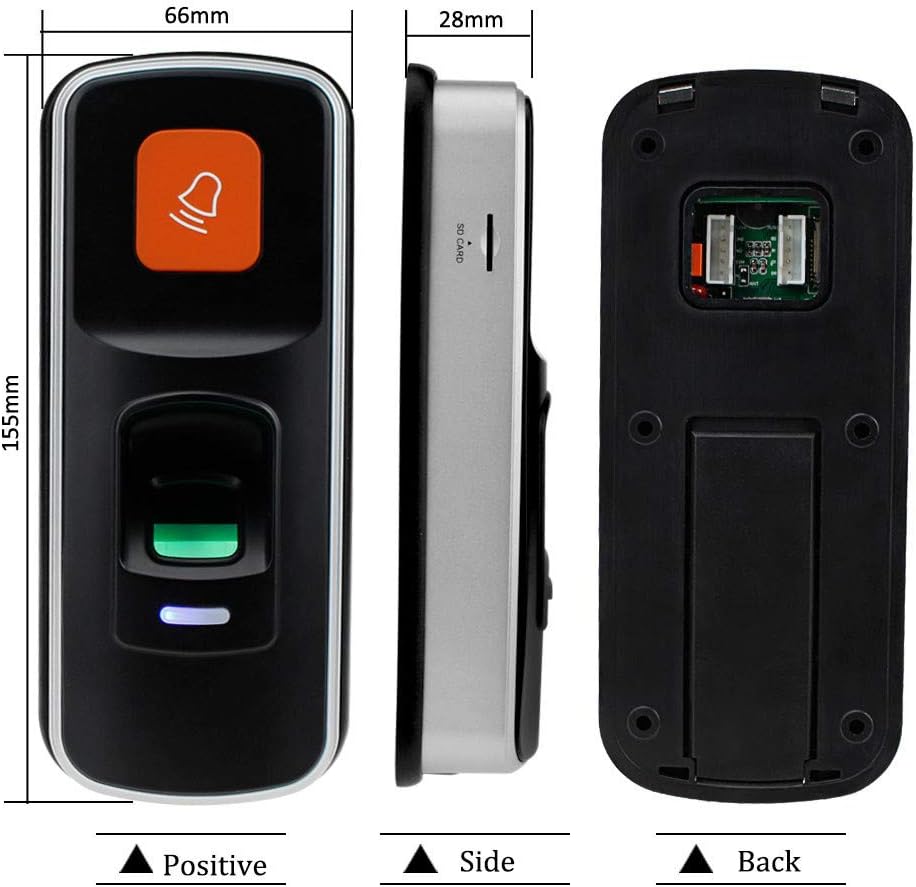
Figure 8.1: Product Dimensions. This image provides a front, side, and back view of the device with measurements indicating its height, width, and depth.
9. Troubleshooting
9.1 Device Not Powering On
- Check all power connections to ensure they are secure and correctly wired according to the diagram.
- Verify that the power supply is providing the correct DC12V output.
- Ensure the power source (e.g., wall outlet) is active.
9.2 Fingerprint Not Recognized
- Ensure your finger is clean and dry.
- Place your finger firmly and completely on the fingerprint collector.
- Try re-enrolling your fingerprint if recognition issues persist.
- Clean the fingerprint collector surface with a soft, dry cloth.
9.3 RFID Card Not Working
- Ensure the RFID card/keyfob is correctly registered in the system.
- Present the card/keyfob directly to the swipe area.
- Verify that the card type is EM (125 KHz).
9.4 Difficulty with Programming
- Ensure you are using the correct Administrator Cards (Add Card / Delete Card).
- Follow the programming steps precisely as outlined in Section 5.
- If issues persist, consult the comprehensive manual or contact customer support.
10. Care and Maintenance
- Cleaning: Use a soft, dry cloth to clean the device surface, especially the fingerprint collector. Avoid abrasive cleaners or solvents.
- Environment: Install the device in a location protected from extreme temperatures, direct sunlight, and excessive moisture.
- Data Backup: Regularly back up user data to an SD card to prevent data loss.
11. Warranty and Support
Specific warranty information for the Sebury NN99 RFID Fingerprint Access Control System is not provided in the product details. Please refer to your purchase documentation or contact the retailer/manufacturer directly for warranty terms and technical support.