
1. Introduction
This manual provides detailed instructions for the setup, operation, and maintenance of your IMRELAX IM-DMX384B DMX Controller. This device is designed to control DMX512 compatible stage lighting fixtures, offering 384 channels for comprehensive lighting management. Please read this manual thoroughly before operating the unit to ensure proper use and to prevent damage.
2. Safety Information
- Ensure the power supply voltage matches the requirements specified on the unit.
- Do not expose the unit to rain or moisture.
- Avoid operating the unit in extremely hot or cold environments.
- Do not open the casing; refer all servicing to qualified personnel.
- Keep the unit away from flammable materials.
- Always disconnect power before cleaning or performing maintenance.
3. Product Overview
The IMRELAX IM-DMX384B is a robust DMX controller featuring 384 channels, designed for intuitive control of stage lighting. It includes faders for channel control, buttons for scene and chase selection, and a display for programming feedback.

Figure 3.1: Front view of the IMRELAX IM-DMX384B DMX Controller, showing faders, buttons, and display.
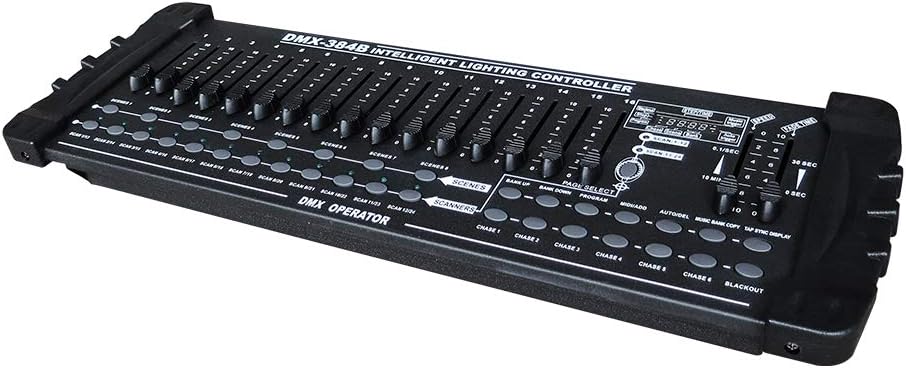
Figure 3.2: Angled view of the DMX Controller, highlighting the ergonomic design and control layout.

Figure 3.3: Rear panel of the DMX Controller, showing DMX output, MIDI ports, DC input, lamp connection, and power switch.

Figure 3.4: The DMX Controller shown with its included gooseneck lamp and user manual.
4. Setup
4.1 Power Connection
- Connect the provided DC 9V 1000mA power adapter to the 'DC INPUT' port on the rear panel of the controller.
- Plug the power adapter into a suitable electrical outlet.
- Turn on the controller using the 'POWER' switch located on the rear panel.
4.2 DMX Fixture Connection
The controller uses a standard DMX512 protocol. Connect your DMX-compatible lighting fixtures to the 'DMX 512 OUTPUT' port using a 3-pin DMX cable. Ensure proper DMX chaining for multiple fixtures.
- Pin 1: Ground
- Pin 2: Data -
- Pin 3: Data +
4.3 MIDI Connection
If using MIDI control, connect your MIDI device to the 'MIDI' input port on the rear panel. Refer to your MIDI device's manual for specific connection instructions.
5. Operating Instructions
5.1 Basic Control
The controller features 16 channel faders and 8 scene buttons. Use the faders to adjust the DMX values for individual channels. The 'SCANNERS' buttons (1-12) allow you to select which DMX fixtures you are controlling.
5.2 Programming Scenes
The IM-DMX384B allows you to program up to 30 banks of 8 scenes each. A scene is a static lighting state.
- Press the 'PROGRAM' button to enter programming mode. The 'PROGRAM' LED will illuminate.
- Select a 'BANK' using the 'BANK UP' or 'BANK DOWN' buttons.
- Adjust the channel faders to achieve your desired lighting state.
- Press the 'MIDI/ADD' button.
- Press one of the 'SCENES' buttons (1-8) to save the current lighting state to that scene number within the selected bank.
- Repeat for other scenes. Press 'PROGRAM' again to exit programming mode.
5.3 Creating Chases
The controller supports 6 programmable chases, each capable of storing up to 240 scenes. A chase is a sequence of scenes played in order.
- Enter programming mode by pressing 'PROGRAM'.
- Select a 'CHASE' (1-6) using the 'CHASE' buttons.
- Select a 'BANK' and then a 'SCENE' that you wish to add to the chase.
- Press the 'MIDI/ADD' button to add the selected scene to the chase.
- Repeat steps 3 and 4 to add more scenes to the chase.
- Exit programming mode by pressing 'PROGRAM'.
5.4 Playback and Speed/Fade Control
- To play a scene, select the desired 'BANK' and then press the corresponding 'SCENE' button.
- To play a chase, press the desired 'CHASE' button.
- Use the 'SPEED' fader to adjust the playback speed of chases.
- Use the 'FADE TIME' fader to adjust the transition time between scenes in a chase.
5.5 Blackout Function
Press the 'BLACKOUT' button to instantly turn off all DMX output. Press it again to restore the previous lighting state.
5.6 MIDI Control
The controller supports MIDI input for triggering scenes and chases. Refer to the detailed MIDI implementation chart in the full manual for specific MIDI note assignments.
5.7 Video Demonstration
Video 5.1: This video demonstrates the general operation and features of an IMRELAX DMX controller. Please note that this video specifically shows a 192-channel model, while your product is a 384-channel model. The core functionalities and interface elements are similar.
6. Maintenance
6.1 Cleaning
To clean the unit, use a soft, dry cloth. Do not use abrasive cleaners or solvents, as these can damage the finish and internal components. Ensure the unit is powered off and unplugged before cleaning.
6.2 Storage
When not in use for extended periods, store the controller in a cool, dry place, away from direct sunlight and extreme temperatures. It is recommended to keep the original packaging for storage and transport.
7. Troubleshooting
- No Power: Check the power adapter connection and the power outlet. Ensure the power switch on the rear panel is in the 'ON' position.
- No DMX Output: Verify that DMX cables are correctly connected and that DMX fixtures are properly addressed and terminated. Check if the 'BLACKOUT' function is active.
- Fixture Not Responding: Confirm the DMX address of the fixture matches the scanner selected on the controller. Ensure the fixture is DMX512 compatible and functioning correctly.
- MIDI Not Working: Check MIDI cable connections. Ensure the MIDI device is sending data and the controller is configured to receive it (refer to advanced settings in the full manual).
8. Specifications
| Feature | Specification |
|---|---|
| DMX Channels | 384 |
| Controllable Fixtures | 24 (up to 16 channels per fixture) |
| Scenes | 30 Banks of 8 programmable scenes |
| Chases | 6 programmable chases (up to 240 scenes each) |
| MIDI Control | Yes |
| Power Input | DC 9V 1000mA |
| Material | Plastic housing |
| Color | Black |
| Mounting Type | Rack Mount |
9. Warranty and Support
For warranty information and technical support, please refer to the documentation included with your product or contact IMRELAX customer service directly. Keep your purchase receipt for warranty claims.