
Rstar WP26
Rstar WP26 TIG Welding Torch Instruction Manual
Model: WP26 | Brand: Rstar
Introduction
This manual provides detailed instructions for the safe and effective use of your Rstar WP26 Air-Cooled TIG Welding Torch. Please read this manual thoroughly before operating the torch to ensure proper setup, operation, and maintenance. Retain this manual for future reference.

Figure 1: Complete Rstar WP26 TIG Welding Torch with 13-foot cable and included accessories.
Safety Information
Always prioritize safety when working with welding equipment. Failure to follow these safety guidelines can result in serious injury or death.
- Electric Shock Can Kill: Ensure your welding machine is properly grounded. Do not touch live electrical parts. Wear dry welding gloves and protective clothing.
- Fumes and Gases Can Be Hazardous: Keep your head out of the fumes. Use enough ventilation and/or exhaust at the arc to keep fumes and gases away from the breathing zone.
- Arc Rays Can Burn Eyes and Skin: Wear a welding helmet with a proper shade filter. Wear protective clothing to protect skin.
- Fire and Explosion Hazard: Remove all flammables from the welding area. Have a fire extinguisher readily available.
- Hot Parts Can Cause Severe Burns: Allow equipment to cool before touching. Wear protective gloves.
- Read the Welding Machine Manual: Always refer to your welding machine's instruction manual for specific safety procedures and compatibility.
Product Overview and Components
The Rstar WP26 TIG Welding Torch is an air-cooled torch designed for TIG welding applications. It features a durable construction and standard connections for compatibility with various welding machines.
Key Components:
- Torch Body: Ergonomically designed handle for comfortable grip.
- Torch Head: Houses the collet, collet body, and ceramic cup.
- Power Cable (13 Feet / 4M): Connects the torch to the welding machine, carrying welding current and shielding gas.
- Gas Connector (M16*1.5): For connecting the shielding gas line.
- Control Cable Connector (Two-pin socket): For connecting the torch's trigger control to the welding machine.
- Ceramic Cups: Direct the shielding gas flow.
- Collets and Collet Bodies: Secure the tungsten electrode.
- Long Back Cap: Secures the tungsten electrode and provides a gas seal.

Figure 2: Exploded view showing the assembly of the torch head components.
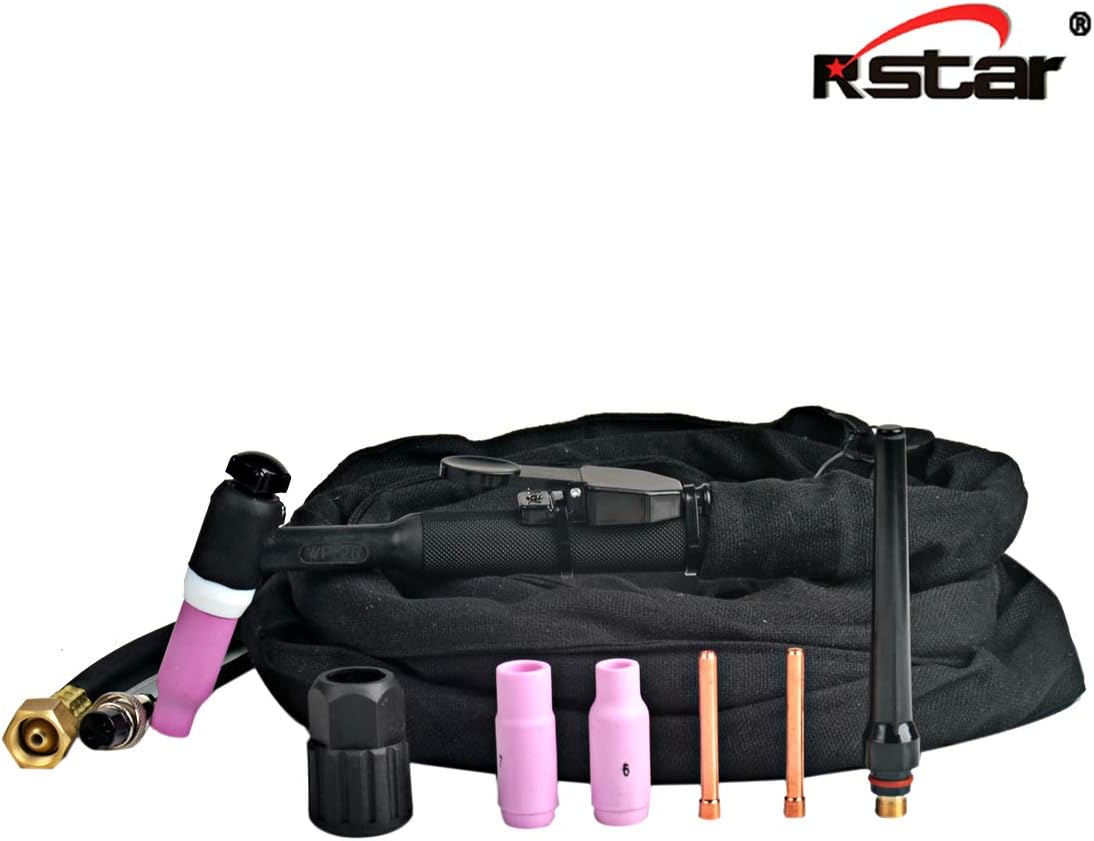
Figure 3: All included components of the WP26 TIG torch kit.
Setup
Follow these steps to properly set up your WP26 TIG welding torch with your welding machine.
- Prepare the Tungsten Electrode: Select the appropriate tungsten electrode size (0.02" to 1/8") and grind it to a sharp point for DC welding or a balled end for AC welding, as per your application requirements.
- Assemble the Torch Head:
- Insert the collet body into the torch head.
- Place the collet into the collet body.
- Insert the prepared tungsten electrode through the back cap and collet, ensuring it extends approximately 1/8" to 3/16" beyond the ceramic cup.
- Thread the ceramic cup onto the torch head.
- Tighten the back cap to secure the tungsten electrode. Do not overtighten.
- Connect to Welding Machine:
- Locate the M16*1.5 gas connector and the two-pin control socket on your welding machine.
- Connect the M16*1.5 gas connector from the torch cable to the corresponding gas inlet on your welding machine. Ensure a secure, leak-free connection.
- Connect the two-pin control socket from the torch cable to the corresponding control port on your welding machine.
- Connect the main power lead of the torch (often integrated with the gas line) to the appropriate terminal on your welding machine (usually the negative terminal for DCEN, or either for AC). Refer to your welding machine's manual for specific connection points.

Figure 4: Detail of the M16*1.5 gas connector and two-pin control socket for connection.

Figure 5: Example of torch connectors properly attached to a welding machine.
Operating Instructions
Once the torch is properly set up and connected to your welding machine and gas supply, you can begin welding. Always wear appropriate Personal Protective Equipment (PPE).
- Power On: Turn on your welding machine and gas supply.
- Set Welding Parameters: Adjust the amperage, gas flow rate, and other settings on your welding machine according to the material thickness and type of weld.
- Initiate Arc:
- High Frequency (HF) Start: Position the tungsten electrode close to the workpiece (typically 1/16" to 1/8" away) and press the torch trigger. The HF arc will jump across the gap.
- Lift Arc Start: Gently touch the tungsten electrode to the workpiece, then lift it slightly (about 1/16"). The arc will initiate.
- Maintain Arc and Weld: Maintain a consistent arc length and travel speed. Feed filler rod into the weld puddle as needed.
- Terminate Arc: Release the torch trigger. The post-flow gas will continue to flow for a set period to protect the hot tungsten and weld puddle from atmospheric contamination.
- Cool Down: Allow the torch and workpiece to cool before handling.
Maintenance
Regular maintenance ensures the longevity and optimal performance of your TIG welding torch.
- Clean Torch Components: Regularly inspect and clean the ceramic cup, collet, and collet body to remove spatter and debris.
- Inspect Tungsten Electrode: Regrind or replace the tungsten electrode as it becomes contaminated or dull.
- Check Gas Connections: Periodically check all gas connections for leaks using a leak detection solution. Tighten any loose connections.
- Inspect Cables: Examine the power and control cables for any signs of damage, cuts, or fraying. Replace damaged cables immediately.
- Store Properly: When not in use, store the torch in a clean, dry environment, preferably in its original packaging or a protective case.
Troubleshooting
This section addresses common issues you might encounter with your TIG welding torch.
| Problem | Possible Cause | Solution |
|---|---|---|
| Poor Arc Start / Unstable Arc |
|
|
| Porous Weld / Contamination |
|
|
| Torch Overheating |
|
|
Specifications
- Model: WP26
- Torch Type: Air-Cooled TIG Welding Torch
- Rating: 200A DC / 160A AC
- Electrode Size Compatibility: 0.02" to 1/8"
- Cable Length: 13 Feet (4 Meters)
- Gas Connector: M16*1.5
- Control Connector: Two-pin socket
- Material: Copper (internal components)
- Item Weight: Approximately 4.53 pounds
- Manufacturer: RSTARWELD
Warranty and Support
For warranty information or technical support regarding your Rstar WP26 TIG Welding Torch, please contact the manufacturer or your point of purchase. Keep your purchase receipt as proof of purchase.
Manufacturer: RSTARWELD
For further assistance, you may visit the Rstar Store on Amazon: Rstar Store
Ask a question about this manual
Ask about setup, troubleshooting, compatibility, parts, safety, or missing instructions. Manuals+ will review the question and use this page’s manual context to help answer it.