
TowerTop TP108MB
TowerTop 2/10/25 Amp 12V Smart Car Battery Charger User Manual
Model: TP108MB | Brand: TowerTop
Introduction
This manual provides essential instructions for the safe and efficient operation of your TowerTop 2/10/25 Amp 12V Smart Car Battery Charger. This fully automatic charger is designed for various 12V battery types including STD, AGM, Gel, Wet, MF, EFB, and Deep Cycle batteries, offering features like engine start, auto desulfation, battery repair, and winter mode. Please read this manual thoroughly before use to ensure proper function and safety.
Safety Information
Always prioritize safety when operating electrical equipment. This TowerTop battery charger incorporates multiple safety features to protect both the user and the battery. Adhere to the following guidelines:
- Spark-Proof: Designed to prevent sparks during connection.
- Reverse Polarity Protection: Prevents damage if clamps are connected incorrectly.
- Overcharge/Discharge Protection: Automatically stops charging when full and prevents excessive discharge.
- Over Voltage Protection: Safeguards against high input voltage.
- Over Current Protection: Prevents damage from excessive current.
- Overload Protection: Protects the unit from drawing too much power.
- Overheat Protection: Reliable cooling systems prevent overheating during operation.
- Current Backflow Protection: Prevents current from flowing back into the charger.
- Short Circuit Protection: Automatically shuts off in case of a short circuit.
- Ensure the charger is connected to a 120V AC power outlet for proper function, especially for the Engine Start feature.
- Do not attempt to repair a totally dead battery with the "Recondition" mode if it shows no signs of life.
The charger is ETL certified, ensuring it meets recognized safety standards.
Product Overview
The TowerTop Smart Car Battery Charger is a compact and robust unit designed for ease of use. It features a clear digital display and intuitive controls.
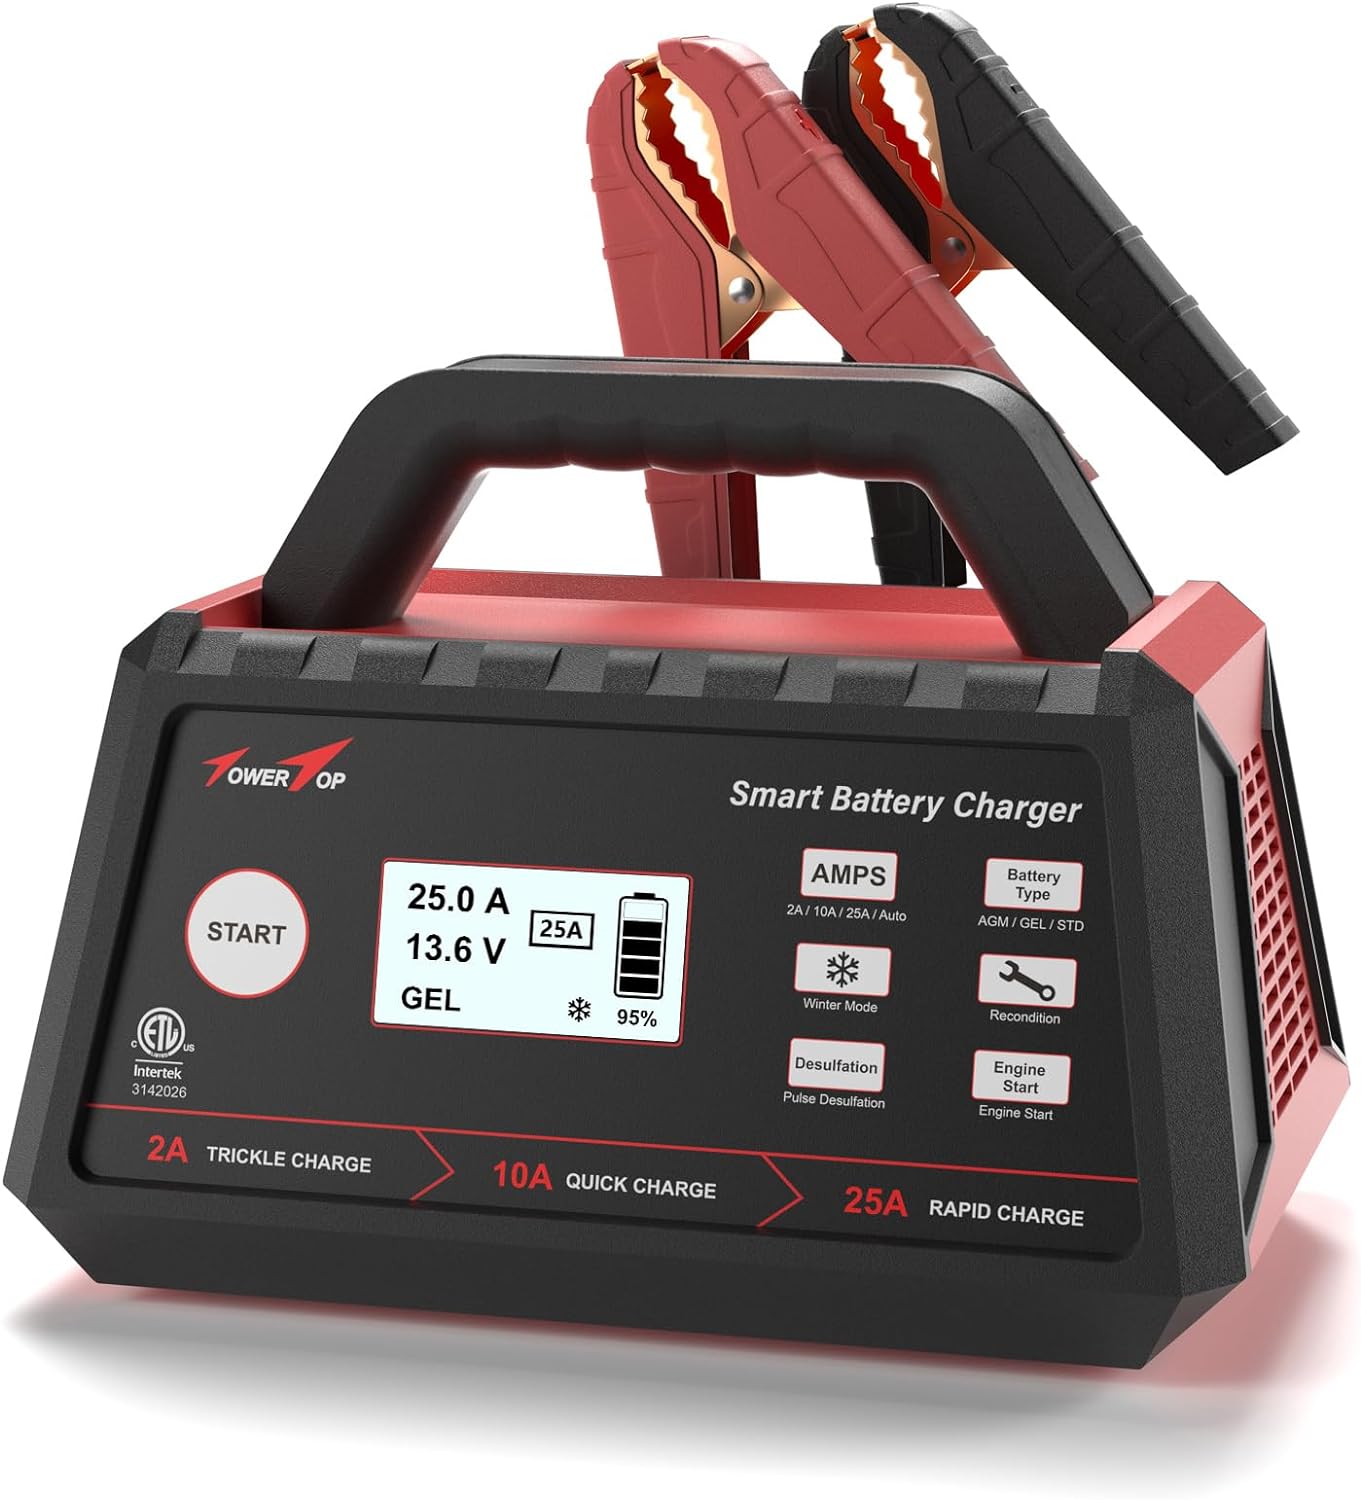
Figure 1: TowerTop Smart Car Battery Charger. This image shows the front view of the charger with its red and black clamps, handle, and digital display.
Control Panel and Display
The charger is equipped with a large HD LCD display that provides real-time information about the charging process. Key indicators and buttons include:
- Digital Display: Shows charging current (Amps), charging voltage (Volts), selected battery type (AGM, GEL, STD), battery power percentage, and active mode (e.g., Winter Mode).
- START Button: Initiates the charging process.
- AMPS Button: Selects desired charging rate (2A/10A/25A/AUTO).
- Battery Type Button: Chooses the appropriate battery type (AGM/GEL/STD).
- Winter Mode Button: Activates charging mode optimized for cold temperatures.
- Desulfation Button: Initiates the desulfation process.
- Recondition Button: Activates the battery repair function.
- Engine Start Button: Provides a high current boost for starting vehicles.

Figure 2: Detailed view of the charger's LCD display and control buttons. The display shows current, voltage, battery type, and charge percentage, with buttons for various functions.
Specifications
| Feature | Detail |
|---|---|
| Brand | TowerTop |
| Model Number | TP108MB |
| Input Voltage | 120V AC (for Engine Start) |
| Output Voltage | 12 Volts |
| Charging Current | 2A / 10A / 25A / AUTO |
| Engine Start Current | 100 Amps (peak) |
| Compatible Battery Types | STD, AGM, Gel, Wet, MF, EFB, Deep Cycle (12V) |
| Dimensions (L x W x H) | 7.68 x 10.04 x 4.92 inches |
| Item Weight | 5 pounds |
| Certifications | ETL Certified |
Setup and Connection
Automatic Charging
For most charging needs, the charger can automatically detect the battery type and begin charging. This is ideal for convenience.
- Connect the clamps to your battery: Connect the red positive (+) clamp to the positive battery terminal and the black negative (-) clamp to the negative battery terminal. Ensure a secure connection.
- Connect the 120V AC power outlet: Plug the charger's power cord into a standard wall outlet.
- Automatic Start: The charger will automatically begin charging after 30 seconds. Alternatively, you can press the "START" button for an immediate start.

Figure 3: Automatic Charging Process. This image illustrates the three simple steps to initiate automatic charging: connecting the battery clamps, plugging into a power outlet, and the optional press of the start button.
Note: The charger has a memory function. If you're using the charger for the first time, it will automatically charge in the "12V & GEL" mode. Therefore, it is recommended that you initially set the charging mode (current and battery type) based on your battery type. Afterward, the charger will remember your last charging settings and charge automatically.
Manual Charging
For specific battery types or charging rates, you can manually select the settings.
- Connect the clamps to your battery: Connect the red positive (+) clamp to the positive battery terminal and the black negative (-) clamp to the negative battery terminal.
- Connect the 120V AC power outlet: Plug the charger's power cord into a standard wall outlet.
- Press the "Battery Type" button: Select the correct battery type (STD, AGM, or GEL) for your battery.
- Press the "AMPS" button: Select your desired charging rate (2A, 10A, or 25A). In Auto mode, the current defaults to 2A.
- Press the "START" button: Initiate the charging process.

Figure 4: Manual Charging Process. This image details the steps for manual charging, including selecting battery type and amperage before starting the charge.
Operating Modes
8-Stage Smart Charging Program
The TowerTop charger utilizes an intelligent 8-stage charging program to optimize battery health and extend its lifespan. The MCU controller monitors the entire process for precision.
- Battery Desulfation: Removes sulfate deposits from battery lead plates.
- Soft Start: Gently introduces current to the battery.
- Bulk Charging: Charges the battery at maximum current until it reaches approximately 80% capacity.
- Absorption: Charges at a decreasing current to bring the battery to 100%.
- Battery Analysis: Tests the battery's ability to hold a charge.
- Battery Recondition: Uses slow pulse reconditioner technology to restore lost performance.
- Float Charging: Maintains the battery at full charge with a constant voltage.
- Pulse Maintenance: Applies small pulses of current to keep the battery optimized.

Figure 5: 8-Stage Smart Charging Program. This diagram visually represents the different phases of the charging process, showing how voltage and current fluctuate to optimize battery health.
Note: If charging has already begun, pressing the "Recondition" button allows you to check which stage of the 8-stage charging process it has reached.
Engine Start Mode
The Engine Start feature provides a powerful 100A current to help activate your car battery and start your vehicle within 100 seconds. This is particularly useful for vehicles with severely discharged batteries.
- Ensure the charger is connected to a 120V AC power source for this function to operate.
- Connect the charger to the battery terminals as described in the Setup section.
- Press the "Engine Start" button on the control panel.
- Attempt to start your vehicle within the 100-second window.

Figure 6: Engine Start Feature. This image highlights the Engine Start button and the corresponding message on the charger's display, indicating when to attempt starting the vehicle.
Winter Mode
When charging in low-temperature conditions, activate Winter Mode. This mode adds 0.2V to the original charging voltage, which helps to boost battery activity and ensures a more thorough charge in cold weather, improving overall battery performance.
- Connect the charger to the battery.
- Press the "Winter Mode" button on the control panel.
- Proceed with the charging process as usual.

Figure 7: Winter Mode in Use. This image depicts the charger in a cold environment, with the display showing Winter Mode activated, emphasizing its utility in low temperatures.
Battery Repair (Recondition)
The advanced Recondition mode uses slow pulse reconditioner technology to detect and address battery sulfation and acid stratification. This process aims to restore lost battery performance, helping to repair old or idle batteries and extend their life.
- If your battery is not charging or performing optimally, connect the charger.
- Press the "Recondition" button to initiate the repair cycle.
- Allow the charger to complete the repair process.
Please note: This function cannot repair a totally dead battery (e.g., one that registers 0V or is internally damaged beyond repair). It is designed for batteries that are sulfated or have acid stratification.
Official Product Video: TowerTop BC025 Smart Battery Charger - Know Batteries Better
Video Description: This official video from TowerTop-US provides an in-depth overview of the BC025 Smart Battery Charger, explaining its features and how it helps users understand and maintain their batteries more effectively. It covers various functionalities and benefits of the charger.
Maintenance
Proper maintenance ensures the longevity and optimal performance of your TowerTop battery charger:
- Cleaning: Disconnect the charger from power and battery before cleaning. Use a soft, dry cloth to wipe the casing. Do not use abrasive cleaners or solvents.
- Storage: Store the charger in a cool, dry place when not in use. Keep cables neatly coiled and clamps protected.
- Cable Inspection: Regularly inspect the power cord and battery cables for any signs of damage, cuts, or fraying. Do not use the charger if cables are damaged.
- Clamp Care: Ensure battery clamps are clean and free of corrosion for optimal conductivity.
Troubleshooting
If you encounter issues with your TowerTop battery charger, refer to the following common problems and solutions:
| Problem | Possible Cause | Solution |
|---|---|---|
| Charger does not turn on. | No power from AC outlet; faulty power cord; internal issue. | Check AC outlet with another device. Inspect power cord for damage. If problem persists, contact customer support. |
| Charger displays "Reverse Polarity" or error. | Battery clamps connected incorrectly. | Disconnect charger. Reconnect red clamp to positive (+) terminal and black clamp to negative (-) terminal. |
| Battery not charging or charging slowly. | Incorrect battery type selected; poor clamp connection; battery is severely discharged or damaged. | Ensure correct battery type is selected. Clean battery terminals and clamps. Try "Recondition" mode for sulfated batteries. If battery is completely dead, it may not be recoverable. |
| Charger overheats and shuts down. | Poor ventilation; prolonged use in high ambient temperatures; internal fault. | Ensure adequate ventilation around the charger. Allow it to cool down. If issue recurs, contact customer support. |
| Engine Start mode does not work. | Charger not connected to AC power; battery too low; vehicle issue. | Ensure charger is plugged into a live 120V AC outlet. Confirm battery connections are secure. If vehicle still doesn't start, consult a mechanic. |
Warranty and Support
TowerTop stands behind the quality of its products. Your TowerTop Smart Car Battery Charger comes with an 18-month warranty from the date of purchase.
This warranty covers any defects in materials or workmanship. In case of any product quality issue, TowerTop offers hassle-free returns or refunds.
Customer Support
If you have any questions, concerns, or require assistance with your product, please do not hesitate to contact TowerTop customer service. They aim to reply within 24 hours and provide a satisfactory solution.
For support, please visit the official TowerTop store on Amazon or use the contact information provided with your product packaging.

Figure 8: Contacting Customer Support. This image represents the ease of reaching out for assistance via email or online channels.
Related documentsTP108MB


Ask a question about this manual
Ask about setup, troubleshooting, compatibility, parts, safety, or missing instructions. Manuals+ will review the question and use this page’s manual context to help answer it.