Introduction
This manual provides detailed instructions for the proper use, setup, operation, and maintenance of your MEDca Digital Hearing Amplifier. Designed for clarity and ease of use, this device offers advanced digital technology to amplify sound and reduce background noise, providing a comfortable and effective hearing experience. Please read this manual thoroughly before using your device to ensure optimal performance and longevity.

Image: The MEDca Digital Hearing Amplifiers with their USB charging dock.
What's in the Box
Upon opening your MEDca Digital Hearing Amplifier package, you should find the following components:
- 1 Pair of Hearing Amplifiers
- 1 Hard Plastic Storage Case
- 1 USB Rechargeable Dock
- 1 Adapter
- 9 Easy Comfort Ear Plugs (various sizes)
- 1 Cleaning Set
- 1 Storage Bag
- 1 Instruction Manual

Image: All components included in the MEDca Digital Hearing Amplifier package.
Product Overview and Components
Familiarize yourself with the different parts of your MEDca Digital Hearing Amplifier:
- Ear Hook: The curved part that fits over the top of your ear.
- Ear Tube: The clear tube connecting the main unit to the ear tip.
- Microphone: Captures sound from your environment.
- Volume Control: A slider or dial to adjust the sound amplification level.
- On/Off Switch: Toggles the device power. Typically marked 'N' for On and 'O' for Off.
- Receiver: Delivers the amplified sound into your ear.
- Ear Tip: The soft dome that fits inside your ear canal.
- Charging Contact: Points on the device that connect to the charging dock.
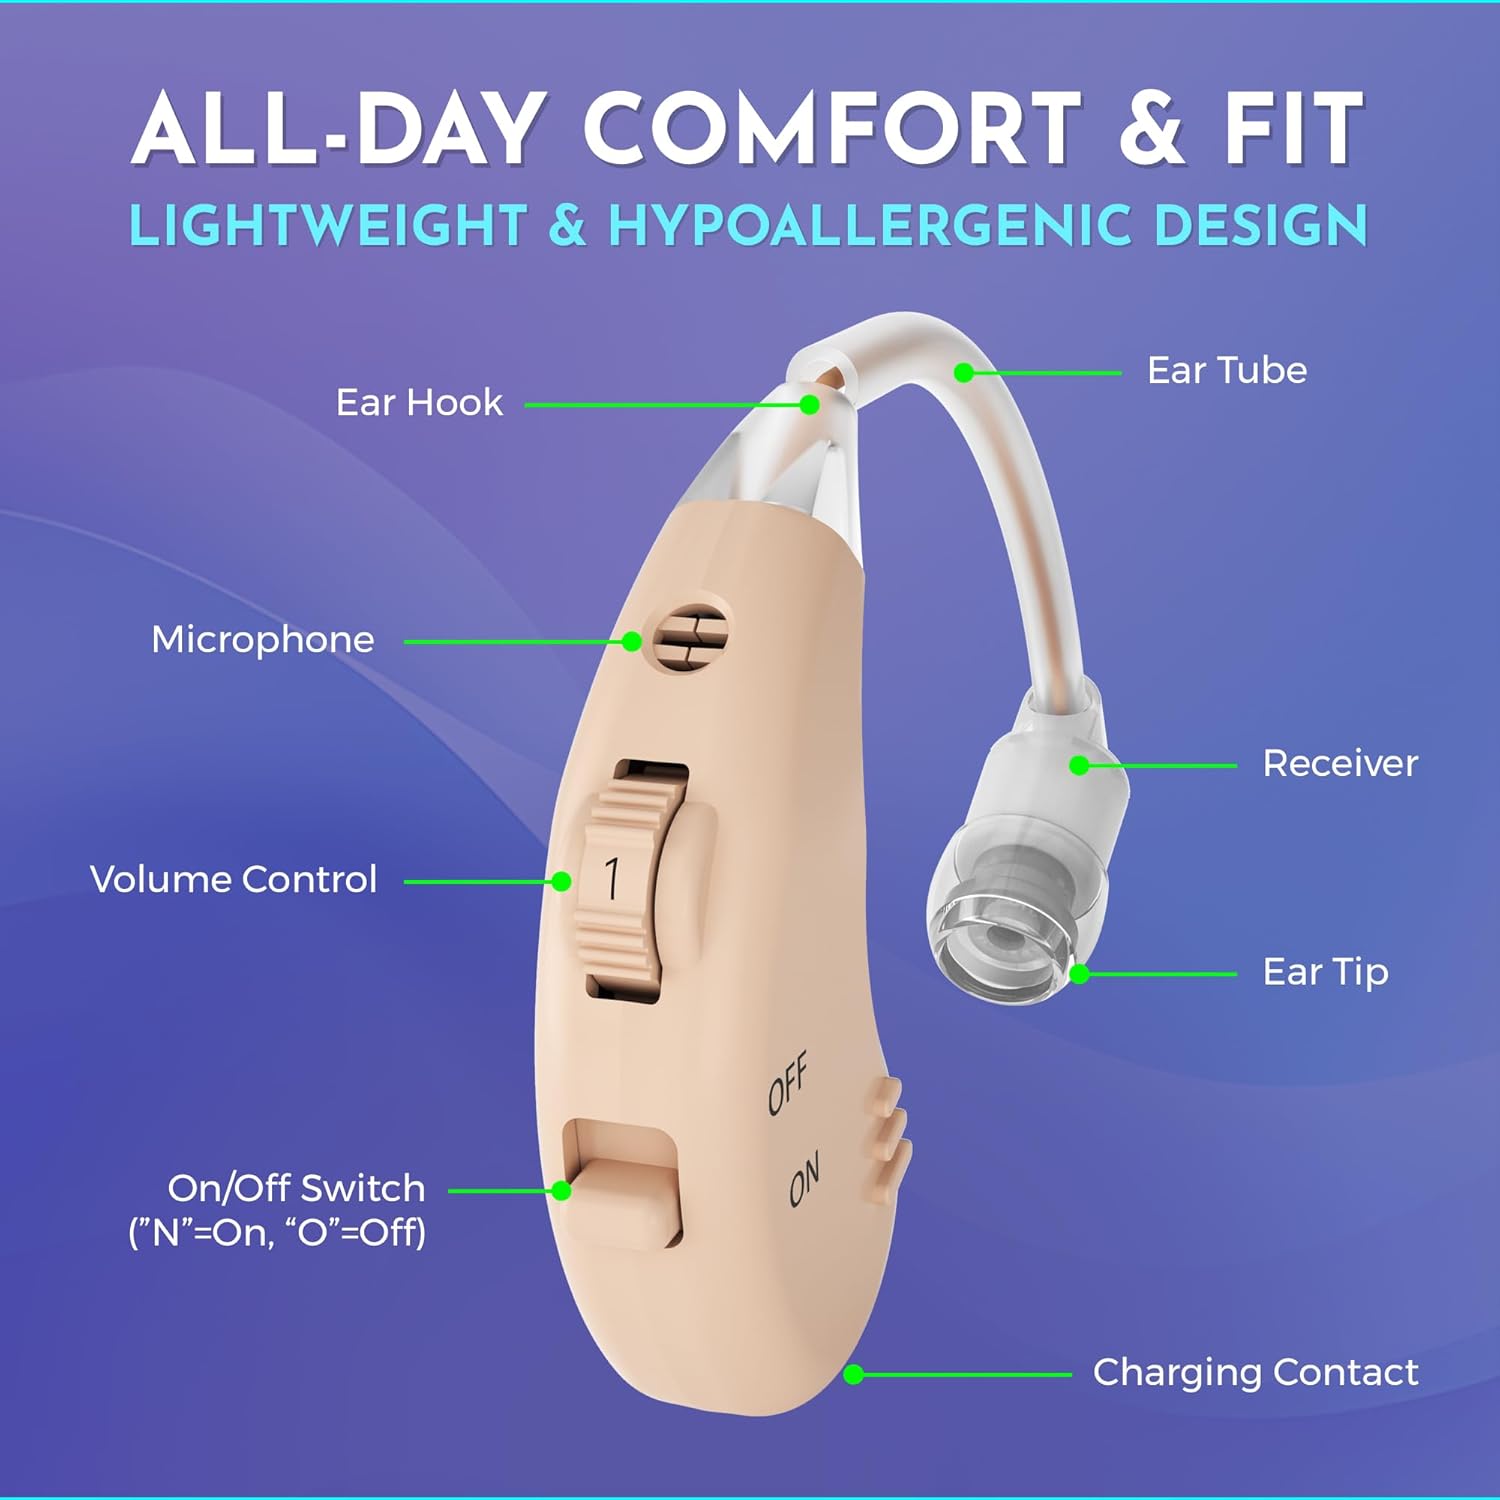
Image: Labeled diagram of the hearing amplifier's components.
Setup
Initial Charging
Before first use, fully charge your hearing amplifiers. This ensures optimal battery life and performance.
- Connect the USB charging dock to a power source using the provided USB cable and adapter.
- Place the hearing amplifiers into their respective slots in the charging dock. Ensure the charging contacts align.
- The indicator light on the dock will show charging status (e.g., red for charging, green for fully charged).
- A full charge typically takes approximately 8.5 hours and provides up to 18 hours of working time.

Image: Hearing amplifiers in the charging dock, illustrating charging time and working time.
Inserting the Hearing Amplifier
Proper insertion ensures comfort and sound quality.
- Select the appropriate ear tip size for a comfortable and secure fit.
- Place the ear hook over the top of your ear.
- Gently insert the ear tip into your ear canal until it feels snug and comfortable.
- Adjust the ear tube and main unit to sit discreetly behind your ear.
Operating Instructions
Powering On/Off
The hearing amplifier features a simple on/off switch for easy control.
- To turn the device ON, slide the switch to the 'N' position.
- To turn the device OFF, slide the switch to the 'O' position.

Image: Detail of the ON/OFF switch on the hearing amplifier.
Volume Control
Adjust the volume to your preferred listening level using the integrated volume control.
- Locate the volume control slider on the side of the hearing amplifier.
- Slide the control upwards to increase the volume.
- Slide the control downwards to decrease the volume.
- Start with a lower volume setting and gradually increase it until sounds are clear and comfortable.
Maintenance and Care
Cleaning
Regular cleaning helps maintain performance and hygiene.
- Use the provided cleaning brush to gently remove any earwax or debris from the ear tip and microphone port daily.
- Wipe the main unit and ear tube with a soft, dry cloth. Do not use water or cleaning solutions directly on the device.
- Ensure the device is turned off before cleaning.
Storage
Proper storage protects your hearing amplifiers when not in use.
- Store the hearing amplifiers in the provided hard plastic storage case when not in use.
- Keep the device in a cool, dry place, away from direct sunlight and extreme temperatures.
- Avoid storing in humid environments like bathrooms.
Troubleshooting
If you experience issues with your hearing amplifier, refer to the table below for common problems and solutions.
| Problem | Possible Cause | Solution |
|---|---|---|
| No sound or weak sound | Device is off; Low battery; Ear tip blocked; Volume too low | Ensure device is ON; Recharge battery; Clean ear tip and microphone; Increase volume |
| Whistling or feedback sound | Improper fit; Ear tip too small; Earwax buildup | Re-insert device for a snug fit; Try a larger ear tip; Clean ear canal or consult a professional |
| Sound is distorted or unclear | Low battery; Microphone blocked; Device malfunction | Recharge battery; Clean microphone port; If problem persists, contact customer support |
| Device not charging | Improper connection; Faulty cable/adapter; Dirty charging contacts | Ensure secure connection; Try different USB port/adapter; Clean charging contacts on device and dock |
Specifications
Key technical specifications for the MEDca Digital Hearing Amplifier:
| Feature | Detail |
|---|---|
| Model Name | AG5 |
| Item Model Number | AG5, LR754 |
| Style | Single Pair (Behind The Ear - BTE) |
| Color | Beige |
| Material | Plastic |
| Battery Type | Lithium Ion (1 required) |
| Charging Time | Approx. 8.5 hours |
| Working Time | Up to 18 hours per charge |
| Product Dimensions | 0.39 x 0.39 x 0.39 inches |
| Item Weight | 5.3 ounces |
| Manufacturer | MEDca |
| First Available Date | April 30, 2019 |
Warranty and Support
MEDca stands by the quality of its products. Each Digital Hearing Amplifier undergoes extensive testing to ensure superb quality and optimal performance in clearly amplifying sounds. For any questions, concerns, or support needs regarding your device, please refer to the contact information provided with your purchase documentation or visit the official MEDca website.


