Dorman 748-469
Dorman 748-469 Rear Passenger Side Power Window Regulator and Motor Assembly
User Manual
1. Introduction and Product Overview
This manual provides essential information for the proper installation, operation, and maintenance of your Dorman 748-469 Rear Passenger Side Power Window Regulator and Motor Assembly. This component is designed as an OE FIX replacement, featuring enhancements over the original equipment to improve reliability and performance.
The Dorman 748-469 assembly addresses common issues found in original equipment window regulators on certain BMW models, such as cable deformation leading to binding. It incorporates added tension springs, improved cable guides, and sheathing to prevent reel binding and reduce cable stretching, ensuring smoother and more consistent window operation.

Image 1.1: Main view of the Dorman 748-469 Power Window Regulator and Motor Assembly. This image displays the complete unit, including the motor, cables, and track system.
2. Safety Information
Always prioritize safety when working with automotive components. Improper installation or handling can lead to injury or damage to the vehicle.
- Disconnect the vehicle's battery before beginning any electrical work to prevent accidental activation or electrical shock.
- Wear appropriate personal protective equipment, including safety glasses and gloves.
- Ensure the vehicle is securely supported on a level surface if lifting is required.
- Exercise caution when handling the window glass, as it can be heavy and sharp.
- If you are not confident in your ability to perform the installation, seek assistance from a qualified automotive technician.
3. Package Contents
Verify that all components are present and undamaged before proceeding with installation.
- 1 Power Window Motor and Regulator Assembly (Dorman 748-469)
4. Vehicle Compatibility
This Dorman 748-469 Power Window Regulator and Motor Assembly is compatible with the rear passenger side of select BMW models. Confirm fitment for your specific vehicle using the following list:
- BMW 323i: 2006, 2007, 2008, 2009, 2010, 2011
- BMW 325i: 2006
- BMW 325xi: 2006
- BMW 328i xDrive: 2009, 2010, 2011, 2012
- BMW 328i: 2007, 2008, 2009, 2010, 2011, 2012
- BMW 328xi: 2007, 2008
- BMW 330i: 2006
- BMW 330xi: 2006
- BMW 335d: 2009, 2010, 2011
- BMW 335i xDrive: 2009, 2010, 2011
- BMW 335i: 2007, 2008, 2009, 2010, 2011
- BMW 335xi: 2007, 2008
- BMW M3: 2008, 2009, 2010, 2011
5. Setup and Installation
Installation of a window regulator and motor assembly typically involves removing the door panel, detaching the window glass, and replacing the old unit. Due to the complexity and safety considerations, professional installation is highly recommended.
General Installation Steps (Consult a service manual for your specific vehicle for detailed instructions):
- Prepare the Vehicle: Park the vehicle on a level surface, engage the parking brake, and disconnect the negative terminal of the battery.
- Remove Door Panel: Carefully remove the interior door panel. This usually involves removing screws, clips, and disconnecting electrical connectors for switches and lights.
- Access Window Regulator: Peel back the vapor barrier or plastic sheeting to expose the window regulator and motor assembly.
- Position Window Glass: Manually move the window glass to a position where its mounting bolts are accessible through the access holes in the door frame. Secure the glass in place with tape or a wedge to prevent it from falling.
- Disconnect Old Regulator: Disconnect the electrical connector from the old motor. Unbolt the window glass from the regulator clips. Unbolt the entire regulator assembly from the door frame.
- Remove Old Assembly: Carefully maneuver and remove the old window regulator and motor assembly from the door cavity.
- Install New Assembly: Insert the Dorman 748-469 assembly into the door cavity. Align the mounting holes and secure the regulator to the door frame with the appropriate bolts.

Image 5.1: Close-up view of the electrical connector on the Dorman 748-469 assembly. This shows the pin configuration for connecting to the vehicle's wiring harness.
- Attach Window Glass: Carefully lower the window glass and align it with the new regulator clips. Secure the glass to the clips.
- Connect Electrical: Connect the electrical connector to the new motor.
- Test Operation: Reconnect the vehicle battery. Test the window's up and down operation using the window switch. Ensure smooth movement and proper sealing. Adjust if necessary.
- Reassemble Door: Reinstall the vapor barrier, ensuring it is properly sealed. Reattach the interior door panel, connecting all electrical components and securing all clips and screws.
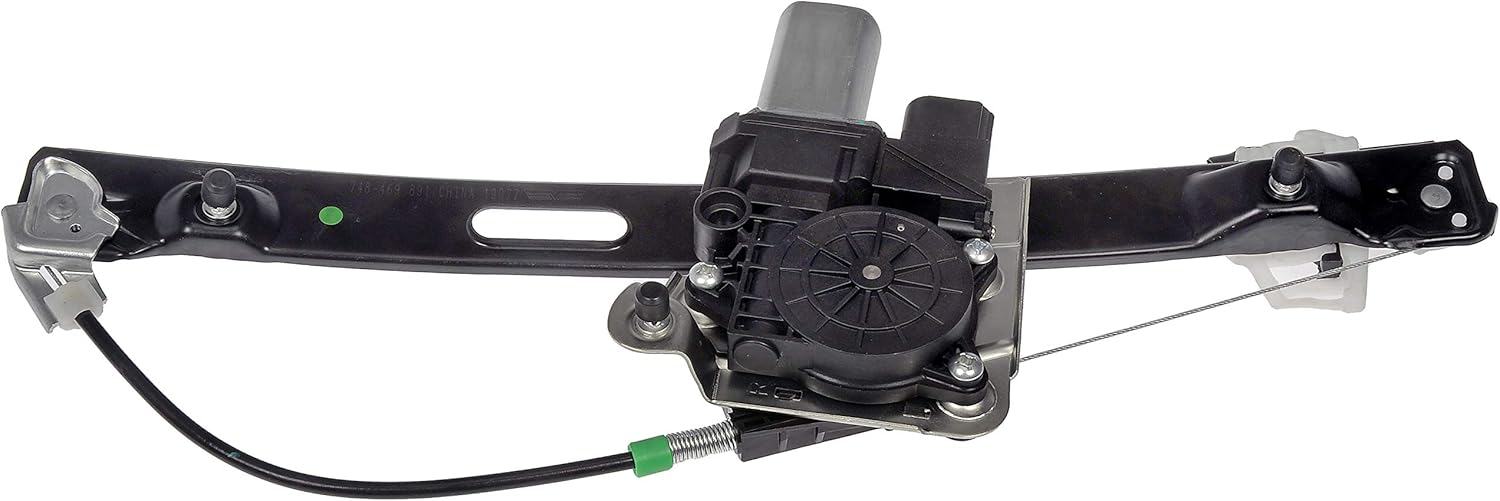
Image 5.2: Rear view of the Dorman 748-469 Power Window Regulator and Motor Assembly. This perspective highlights the mounting points and the overall structural design.

Image 5.3: Top view of the Dorman 748-469 Power Window Regulator and Motor Assembly. This image provides a different angle of the cable routing and motor placement.
6. Operating Instructions
Once installed, the Dorman 748-469 Power Window Regulator and Motor Assembly operates identically to the original equipment. Use the vehicle's existing power window switch located on the door panel to control the window movement.
- Pressing the switch down will lower the window.
- Pulling the switch up will raise the window.
- Some vehicles may feature an 'auto up/down' function, where a single full press or pull of the switch will fully open or close the window. This functionality should be retained with the Dorman replacement.
7. Maintenance
The Dorman 748-469 Power Window Regulator and Motor Assembly is designed for long-term, maintenance-free operation. However, general vehicle maintenance practices can contribute to its longevity:
- Keep window channels clean and free of debris to prevent excessive friction on the window glass.
- Avoid forcing the window if it encounters an obstruction.
- Periodically inspect the door panel area for any signs of moisture intrusion, which could affect electrical components.
8. Troubleshooting
If you experience issues with your power window after installation, consider the following common troubleshooting steps:
- Window does not move: Check the vehicle's fuse box for a blown fuse related to the power windows. Ensure all electrical connectors to the motor and switch are securely attached. Verify the battery is fully charged.
- Window moves slowly or binds: Inspect the window channels for dirt, debris, or worn weatherstripping that might be causing excessive friction. Ensure the window glass is properly aligned within the channels.
- Window does not go all the way up/down: This may require a recalibration procedure specific to your BMW model. Consult your vehicle's service manual for instructions on resetting window limits or performing a 're-initialization' procedure.
- Unusual noises during operation: This could indicate an obstruction in the window path or a loose component. Re-inspect the installation area.
If troubleshooting steps do not resolve the issue, it is recommended to consult a qualified automotive technician.
9. Specifications
| Specification | Detail |
|---|---|
| Brand | Dorman |
| Model Name | Dorman 748-469: Window Regulator And Motor Assembly |
| Item Weight | 3.02 pounds |
| Product Dimensions | 22 x 8.66 x 8.7 inches |
| Item Model Number | 748-469 |
| Manufacturer Part Number | 748-469 |
| OEM Part Number Equivalents | 384887; 51357140590; 67626927026 |
| Position | Rear Passenger Side |
| Special Features | Easy to Install |
| UPC | 037495205856 |
10. Warranty and Support
Dorman products are backed by a team of product experts in the United States and more than a century of automotive experience, ensuring trustworthy quality. For specific warranty details or technical support, please refer to the official Dorman website or contact Dorman customer service directly.
Ask a question about this manual
Ask about setup, troubleshooting, compatibility, parts, safety, or missing instructions. Manuals+ will review the question and use this page’s manual context to help answer it.