1. Introduction
The TENMARS TM-207 Solar Power Meter is designed for precise measurement of solar radiation. It quantifies the electromagnetic energy emitted by the sun, which includes visible, near-infrared, and ultraviolet parts of the spectrum. This device is essential for various applications requiring accurate solar energy assessment, providing readings in Watts per square meter (W/m²) or BTU per square foot per hour (BTU/(ft²xh)).
2. Product Overview
2.1 Key Features
- 3-digit LCD display with a maximum reading of 2000.
- Measures solar radiation emitted by the sun.
- Display units: W/m² (Watts per square meter) or BTU/(ft²xh).
- Data Hold, Maximum (MAX), and Minimum (MIN) functions for convenient data analysis.
- Equipped with an external sensor for flexible positioning and accurate readings.
2.2 Components
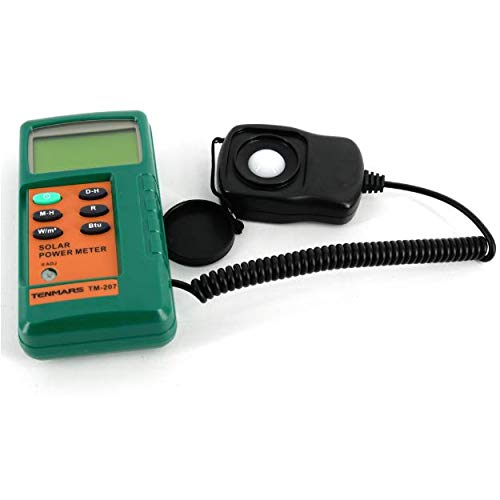
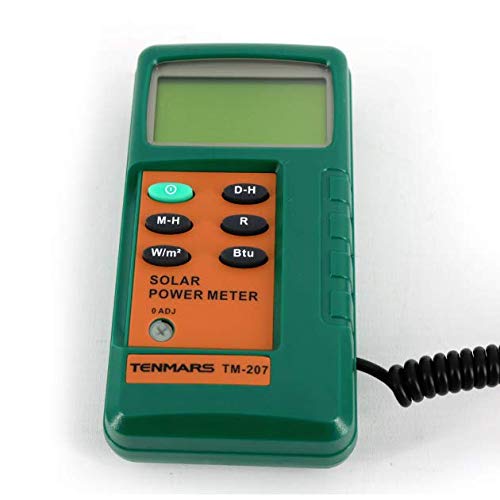
The TM-207 Solar Power Meter consists of a main display unit and a remote sensor connected by a coiled wire. The display unit features an LCD screen, control buttons, and a battery compartment on the rear.


3. Setup
3.1 Battery Installation
- Ensure the meter is powered off.
- Locate the battery compartment cover on the back of the meter (refer to Figure 4).
- Slide or unclip the cover to open the compartment.
- Insert one 9V battery, observing the correct polarity (+/-) as indicated inside the compartment.
- Replace the battery compartment cover securely.
Note: A 9V battery is not included with the package.
3.2 Sensor Connection
The external sensor is permanently attached to the main unit via a 1.5-meter coiled wire. No separate connection is required. Ensure the sensor is clean and unobstructed for accurate readings.
4. Operating Instructions
4.1 Power On/Off
- To power on the meter, press the green Power button (usually labeled with a circle and line symbol).
- To power off the meter, press and hold the green Power button until the display turns off.
4.2 Unit Selection (W/m² or BTU)
- Press the W/m² button to select Watts per square meter as the unit of measurement.
- Press the BTU button to select BTU per square foot per hour as the unit of measurement.
- The selected unit will be displayed on the LCD screen.
4.3 Data Hold Function
- To freeze the current reading on the display, press the D-H (Data Hold) button. The "D-H" indicator will appear on the LCD.
- To release the hold and resume live readings, press the D-H button again.
4.4 MAX/MIN Functions
- To record the maximum reading, press the M-H (Max Hold) button. The "MAX" indicator will appear, and the display will show the highest value measured since the function was activated.
- To record the minimum reading, press the M-H button again. The "MIN" indicator will appear, and the display will show the lowest value measured.
- To exit MAX/MIN mode and return to live readings, press the R (Recall/Reset) button.
5. Applications
The TENMARS TM-207 Solar Power Meter is suitable for a wide range of applications, including but not limited to:
- Meteorology applications for weather monitoring and climate studies.
- Agriculture applications to optimize crop growth conditions.
- Physics and optical laboratories for experimental setups.
- General solar radiation measurement.
- Solar transmission measurement through various materials.
- Solar power research and development.
- Identifying high-performance windows for energy efficiency.
- Assisting in setting up Solar PV Panels at optimum angles of incidence for maximum energy capture.
- Light intensity measurement for automotive windows.
6. Specifications
| Parameter | Specification |
|---|---|
| Display | 3 digits, 2000 readings |
| Range | 2000 W/m², 634 BTU/(ft²xh) |
| Resolution | 0.1 W/m², 0.1 BTU/(ft²xh) |
| Accuracy | Typically within ± 10W/m² [±3 BTU/(ft²xh)] or ± 5% whichever is greater in sunlight. Temperature included error ± 0.38 W/m² / °C [±0.12 BTU/(ft²xh) / °C] deviation from 25 °C. |
| Angular Accuracy | Cosine corrected |
| Drift | <± 2% per year |
| Over-input Indication | Display "OL" |
| Sampling Time | 0.25 second |
| Operating Temperature & Humidity | 0°C ~ 50°C below 80% RH |
| Power Supply | 9V battery x1 (not included) |
| Sensor Wire Length | Approx. 1.5M |
| Size (LxWxH) | 130 x 55 x 39mm |
| Weight | About 150g |
7. Maintenance
- Cleaning: Wipe the meter and sensor with a soft, dry cloth. Do not use abrasive cleaners or solvents. Ensure the sensor surface is clean and free of dust or smudges for accurate readings.
- Battery Replacement: Replace the 9V battery when the low battery indicator appears on the display or if the meter fails to power on. Refer to Section 3.1 for battery installation instructions.
- Storage: When not in use for extended periods, remove the battery to prevent leakage. Store the meter in a cool, dry place, away from direct sunlight and extreme temperatures.
- Calibration: The meter is factory calibrated. If you suspect inaccuracies, contact the manufacturer or an authorized service center for recalibration.
8. Troubleshooting
| Problem | Possible Cause | Solution |
|---|---|---|
| Meter does not power on. | Dead or improperly installed battery. | Check battery polarity. Replace with a fresh 9V battery. |
| Display shows "OL". | Over-input; solar radiation exceeds the meter's range. | Move the sensor to an area with lower solar intensity or ensure the sensor is not directly exposed to extremely concentrated light sources. |
| Inaccurate readings. | Dirty sensor, obstructed sensor, or meter not stable. | Clean the sensor surface. Ensure no objects are blocking the sensor. Hold the meter steady during measurement. |
| Display is dim or flickering. | Low battery. | Replace the 9V battery. |
9. Warranty and Support
For information regarding warranty coverage, technical support, or service, please contact the retailer or manufacturer directly. Keep your purchase receipt as proof of purchase for any warranty claims.
Manufacturer: Road Far
Date First Available: April 10, 2019