1. Introduction
The Dixell XR06CX-4N1F1 is a microprocessor-based temperature controller designed for applications in medium or low temperature ventilated refrigerating units. This manual provides essential information for the safe and effective installation, operation, and maintenance of your device.
It features three relay outputs for controlling the compressor, fan, and defrost functions, which can be configured for either electrical or reverse cycle (hot gas) defrosting. The integrated hotkey functionality allows for quick and easy programming.
2. Safety Precautions
Please read and understand the following safety precautions before connecting or operating the instrument:
- Always verify that the supply voltage is correct and matches the instrument's requirements before making any connections.
- Do not expose the controller to water or excessive moisture. Operate the device only within its specified operating limits.
- Avoid sudden temperature changes in environments with high atmospheric humidity to prevent condensation formation, which can damage the unit.
- Warning: Always disconnect all electrical connections to the controller before performing any type of maintenance, inspection, or repair work.
3. Product Overview
The XR06CX-4N1F1 controller is designed for precise temperature management in refrigeration systems. Its compact format (32 x 74 x 60 mm) allows for versatile installation.

Figure 3.1: Front view of the Dixell XR06CX-4N1F1 Temperature Controller.
The controller features two NTC probe inputs: one for temperature control and a second for evaporator temperature, which manages defrost termination and fan operation. It also includes a configurable digital input.

Figure 3.2: Rear view with wiring diagram and terminal connections.
Note: Temperature probes are sold separately and are not included with the controller.
4. Installation and Electrical Connections
The XR06CX-4N1F1 is designed for panel mounting. Ensure proper ventilation around the unit to prevent overheating. Refer to the wiring diagram on the back of the unit and in this manual for correct electrical connections.
4.1. Wiring Diagram Overview
The controller provides terminals for power supply, compressor, fan, and defrost outputs, as well as inputs for NTC probes and a digital input. Always ensure connections are secure and comply with local electrical codes.
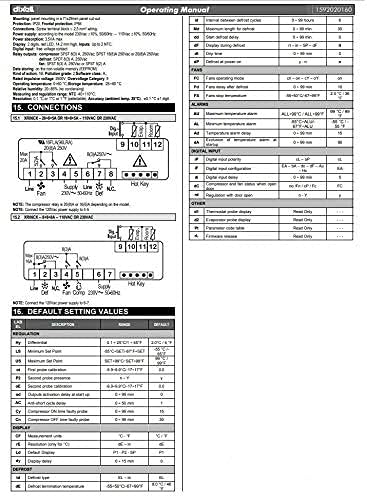
Figure 4.1: Detailed connection diagram for the XR06CX-4N1F1.
The supply voltage for this model is 120V. Verify your power source before connecting.
5. Operation
This section outlines the basic operation and programming of the Dixell XR06CX-4N1F1 controller.
5.1. Front Panel Commands
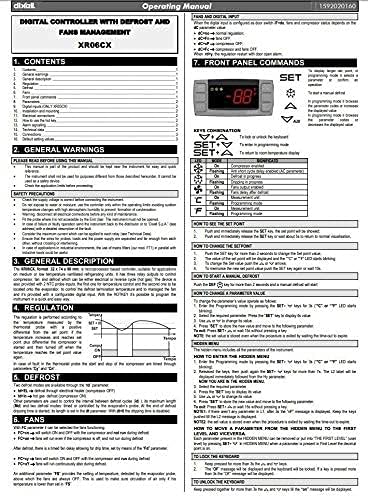
Figure 5.1: Front panel layout and key functions.
- SET: To display the set point; in programming mode, it selects a parameter or confirms an operation.
- UP (▲): To scroll through parameter values or increase a value.
- DOWN (▼): To scroll through parameter values or decrease a value.
- AUX (Auxiliary): To activate/deactivate auxiliary output or other functions depending on configuration.
- DEF (Defrost): To manually initiate a defrost cycle.
5.2. Setting the Setpoint
- Press and release the SET key. The set point value will be displayed.
- Use the UP (▲) or DOWN (▼) keys to change the value.
- Press the SET key to confirm the new value.
5.3. Programming Parameters
To access and modify programming parameters:
- Enter the programming mode by holding the SET + DOWN (▼) keys for 3 seconds. The L2 LED will blink.
- Use the UP (▲) or DOWN (▼) keys to navigate through the parameters.
- Press SET to display the value of the selected parameter.
- Use the UP (▲) or DOWN (▼) keys to change the value.
- Press SET to save the new value and move to the next parameter.
- To exit programming mode, press SET + UP (▲) or wait 15 seconds without pressing any key.

Figure 5.2: Advanced parameter settings and alarm configurations.
6. Maintenance
To ensure the longevity and optimal performance of your Dixell XR06CX-4N1F1 controller, regular maintenance is recommended.
- Cleaning: Periodically clean the front panel with a soft, damp cloth. Do not use abrasive cleaners or solvents. Ensure no liquid enters the unit.
- Connections: Regularly check all electrical connections for tightness and signs of corrosion. Loose connections can lead to erratic behavior or damage.
- Environment: Ensure the operating environment remains within the specified temperature and humidity ranges to prevent damage to internal components.
- Probe Inspection: Inspect the temperature probes for physical damage or wear. Ensure they are correctly positioned and securely connected.
Always disconnect power to the unit before performing any maintenance.
7. Troubleshooting
This section provides guidance for common issues you might encounter with your Dixell XR06CX-4N1F1 controller.
| Problem | Possible Cause | Solution |
|---|---|---|
| Controller display is off | No power supply or incorrect voltage. | Check power connections and supply voltage (120V). Ensure circuit breaker is on. |
| Incorrect temperature reading | Faulty probe or loose probe connection. | Check probe wiring. Replace probe if damaged or reading is consistently inaccurate. |
| Compressor not running | Setpoint too high, defrost cycle active, or compressor relay issue. | Verify setpoint. Check if defrost is active. Consult a qualified technician for relay issues. |
| Fan not operating | Fan parameter settings incorrect or fan motor issue. | Check fan operating parameters. Inspect fan motor and wiring. |
| "P1" or "P2" alarm on display | Probe 1 or Probe 2 error (faulty or disconnected). | Check the respective probe's connection and integrity. Replace if necessary. |
For issues not listed here or if troubleshooting steps do not resolve the problem, please contact qualified technical support.
8. Specifications
Key technical specifications for the Dixell XR06CX-4N1F1 Temperature Controller:
| Feature | Specification |
|---|---|
| Model Number | XR06CX-4N1F1 |
| Manufacturer | Xiltek |
| Display Type | LCD or LED |
| Voltage | 120 Volts |
| Product Dimensions (L x W) | 1.26" x 2.91" (32 x 74 mm) |
| Item Weight | 1 Pound |
| Number of Pieces | 1 |
| Color | Gray |
| UPC | 661020724255 |
9. Warranty and Support
For warranty information and technical support, please refer to the documentation provided with your purchase or contact Xiltek customer service directly. Ensure you have your product model number (XR06CX-4N1F1) and purchase details available when seeking support.
For additional resources and product information, you may visit the Xiltek Store on Amazon.


