1. Introduction
This manual provides essential information for the installation, operation, and maintenance of your Proven Part 48-inch mower deck replacement kit. This kit includes three spindles, three spindle pulleys, three mulching blades, three idler pulleys, and one deck belt, designed to replace specific original equipment manufacturer (OEM) parts. Please review all instructions carefully before beginning any work.
Important: Always verify compatibility with your specific mower model number before installation. If you are unsure, consult your mower's original manual or contact Proven Part customer support.
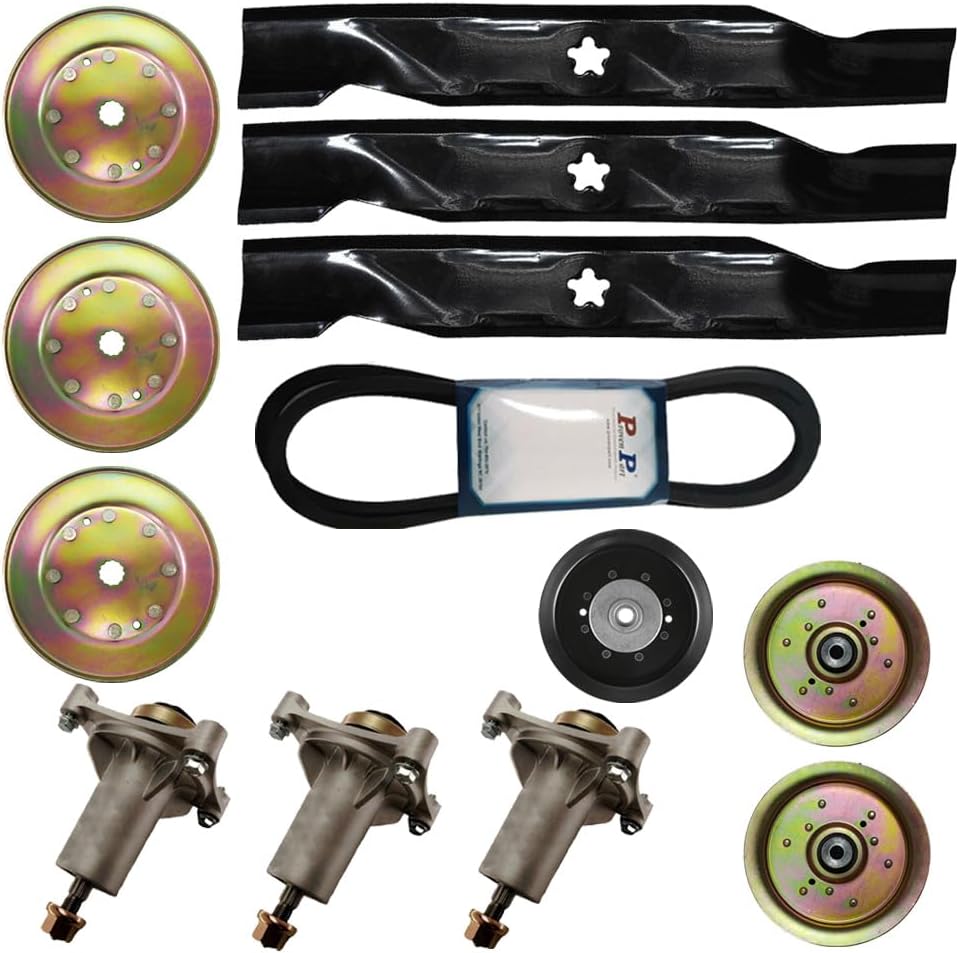
Image 1.1: Overview of the Proven Part 48-inch mower deck replacement kit, showing three spindles, three spindle pulleys, three mulching blades, one deck belt, and various idler pulleys.
2. Safety Information
Prioritize safety during all installation and maintenance procedures. Failure to follow safety guidelines can result in serious injury.
- Always disconnect the spark plug wire(s) or remove the battery before working on the mower deck to prevent accidental starting.
- Wear appropriate personal protective equipment (PPE), including safety glasses, gloves, and sturdy footwear.
- Ensure the mower is on a stable, level surface and properly supported before working underneath it.
- Handle blades with extreme caution. They are sharp and can cause severe cuts.
- Refer to your mower's original owner's manual for specific safety instructions related to your equipment.
3. Installation Guide
This section outlines the general steps for replacing the components of your 48-inch mower deck. Specific procedures may vary slightly depending on your mower model. Always consult your mower's service manual for detailed instructions.
3.1. Required Tools
- Socket wrench set
- Torque wrench
- Blade removal tool or wood block
- Pry bar (for belt removal/installation)
- Grease gun (for spindles, if applicable)
3.2. Removing the Old Components
- Prepare the Mower: Park the mower on a flat, stable surface. Engage the parking brake. Disconnect the spark plug wire(s) or remove the battery.
- Remove Mower Deck: Follow your mower's manual to safely detach and remove the mower deck from the tractor. Place the deck on a clean, stable workbench or floor.
- Remove Deck Belt: Carefully release tension from the deck belt and remove it from all pulleys. Note the routing for reinstallation.
- Remove Blades: Secure each blade with a blade removal tool or a block of wood. Loosen and remove the blade retaining nut. Remove the old blades.
- Remove Spindles and Pulleys: Remove the nuts or bolts securing the spindle pulleys to the spindles. Then, remove the bolts that attach each spindle assembly to the mower deck. Carefully lift out the old spindles and pulleys.
- Remove Idler Pulleys: Unbolt and remove any old idler pulleys from the deck.
3.3. Installing the New Components
- Install Spindles: Position the new spindles (Proven Part replacement for OEM 187292) onto the mower deck. Ensure they are correctly oriented and secure them with the appropriate bolts. Torque bolts to manufacturer specifications.
- Install Spindle Pulleys: Place the new spindle pulleys (Proven Part replacement for OEM 153532) onto the top of each spindle. Secure them with the retaining nuts. Torque nuts to manufacturer specifications.
- Install Idler Pulleys: Mount the new idler pulleys (Proven Part replacements for OEM 196106, 196104, 177968) in their correct positions on the deck. Secure them firmly.
- Install Blades: Place the new mulching blades (Proven Part replacement for OEM 173921) onto the spindle shafts, ensuring the cutting edge is facing the correct direction for proper cutting. Secure with the blade retaining nuts and torque to manufacturer specifications. Use a blade removal tool or wood block to prevent rotation.
- Install Deck Belt: Route the new deck belt (Proven Part replacement for OEM 197242) around all pulleys according to your mower's belt diagram. Use a pry bar if necessary to stretch the belt over the final pulley. Ensure the belt is seated correctly in all pulley grooves.
- Reattach Mower Deck: Reinstall the mower deck onto the tractor, following the reverse of the removal steps in your mower's manual.
- Reconnect Power: Reconnect the spark plug wire(s) or reinstall the battery.

Image 3.1: Detailed view of a Proven Part spindle assembly (replacement for OEM 187292), showing its height and 5-point star blade mount.

Image 3.2: Dimensions of a Proven Part spindle pulley (replacement for OEM 153532), indicating an outer diameter of 4 7/8 inches and an inner diameter of 0.64 inches.
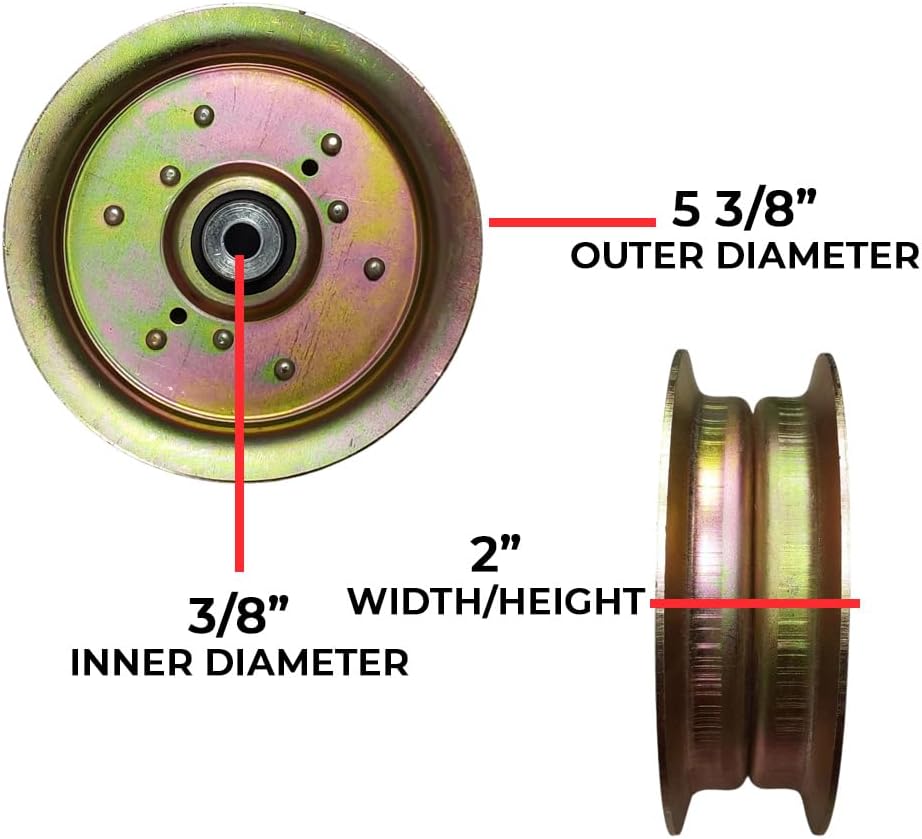
Image 3.3: Dimensions of a gold-colored Proven Part idler pulley, showing an outer diameter of 5 3/8 inches, an inner diameter of 3/8 inches, and a width/height of 2 inches.

Image 3.4: Top view of a black Proven Part idler pulley, indicating an outer diameter of 5 3/8 inches and an inner diameter of 0.45 inches.

Image 3.5: Side view of a black Proven Part idler pulley, showing a height of 1 11/16 inches.

Image 3.6: A Proven Part mulching blade, similar to the replacement for OEM 173921, showing a length of approximately 16 3/4 inches, a 5-point star center hole, and a width of 2 1/2 inches. The actual replacement blade (173921) has a length of 16 5/8 inches.

Image 3.7: A Proven Part deck belt (replacement for OEM 197242), indicating a size of 5/8 inch by 138 inches. This corresponds to a 138-inch outer diameter and 135-inch inner diameter.
4. Operating Considerations
After installing the new deck components, observe the following during initial operation:
- Initial Inspection: Before starting the mower, visually inspect the deck to ensure all components are securely fastened and the belt is properly routed.
- Test Run: Start the mower in a clear area. Engage the blades briefly and listen for any unusual noises or vibrations. If any issues are detected, immediately shut off the mower and investigate.
- Cut Quality: Monitor the cut quality during the first few uses. Properly installed and sharpened blades should provide a clean, even cut.
5. Maintenance
Regular maintenance extends the life of your mower deck components and ensures optimal performance.
- Blade Sharpening/Replacement: Sharpen blades regularly (every 8-10 hours of use, or as needed) to maintain cut quality. Replace blades if they are bent, cracked, or excessively worn.
- Belt Inspection: Periodically inspect the deck belt for cracks, fraying, or excessive wear. Replace the belt if any damage is observed.
- Spindle Lubrication: If your spindles have grease fittings, lubricate them according to your mower's manual.
- Component Tightness: Regularly check all nuts and bolts on the deck, especially those securing the spindles and blades, to ensure they remain tight.
- Deck Cleaning: Clean the underside of the mower deck after each use to prevent grass buildup, which can affect cut quality and promote rust.
6. Troubleshooting Common Issues
This section addresses common problems you might encounter after installing new deck components.
| Issue | Possible Cause | Solution |
|---|---|---|
| Poor cut quality (uneven, ragged) | Dull or bent blades, incorrect blade installation, incorrect deck height. | Sharpen or replace blades. Ensure blades are installed with cutting edge facing down. Adjust deck height. |
| Excessive vibration | Unbalanced blades, bent spindle shaft, loose components. | Check blade balance. Inspect spindles for damage. Tighten all fasteners. |
| Belt slipping or coming off | Incorrect belt routing, worn belt, loose idler pulley, incorrect pulley size. | Verify belt routing. Replace worn belt. Ensure idler pulleys are tight. Confirm correct pulley part numbers. |
| Unusual noise from deck | Worn spindle bearings, loose components, debris in deck. | Inspect spindle bearings. Tighten all fasteners. Clean deck thoroughly. |
7. Product Specifications
This kit includes the following components, designed as replacements for the specified OEM part numbers:
- Spindles (3): Replaces OEM Part #187292. Features a 5-point star blade mount.
- Spindle Pulleys (3): Replaces OEM Part #153532. Outer Diameter: 4 7/8 inches. Inner Diameter: 0.64 inches.
- Mulching Blades (3): Replaces OEM Part #173921. Length: 16 5/8 inches. Center Hole: 5-point star.
- Idler Pulleys (3):
- Replaces OEM Part #196106
- Replaces OEM Part #196104
- Replaces OEM Part #177968
- Deck Belt (1): Replaces OEM Part #197242. Size: 5/8 inch x 138 inches.
8. Support and Warranty
For technical assistance, compatibility questions, or warranty information regarding your Proven Part replacement kit, please contact the manufacturer directly.
You can visit the official Proven Part store on Amazon for more products and support information: Proven Part Amazon Store.
Please retain your purchase receipt for any warranty claims.