GOOACC GRC-47
GOOACC Universal Plastic Fender Clips Instruction Manual
Comprehensive guide for installation, usage, and maintenance of GOOACC Universal Plastic Fender Clips.
1. Product Overview
The GOOACC Universal Plastic Fender Clips kit provides a versatile assortment of push-type retainer clips designed for various automotive applications. These clips are essential for securing components such as door trim, radiator shields, fenders, bumpers, and splash shields across a wide range of vehicle makes and models.
Key Features:
- Universal Fit Kit: Includes 6 popular sizes suitable for replacements on Ford, GM, Chrysler, Toyota, Honda, and more.
- Cost-Effective Solution: Eliminates the need to purchase individual fasteners from auto parts stores, saving time and money.
- High Quality Material: Constructed with heavy-duty plastic for durability, ensuring clips do not break or crack easily during use.
- Common Sizes Included: Provides necessary retainers for exact replacement of old or damaged body fasteners.

Image 1.1: Overview of the GOOACC 200-piece Universal Plastic Fender Clips kit.
2. Product Specifications
Below are the detailed specifications for the GOOACC Universal Plastic Fender Clips.
| Attribute | Value |
|---|---|
| Brand | GOOACC |
| Model | GRC-47 |
| Material | Plastic |
| Number of Pieces | 200 |
| Fastener Type | Push |
| Head Style | Push Bumper |
| Item Weight | 9.9 ounces |
| Product Dimensions | 1.9 x 6.26 x 7.6 inches |
| Country of Origin | China |

Image 2.1: Detailed dimensions and quantities for the 6 most common clip sizes included in the kit.
3. Installation Guide
Follow these general steps for installing GOOACC Universal Plastic Fender Clips. Always ensure you select the correct clip size for your specific application.
- Identify the Correct Clip: Compare the damaged or missing clip with the various sizes provided in the kit. Refer to Image 2.1 for dimensions.
- Prepare the Hole: Ensure the mounting hole is clean and free of debris.
- Insert the Clip: Align the clip with the hole and gently push it into place. For push-type clips, the center pin may need to be slightly pulled out before insertion and then pushed flush to expand the clip and secure it.
- Secure the Clip: Once inserted, push the center pin flush with the clip head. This expands the clip's prongs, creating a secure fit within the mounting hole.
- Verify Security: Gently tug on the installed component to ensure the clip is firmly in place and the component is secure.

Image 3.1: Step-by-step visual guide for installing push-type clips.
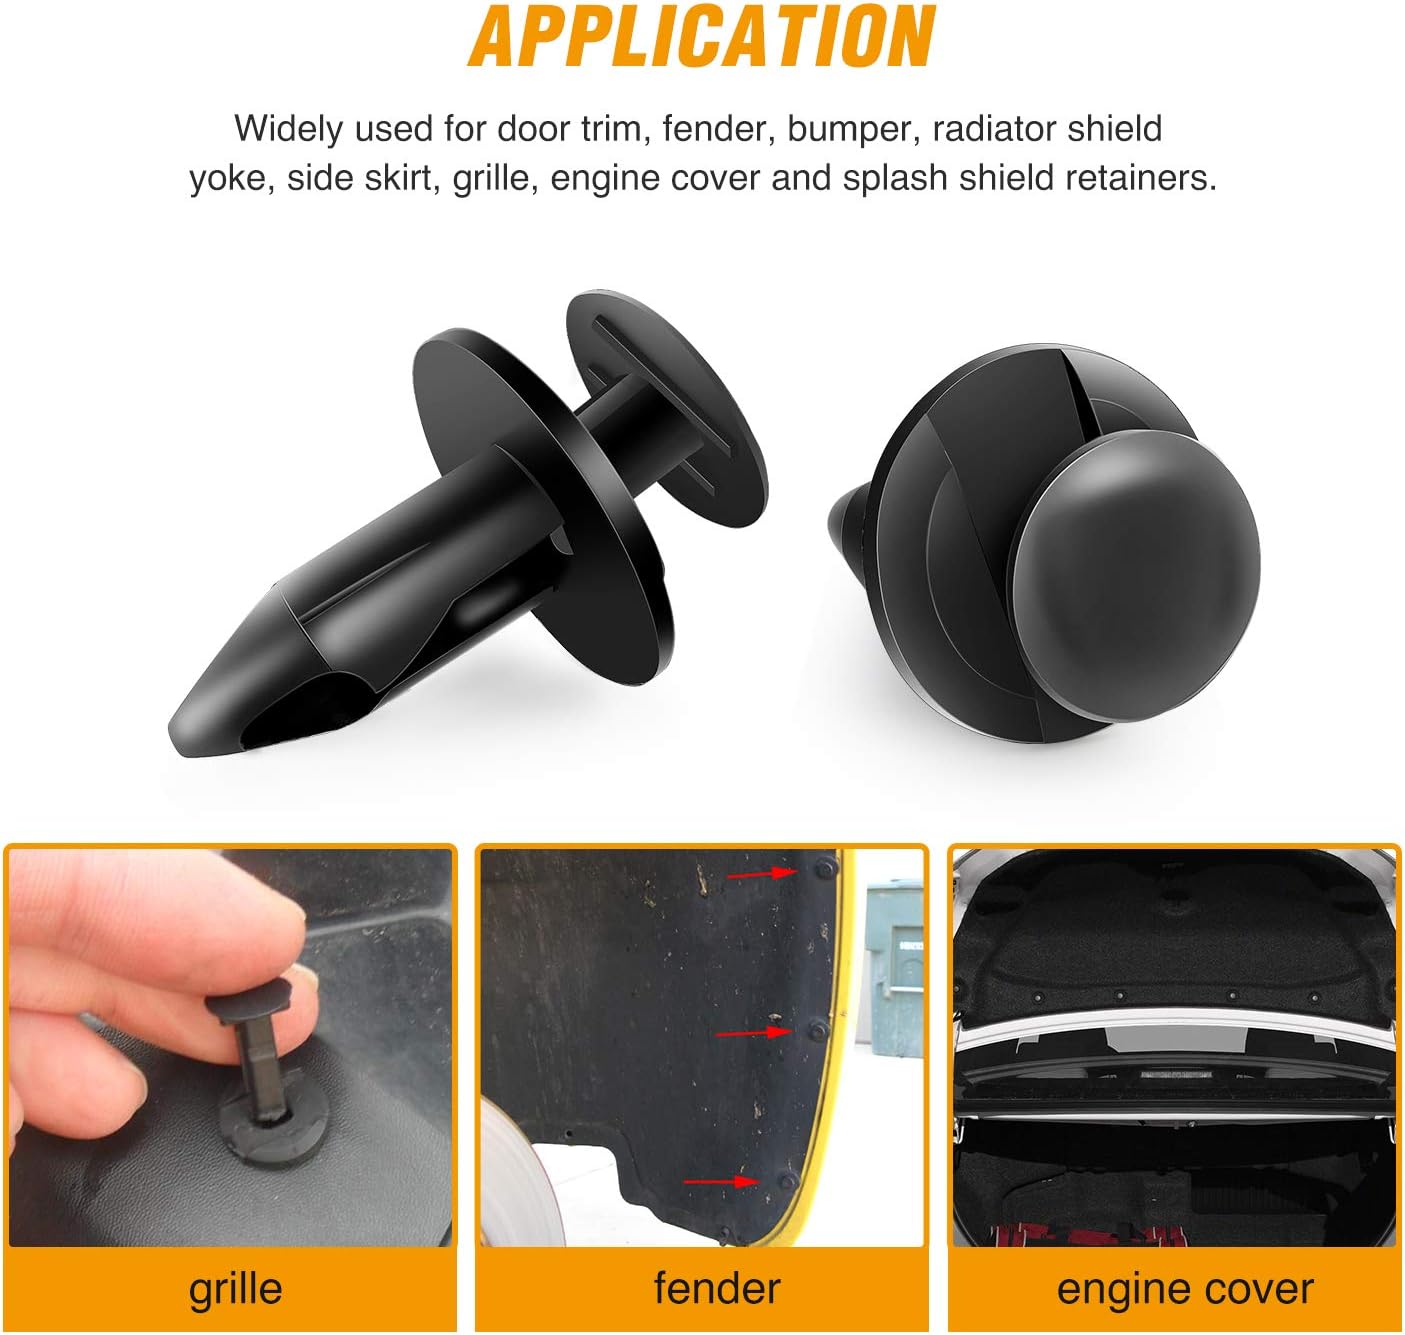
Image 3.2: Examples of common automotive areas where these clips are applied, such as grilles, fenders, and engine covers.
Video 3.1: Official product video demonstrating the application and use of GOOACC Push Bumper Fastener Rivet Clips.
4. Usage and Removal
These clips are designed for secure fastening and, in many cases, reusability. Proper removal techniques are crucial to prevent damage to the clips or the vehicle's components.
Proper Removal:
- For clips with a center pin, use a flat-head screwdriver or a specialized trim removal tool to gently pry up the center pin until it is raised.
- Once the center pin is raised, the main body of the clip can be carefully pulled out from the mounting hole.
- For clips without a distinct center pin, a trim removal tool can be used to gently pry the entire clip out from its base.
The "card slot design" on some clips facilitates easier removal, as shown in Image 4.1.

Image 4.1: Illustration of reusable clip styles and their removal methods.
Video 4.1: Product overview video demonstrating various clips and their functionality.
5. Care and Maintenance
To ensure the longevity and optimal performance of your GOOACC fender clips, consider the following maintenance tips:
- Storage: Store unused clips in a cool, dry place away from direct sunlight and extreme temperatures to prevent material degradation. The provided bags or a dedicated organizer can help keep them sorted by size.
- Cleaning: If clips become dirty during removal or handling, clean them with a mild soap and water solution. Ensure they are completely dry before reinstallation or storage.
- Inspection: Before re-using a clip, inspect it for any signs of cracking, bending, or deformation. Damaged clips should be replaced to ensure a secure fit.

Image 5.1: An organized display of various clip types, highlighting the importance of proper storage.
6. Troubleshooting
Here are some common issues you might encounter and their potential solutions:
- Clip Does Not Fit: Ensure you have selected the correct size and type of clip for the specific mounting hole. Refer to the size chart (Image 2.1) and compare with the original clip if available.
- Clip Breaks During Installation/Removal: This can occur if excessive force is used, or if the clip material has become brittle due to age or environmental exposure. Always use appropriate tools (e.g., trim removal tools) and gentle pressure. Replace broken clips with new ones.
- Component Feels Loose After Installation: The clip might be the wrong size, or it may not have been fully seated. Remove the clip, inspect the hole and the clip for damage, and re-install a new, correctly sized clip, ensuring it is fully expanded and secure.
- Difficulty Removing Clip: Ensure the center pin is fully raised (if applicable) before attempting to pull out the clip. Use a trim removal tool to gently pry the clip without damaging surrounding surfaces.
7. Warranty and Support
Specific warranty details for GOOACC Universal Plastic Fender Clips are not provided within this manual. For information regarding product warranty, returns, or technical support, please refer to the product listing on the retailer's website or contact GOOACC customer service directly through their official channels.
You can visit the official GOOACC store for more products and support:
Ask a question about this manual
Ask about setup, troubleshooting, compatibility, parts, safety, or missing instructions. Manuals+ will review the question and use this page’s manual context to help answer it.