Introduction
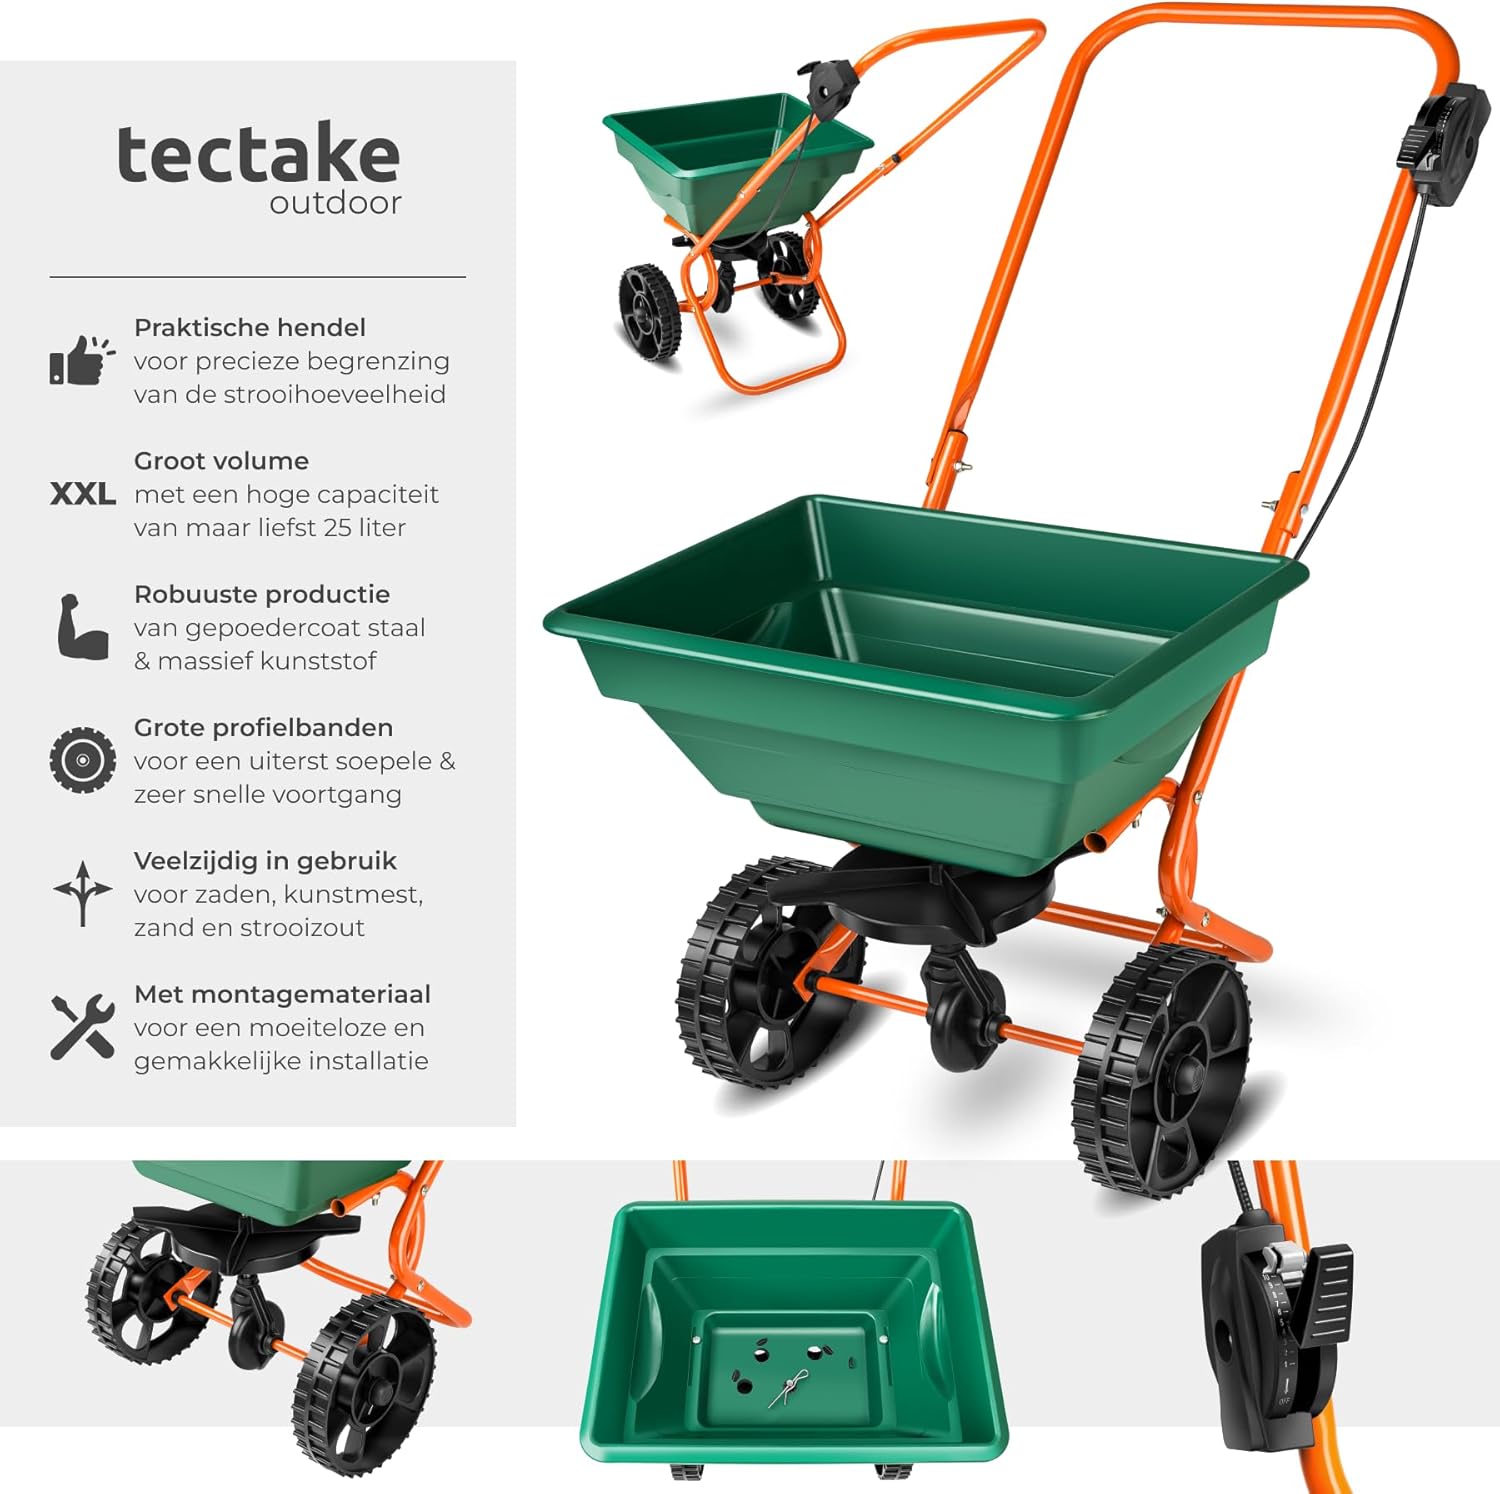
Thank you for choosing the tectake Spreader. This robust and durable tool is designed for versatile use in your garden, on paths, and roads. With its 25-liter capacity hopper, you can quickly and efficiently spread fertilizer, seeds, sand, de-icing salt, and gravel. The stable wheels ensure excellent mobility across various terrains.
This manual provides important information on the safe assembly, operation, and maintenance of your spreader. Please read it thoroughly before first use and keep it for future reference.
Safety Instructions
Always observe the following safety precautions to prevent injury and damage to the product:
- Read all instructions carefully before assembly and operation.
- Wear appropriate personal protective equipment, such as gloves and eye protection, especially when handling chemicals like fertilizers or de-icing salt.
- Keep children and pets away from the spreader during operation.
- Do not overload the hopper beyond its 25-liter capacity.
- Ensure all fasteners are securely tightened before each use.
- Do not use the spreader on steep slopes where control may be lost.
- Clean the spreader thoroughly after each use to prevent corrosion and material buildup.
- Store the spreader in a dry, secure location, out of reach of children.
Package Contents
Please check that all parts are present and undamaged before beginning assembly:
- 1 x tectake Spreader unit
- Assembly materials (screws, nuts, washers, etc.)
- 1 x Instruction Manual
If any parts are missing or damaged, please contact your retailer immediately.
Setup and Assembly
Assembly of your tectake spreader requires careful attention. Follow these steps:
- Unpack Components: Carefully remove all parts from the packaging and lay them out on a clean, flat surface. Verify against the package contents list.
- Attach the Frame: Connect the handle frame sections to the main hopper support frame using the provided bolts and nuts. Ensure all connections are secure.
- Install Wheels: Slide the wheels onto the axle. Secure them with the provided washers and cotter pins or plastic circlips. Ensure the wheels rotate freely.
- Connect Control Lever: Attach the control lever mechanism to the handle. Connect the control cable from the lever to the spreader mechanism at the bottom of the hopper. Ensure the cable is routed correctly and allows for smooth operation of the flow gate.
- Final Check: Before first use, double-check all bolts, nuts, and connections to ensure they are tight and secure. Test the control lever to confirm the flow gate opens and closes properly.


Operating Instructions
1. Filling the Hopper
- Ensure the flow gate is completely closed before filling to prevent material spillage.
- Fill the hopper with your desired material (seeds, fertilizer, salt, sand, or gravel). Do not exceed the 25-liter capacity.
- Distribute the material evenly within the hopper.
2. Adjusting the Spread Rate
- The spreader features an adjustable flow rate mechanism controlled by a lever on the handle.
- Move the lever to the desired setting. Higher numbers typically indicate a larger opening and a higher spread rate.
- It is recommended to perform a test spread on a small, inconspicuous area to determine the optimal setting for your material and desired coverage.
3. Spreading Technique
- Begin walking at a consistent pace before opening the flow gate. This ensures an even start to the spread.
- Maintain a steady walking speed throughout the spreading process.
- Overlap each pass slightly to ensure complete coverage and avoid streaks.
- Close the flow gate before stopping or turning to prevent over-application in one spot.
- For de-icing salt, spread evenly over icy surfaces. For seeds or fertilizer, follow product-specific application rates.


Maintenance
1. Cleaning After Use
- After each use, especially with corrosive materials like salt or certain fertilizers, thoroughly clean the hopper and spreading mechanism.
- Rinse the hopper with water and ensure all material residue is removed.
- Clean the wheels and axle area to prevent buildup that could impede movement.
- Dry all metal parts completely to prevent rust.
2. Storage
- Store the spreader in a dry, covered area, protected from direct sunlight and extreme temperatures.
- Ensure the spreader is clean and dry before storing for extended periods.
3. Inspection
- Periodically inspect the spreader for any signs of wear, damage, or loose fasteners.
- Tighten any loose bolts or nuts. Replace damaged parts immediately to ensure safe and effective operation.
Troubleshooting
| Problem | Possible Cause | Solution |
|---|---|---|
| Material not spreading or unevenly spreading | Flow gate closed; material clumped; incorrect spread setting; obstruction in mechanism. | Ensure flow gate is open. Break up clumps in hopper. Adjust spread setting. Clear any obstructions from the spreading mechanism. |
| Wheels not turning smoothly | Debris in wheel mechanism; axle bent; loose wheel. | Clean wheels and axle thoroughly. Inspect axle for damage; if bent, replace. Ensure wheels are securely attached. |
| Control lever stiff or not engaging | Cable kinked or damaged; mechanism corroded; debris in lever assembly. | Inspect control cable for damage and proper routing. Clean and lubricate the mechanism if corroded. Remove any debris from the lever assembly. |
Specifications
| Feature | Detail |
|---|---|
| Model Number | 402424-4 |
| Overall Dimensions (L x W x H) | Approx. 75 cm x 46 cm x 105 cm (29.5 x 18.1 x 41.3 inches) |
| Hopper Dimensions (L x W x H) | Approx. 46 cm x 34 cm x 22 cm (18.1 x 13.4 x 8.7 inches) |
| Wheel Dimensions (Diameter x Width) | Approx. 20 cm diameter x 4.5 cm (7.9 x 1.8 inches) |
| Capacity | 25 Liters |
| Weight | Approx. 4 kg (8.8 lbs) |
| Materials | Hopper: 100% Polypropylene; Frame: Metal (powder-coated steel) |

Warranty and Support
For warranty information and customer support, please refer to the purchase documentation or contact your retailer directly. Information regarding spare parts availability may also be obtained from your retailer or the manufacturer's official website.
Please retain your proof of purchase for any warranty claims.